Greenworks 40V Cordless Dethatcher Review: I Tried It (2024)

Greenworks cordless dethatcher

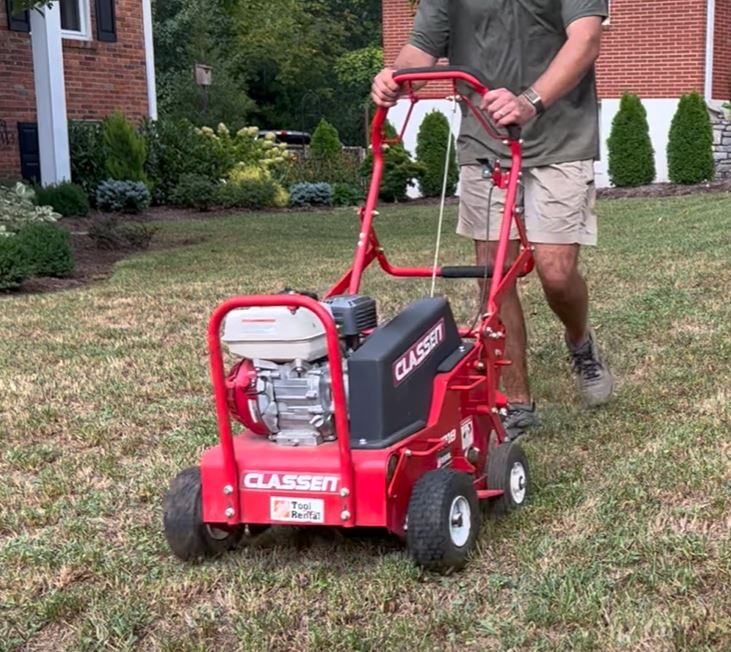
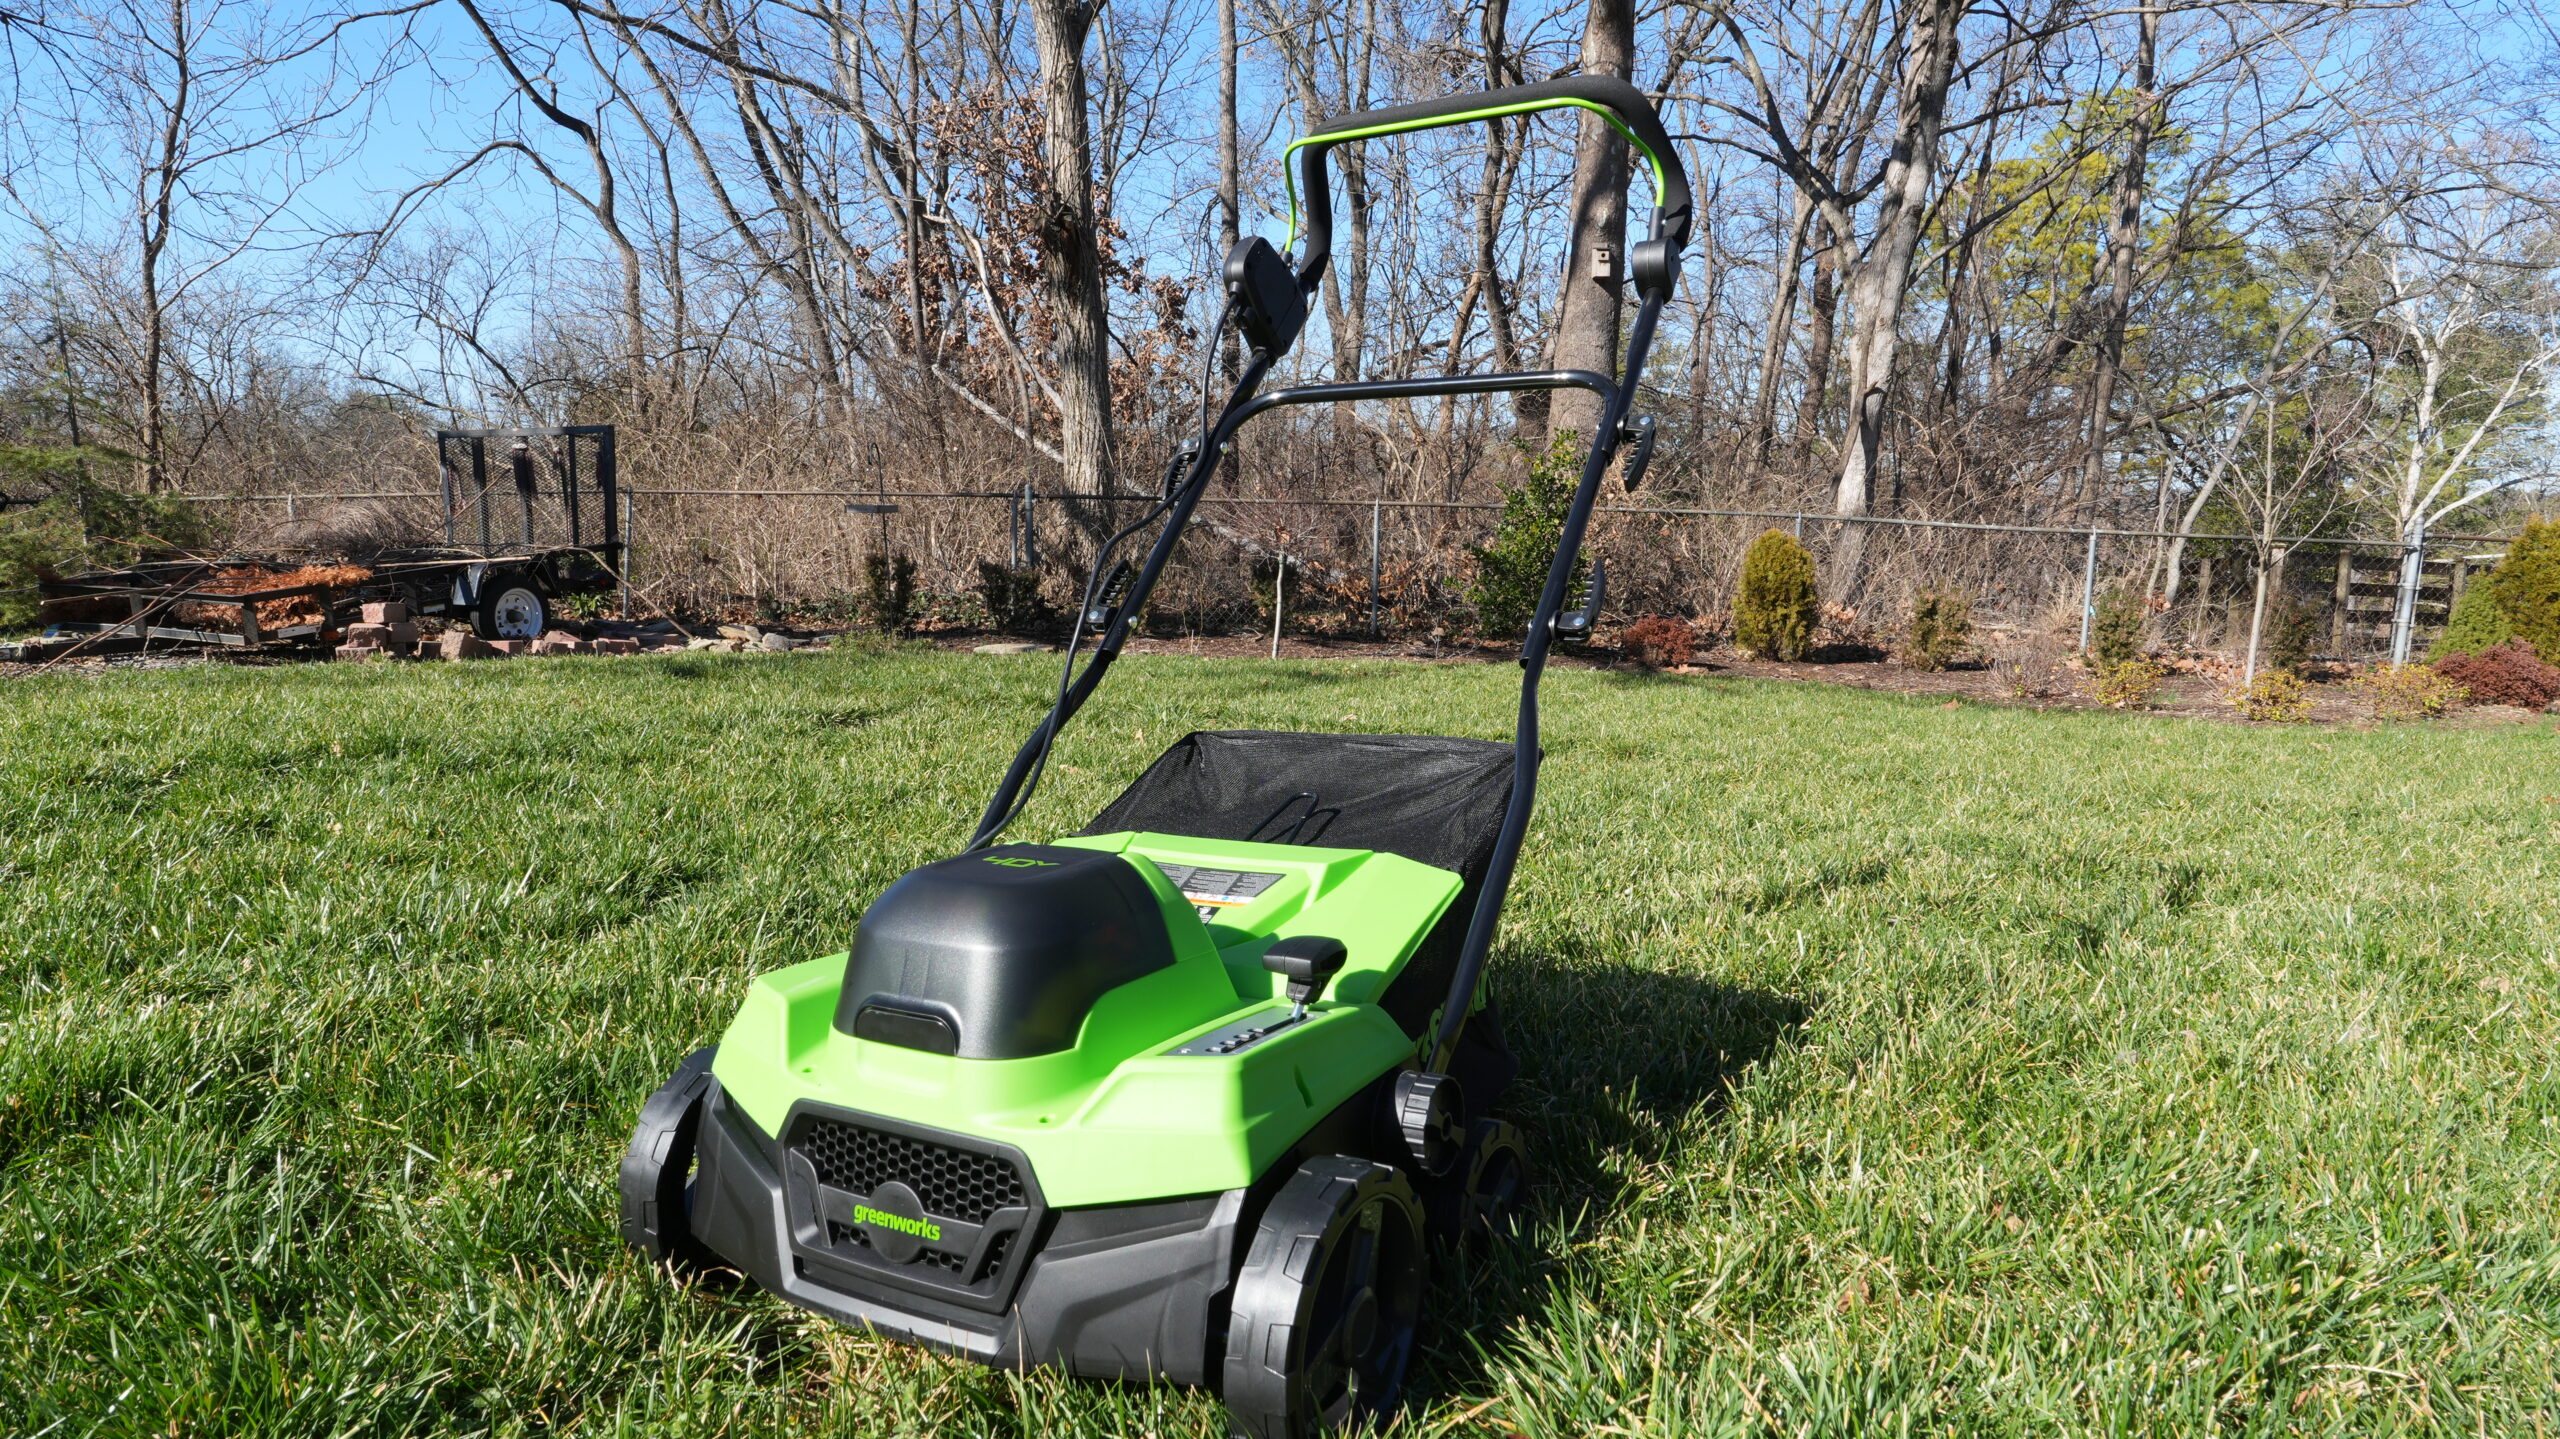
The Greenworks 40V Cordless Dethatcher is an incredible tool for clearing out the top layer of your lawn and letting it fully breathe again. I got this new cordless dethatcher from Greenworks and was blown away with not only how well this worked on my lawn and how satisfying it was. 

Bottom Line: I recommend grabbing a cordless dethatcher from Greenworks for a great price over on Amazon. If it is out of your price range, you can grab the corded electric version for a way cheaper price here.

Before you read any further – make sure to check out my guide on dethatching here.

How I tested the Greenworks Cordless Dethatcher

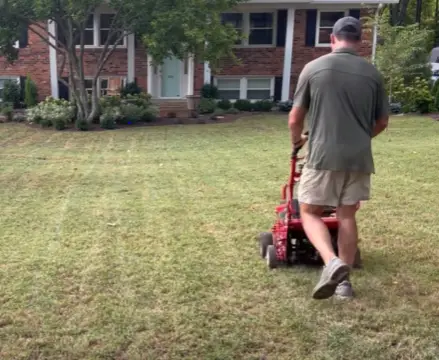
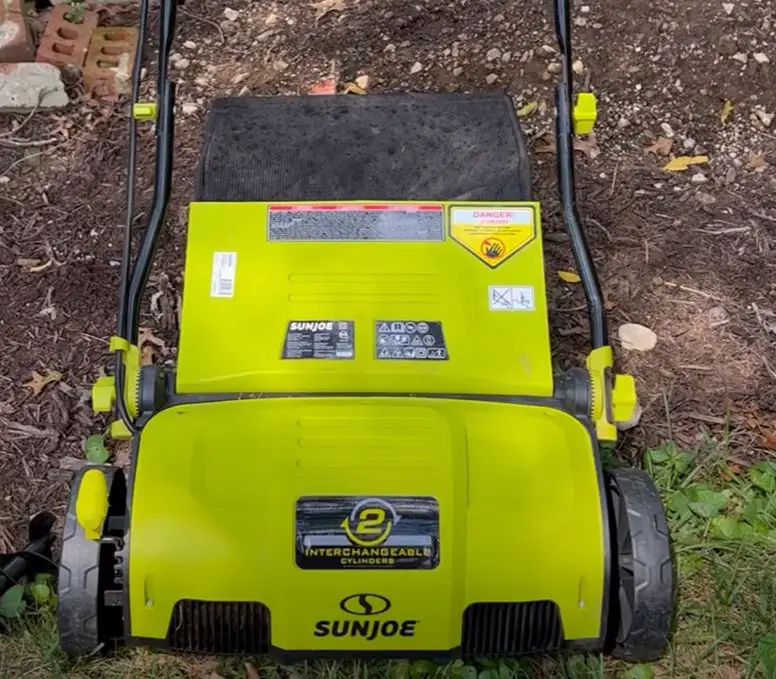
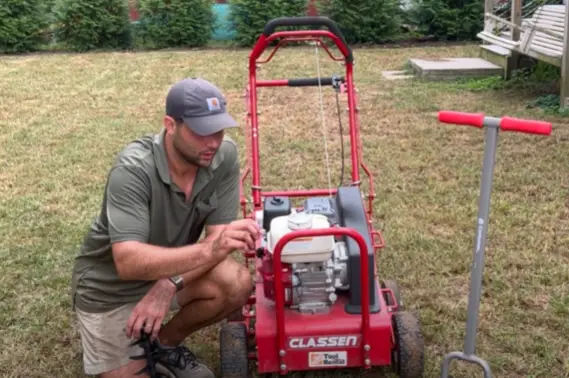
It’s really quite simple – I just took it through my yard. I dethatch a couple of times per year and have a ton of experience using both the Greenworks corded electric dethatcher and other dethatchers like the Sun Joe dethatcher. I have even done a nice side-by-side comparison of those two.

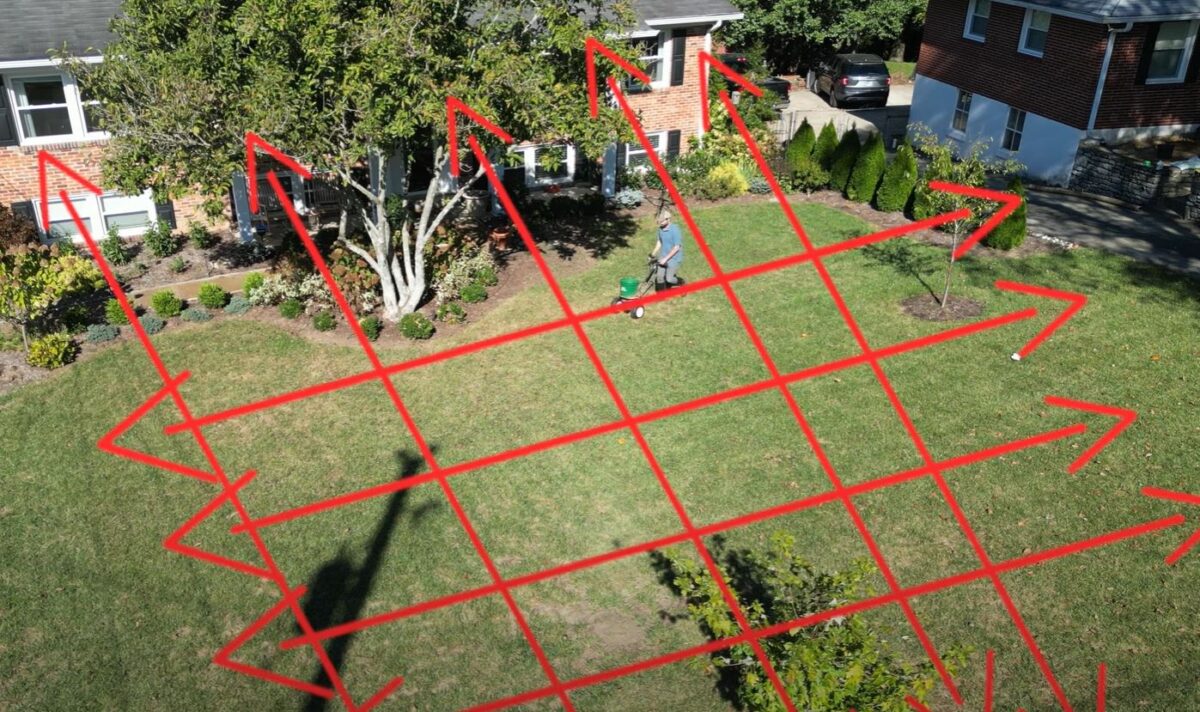
Since I have used these so many times, I have a nice pattern I do in my yard that helps me evaluate the performance of each of these. This was my first time using a cordless dethatcher, so it felt refreshingly different and more convenient than when I used the corded versions.

One thing I noticed during this testing process was the lack of an extension cord made me walk a lot faster. I had to slow down multiple times to make sure I was getting a thorough dethatching.

Using the Greenworks Cordless Dethatcher In My Yard

The best time to use a dethatcher is in the Fall, right before you aerate and overseed. The next best time is in the early Spring before putting down your pre emergent. That’s exactly what I did this year to make sure I was starting with a clean canvas. 

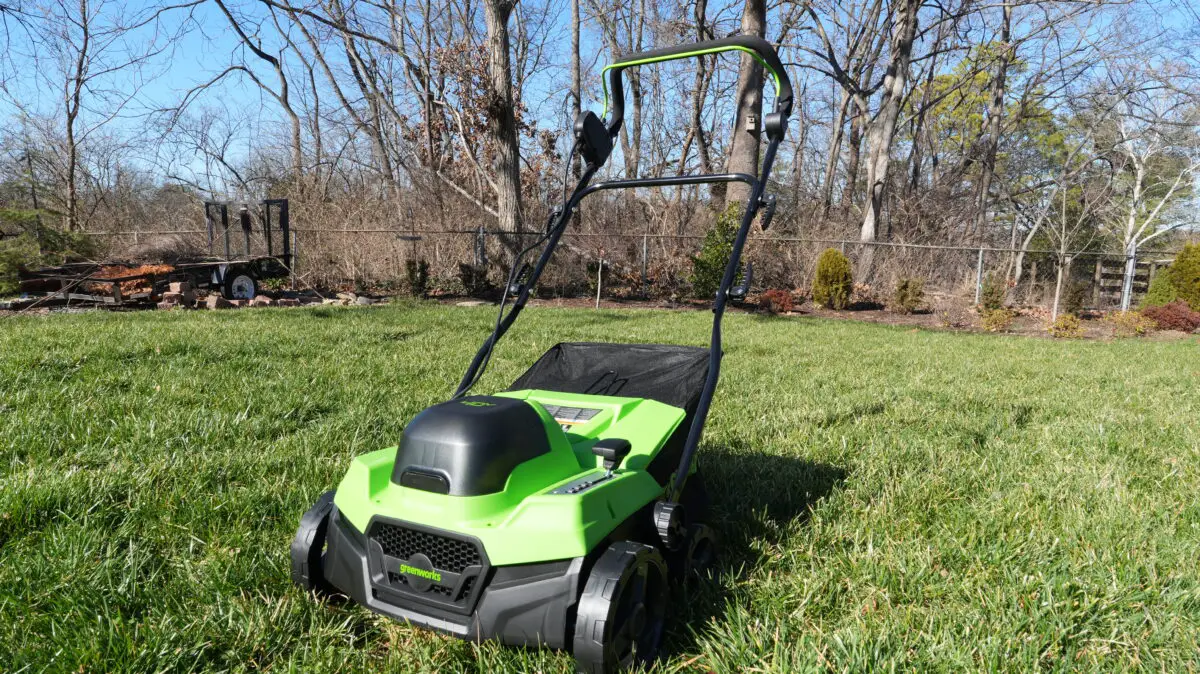
Here’s how the Greenworks 40V cordless dethatcher did in my lawn.

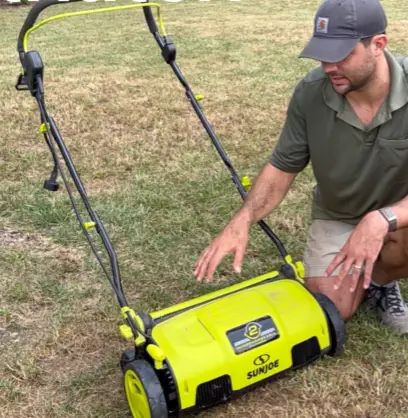
The Greenworks Cordless Dethatcher is incredibly easy to use

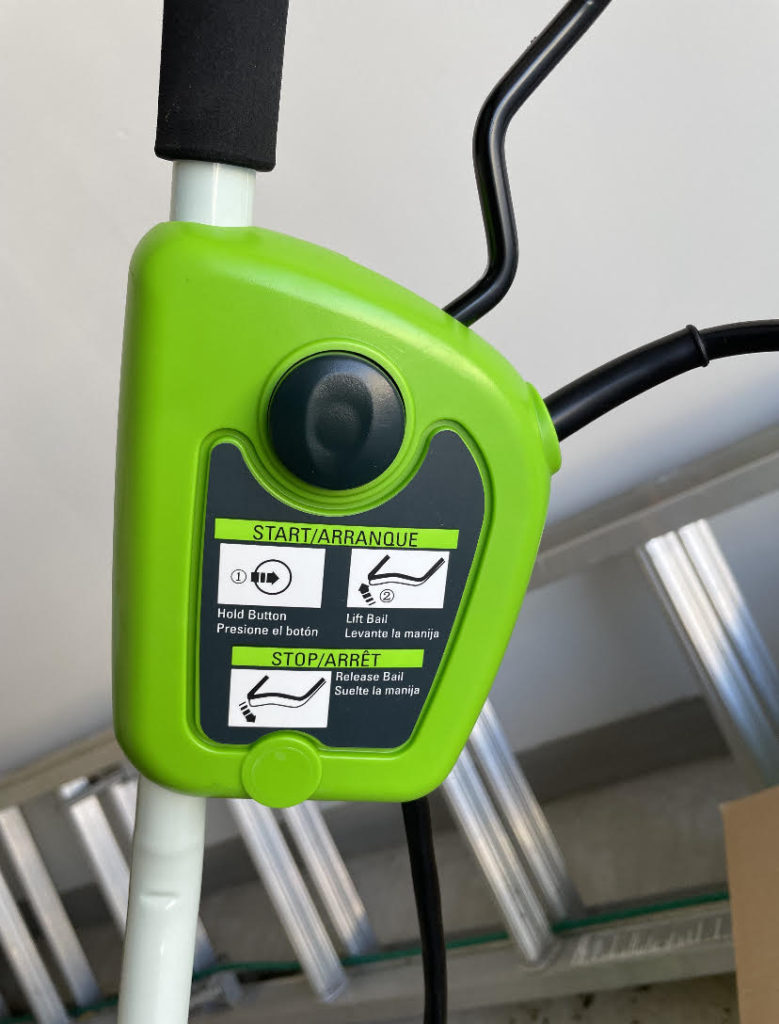
Getting started with the Greenworks dethatcher is a breeze. Once I assembled it, I simply squeezed the handlebars together and pressed the button on the side of the handlebars to get it started. That’s it. 

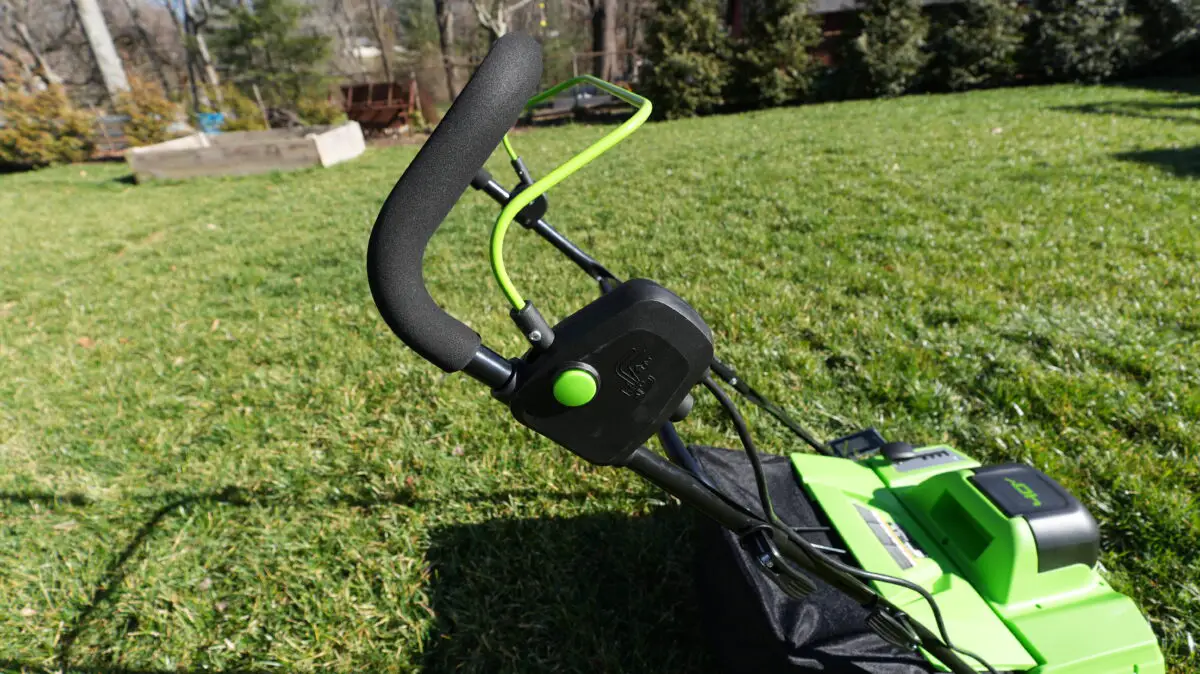
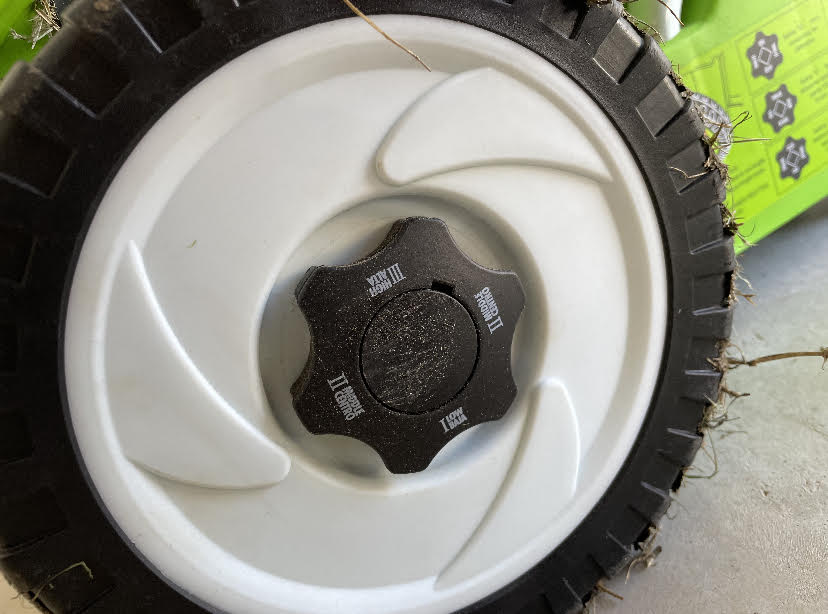
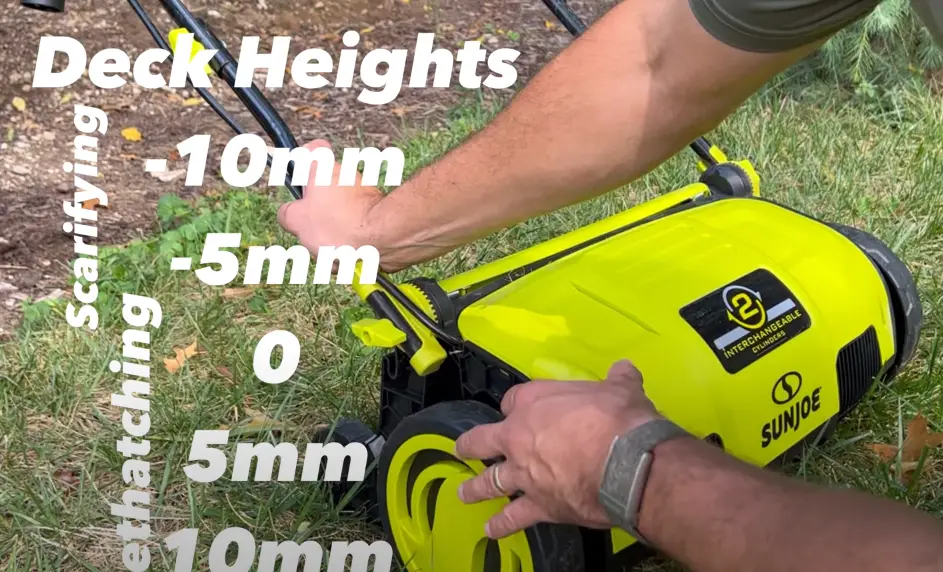
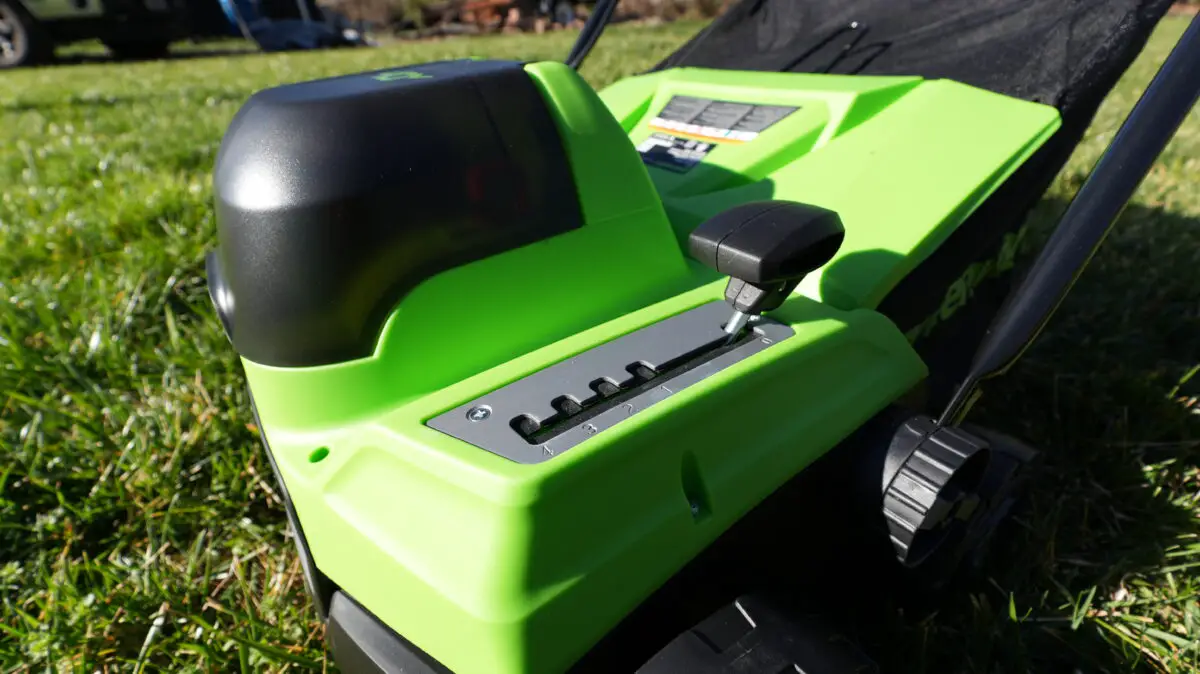
Once you have it started, you can simply adjust the deck height to make sure you aren’t digging too deep or not deep enough into your lawn to get the right amount of thatch off of your lawn. 

How to use the Greenworks cordless dethatcher

My simple instructions for using the Greenworks dethatcher are below:

  1. Place the 40V battery inside the battery port
  2. Squeeze the top handlebar and press the “start” button on the side
  3. Start walking slowly through your lawn
  4. Adjust the deck height as needed – raise it if you start pulling up dirt and lower it if you aren’t getting much thatch
  5. You should be replacing the collection bag pretty frequently if you have the deck height set on the correct setting
  6. Walking slowly is absolutely critical

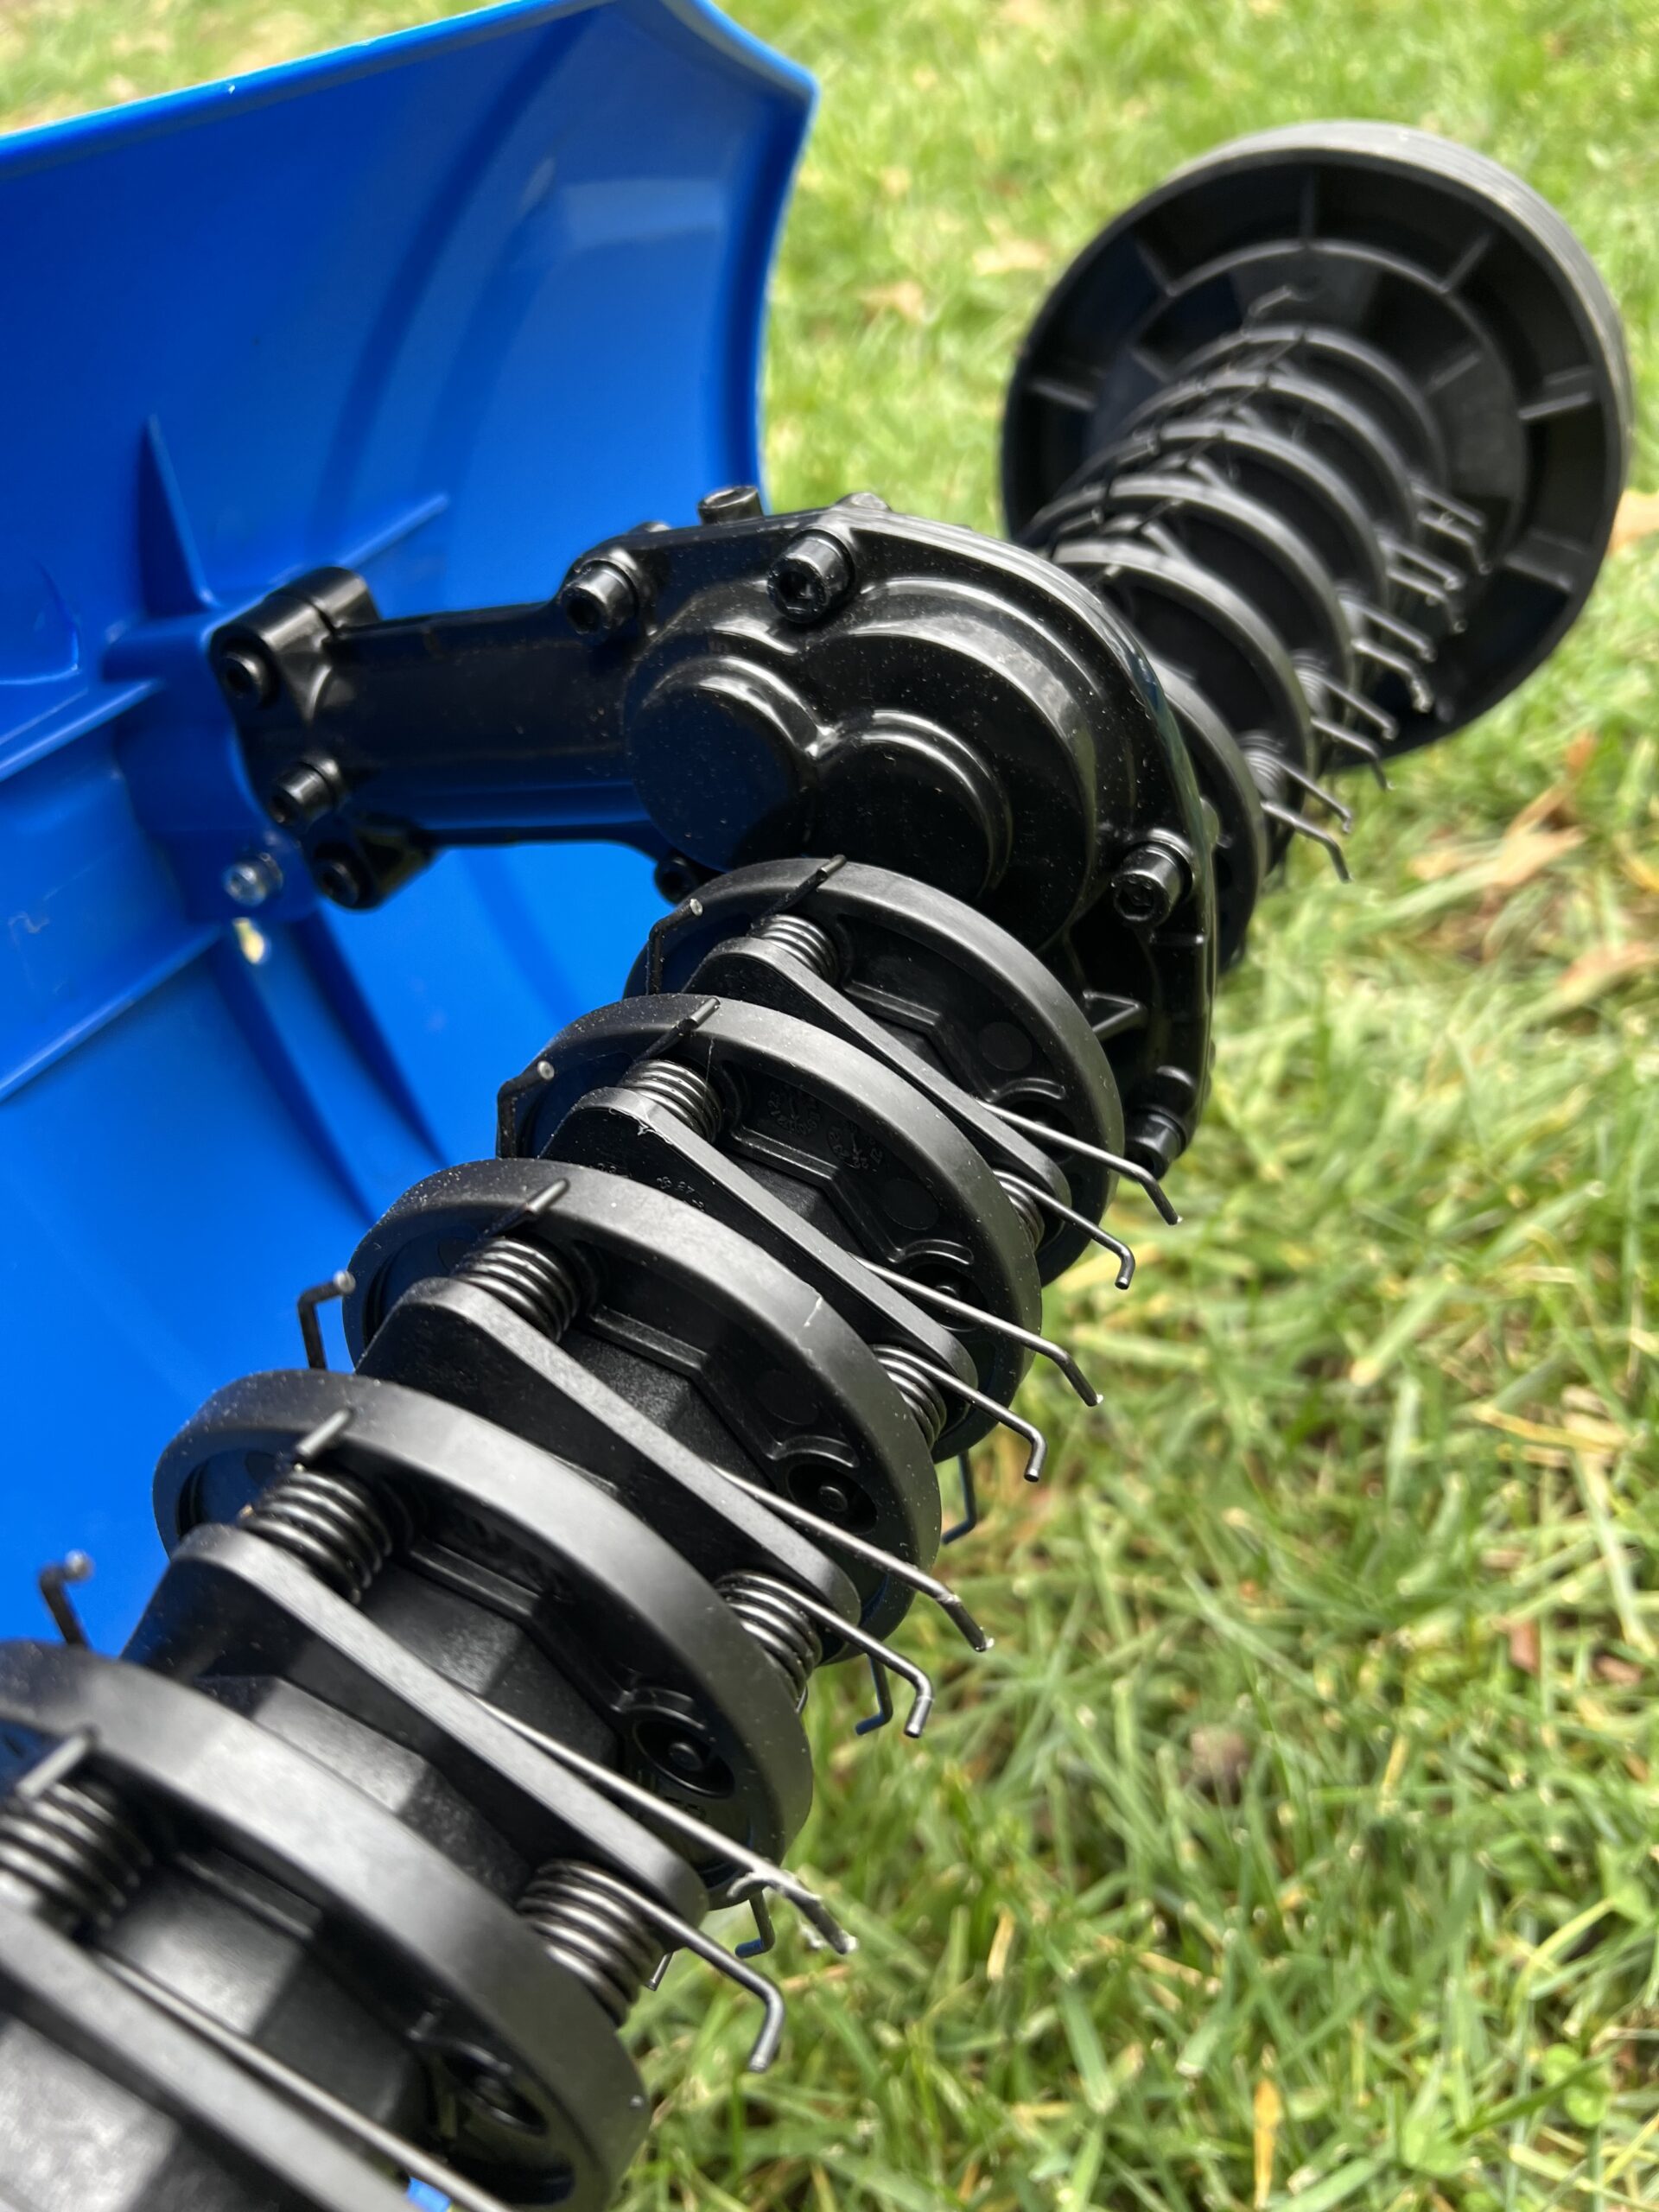
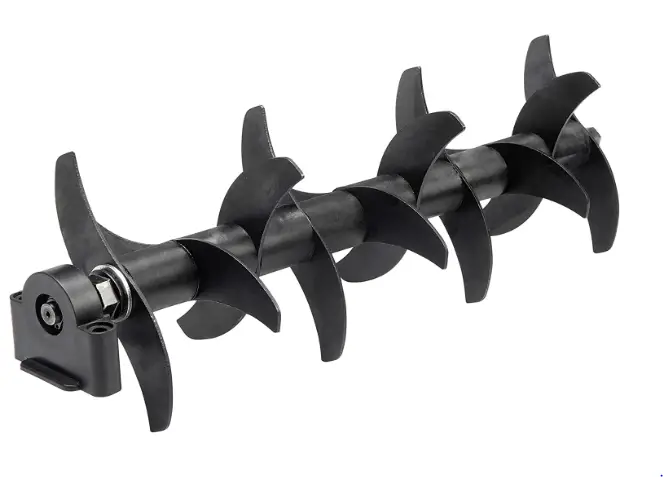
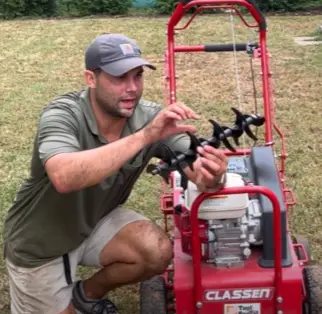
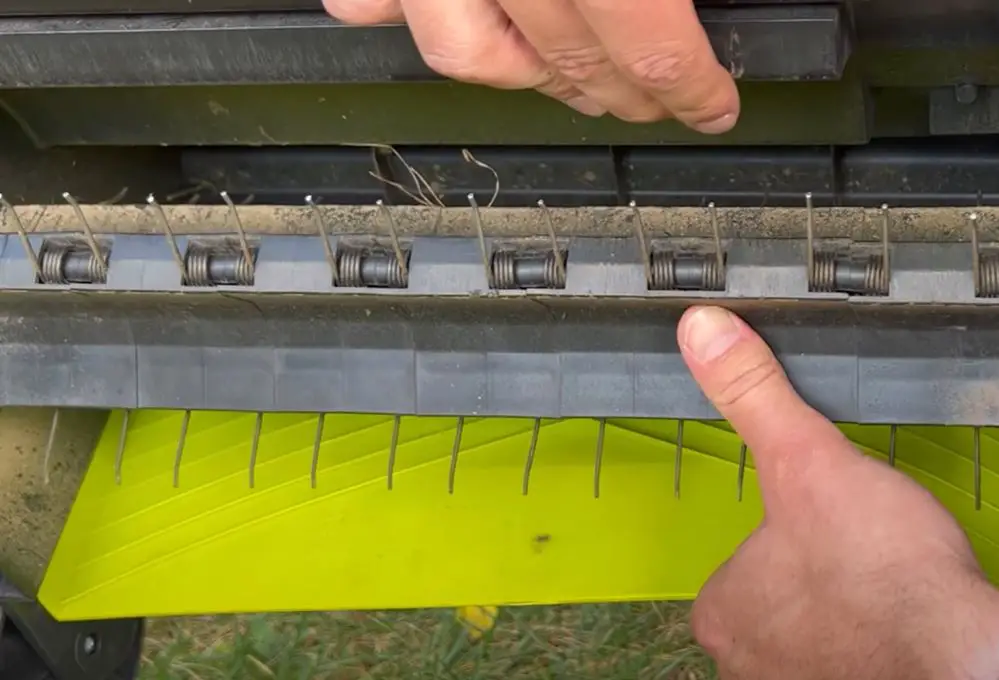
Using the scarifier attachment on the Greenworks Cordless Dethatcher

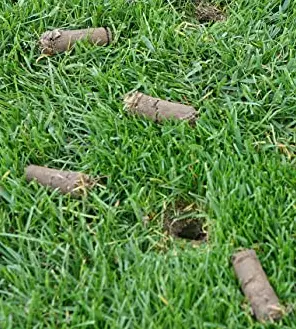
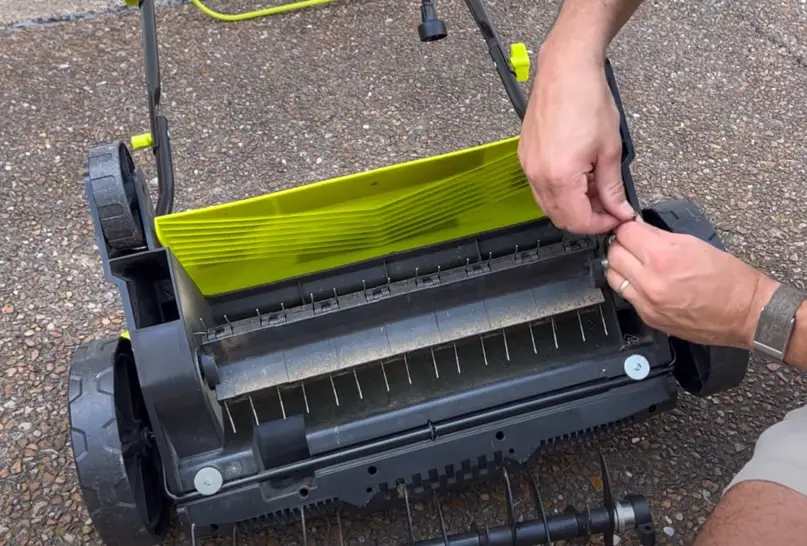
The scarifier attachment is something you will want to pop on before you dethatch your lawn. A  scarifier basically cuts up the thatch that is sitting on top of your soil and makes it much easier to dethatch.

Scarifiers work almost like little blenders, rotating blades vertically around to dig into the soil and chop up layers of dead grass sitting on top. I didn’t notice any thatch being collected at this point – it just preps the surface for a powerful dethatching. 

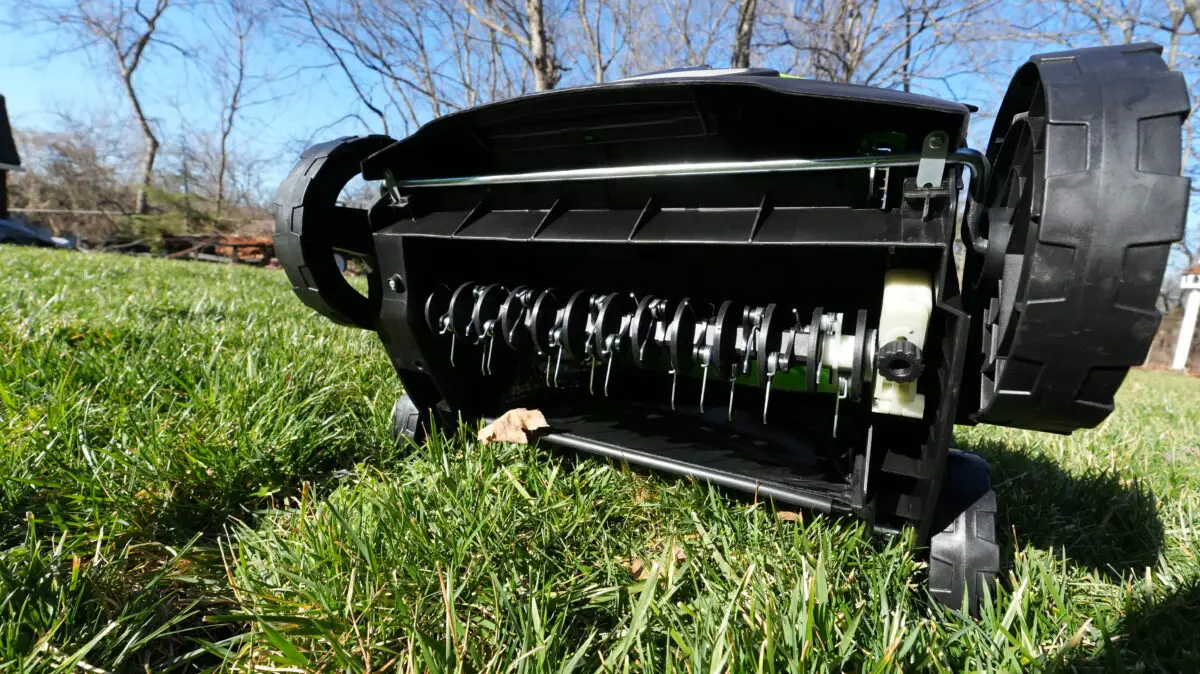
Swapping out the dethatcher tines and scarifier attachment is pretty easy on the Greenworks dethatcher. There’s a little screw next to the attachments that you can hand-twist and open to place the new attachments. No tools needed!

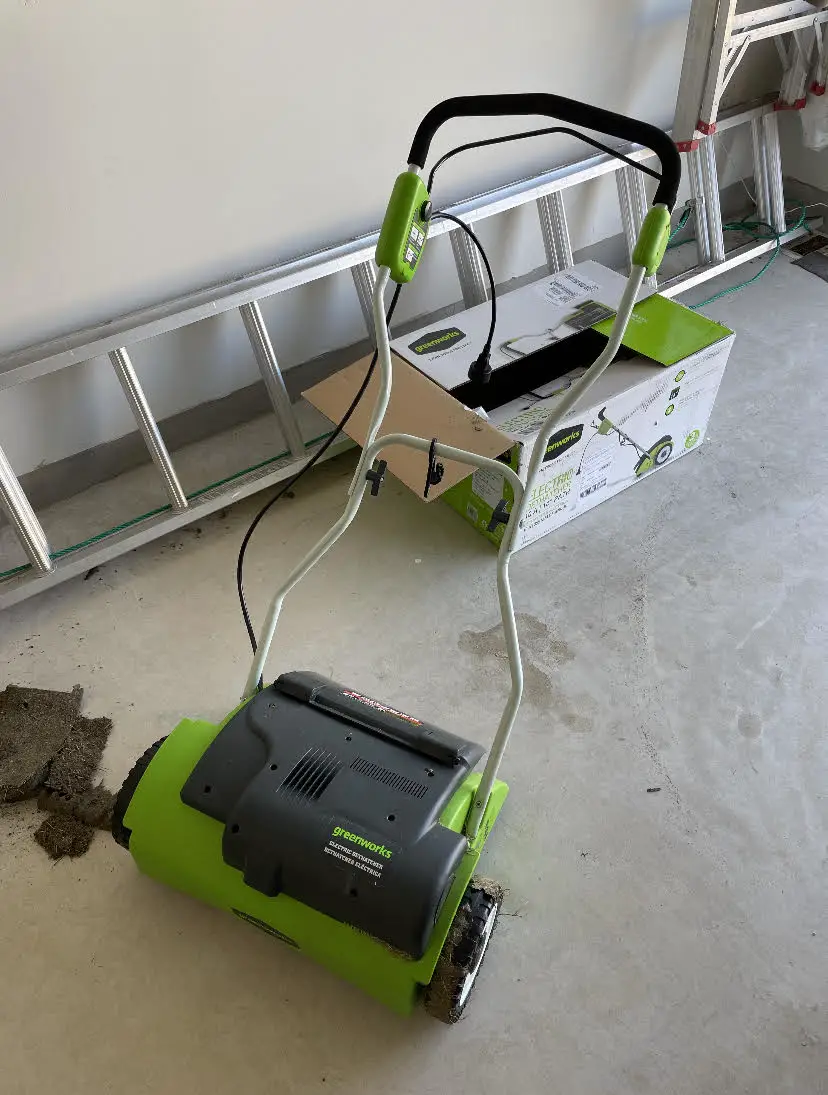
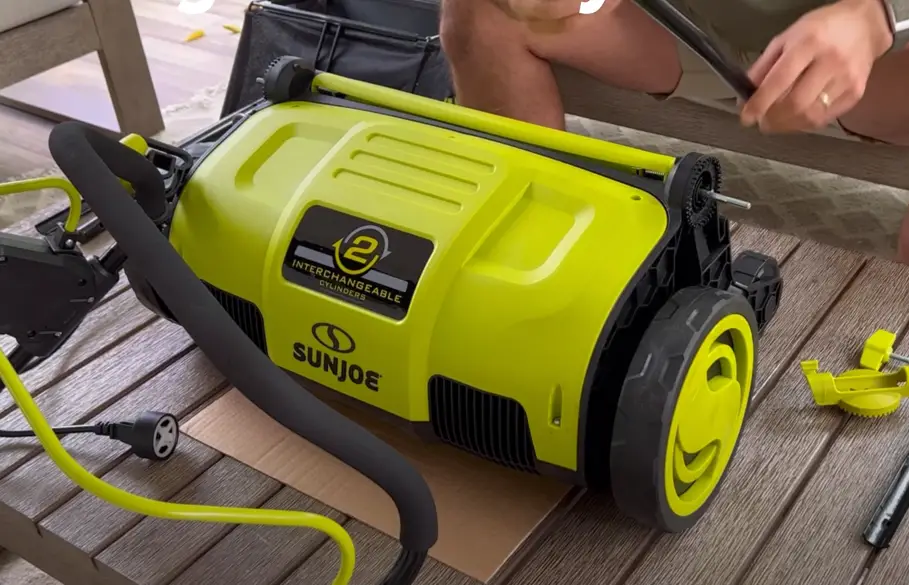
Lastly, storing the Greenworks dethatcher is super easy. It folds in half really well at the handlebars. I only use a dethatcher once or twice per year so being able to store it in a tight spot makes it way better.

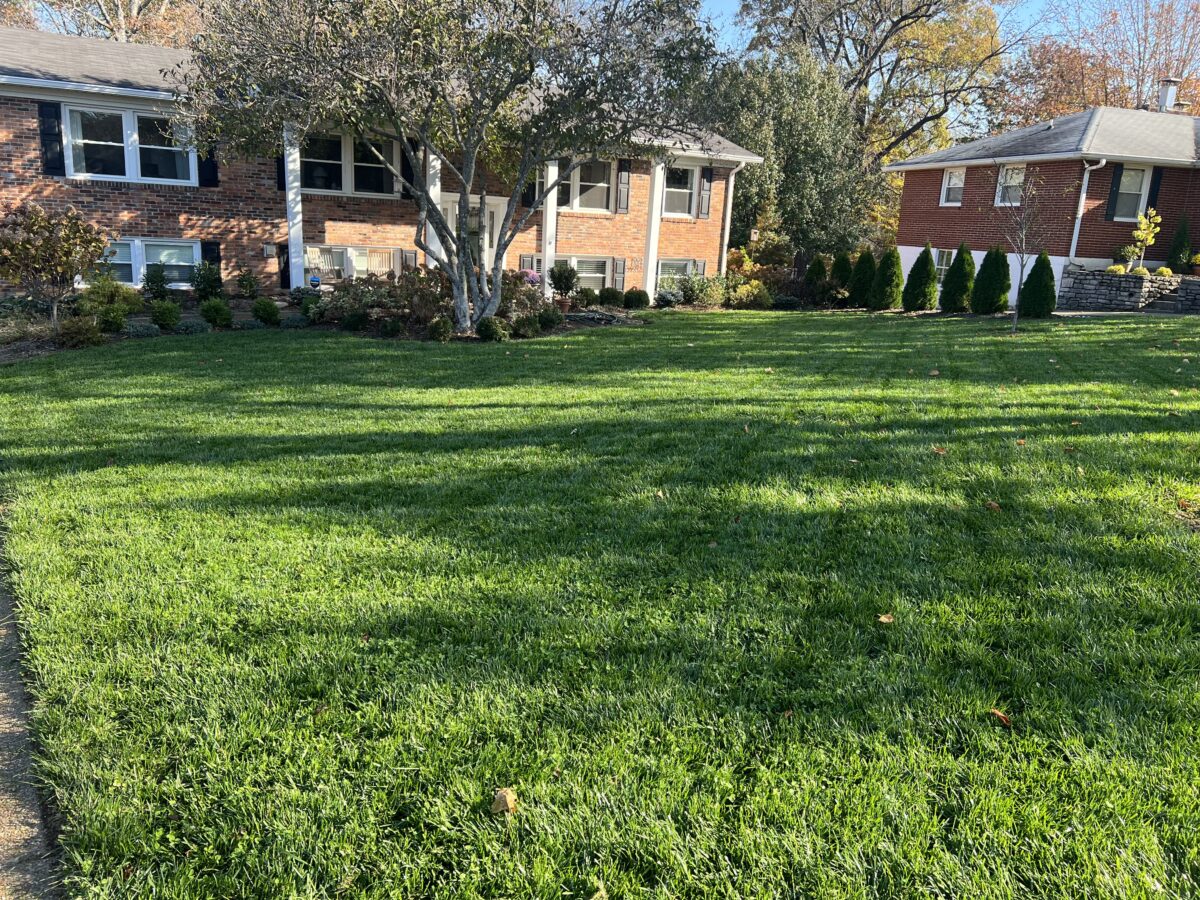
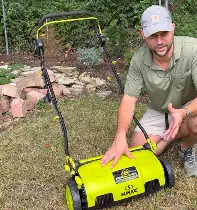
The Greenworks Cordless Dethatcher performed well

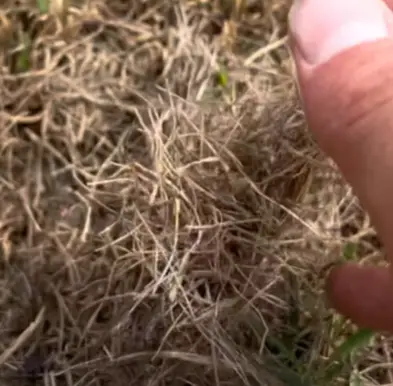
Taking the scarifier blade through my lawn followed by a nice slow-paced dethatching had my lawn looking crazy. I dethatch my lawn every year but have never pulled up so much thatch. Going cordless made the work more enjoyable because I didn’t have to lug around my extension cord or think about it at all. 

The cordless dethatcher is also quiet enough that I could walk around my lawn with headphones on and listen to an audiobook while I used it. 

Good performance, good experience, pretty sweet machine.

Corded vs Cordless Greenworks dethatcher

The corded and cordless Greenworks dethatchers operate nearly 100% identically. Both do a really good job of clearing out the thatch from your lawn. The main difference between the two is power source and price. 

The corded electric Greenworks dethatcher is much cheaper and can run for…forever (as long as you pay your electric bill). To operate the corded version, you will need to buy a separate extension cord that can run the length of your lawn. You’ll also need to lug it around with you the entire time which can be super annoying.

The cordless Greenworks dethatcher is a bit more expensive and runs with the Greenworks 40V battery. The battery life on the cordless dethatcher is decent – about 30 minutes of runtime. 

Is the Greenworks Cordless Dethatcher worth it?

The cordless dethatcher is definitely the better purchase if you already own the Greenworks 40V battery. If this is the case, you can buy the TOOL ONLY VERSION.

If you buy the tool-only version, the corded and cordless version are about the same price. 

You can check out both versions here by toggling the tool-only and normal version of the dethatcher. You can also grab this cordless dethatcher over at Greenworks website here

My final review of the Greenworks Cordless Dethatcher

I have used both the cordless and corded electric Greenworks dethatcher. Getting a dethatcher is one of the cheapest ways I’ve transformed my lawn – and the most satisfying. I say yes to getting a dethatcher and that the Greenworks cordless version is a really, really convenient way to get the job done.

Why we started The Lawn Review

The reason we started this website in the first place was because we had so much trouble trying to find reasonable, understandable, honest reviews for lawn equipment. And it’s not cheap! After hours and hours of research, trying products and returning them, and messing up our yards – we started this site. 

As people who had to learn the hard way, we want you to know exactly what you are signing up for before you purchase a piece of equipment. That’s why we are committed to providing honest, easy-to-understand reviews that mean something.

Here’s the manual for the Greenworks Cordless dethatcher: 

5 Must-Do Steps This Fall For A Perfect Lawn

Maintaining a beautiful lawn is a source of pride for many homeowners (me), and it’s no secret that a lush Spring lawn starts with proper care in the Fall

In a recent Youtube video I made titled “The TRUTH about FALL Lawn Care that the PROS know. (5 STEPS),” I share my valuable insights into Fall lawn care. Let’s dive into the main points of my Fall lawn routine to uncover the secrets the pros swear by.

Here are the steps for a perfect Fall lawn:

  1. Clearing the surface of your lawn
  2. Mowing at the right height
  3. Aerating your lawn with a core aerator (you can rent from Home Depot)
  4. Overseeding with a spreader
  5. Implementing weed control and a consistent watering schedule

Too late? Already November? Check out our guide for getting green grass in November.

Clear the surface of your yard of debris

I cannot overemphasize the importance of clearing the surface of your lawn. This means removing debris, sticks, dog poop, leaves, and any clutter that may have accumulated over the summer. 

A clean surface provides a fresh start for your lawn as your grass prepares to enter the dormant winter phase. This step takes a few minutes, but its impact on your lawn’s health is invaluable.

Pro tip: You can clean up the leaves and shred them into a mulch using a leaf mulcher.

Mowing lower before aerating and overseeding

One of the sneakiest but most crucial steps for maintaining a healthy lawn in the Fall is proper mowing. In my video I delve into the importance of mowing at the right height. The pros recommend gradually lowering your mower blade height with each cut as fall progresses. 

This technique ensures that your grass doesn’t become too long and susceptible to diseases like snow mold. Additionally, I recommend not removing more than one-third of the grass blade’s height in a single mowing session to maintain the lawn’s vitality.

Aerating the lawn with a core aerator

Aeration is a key practice that helps your lawn breathe. Aerating your lawn involves perforating the soil with small holes to allow nutrients, water, and air to penetrate the roots. Aeration is essential in reducing soil compaction and thatch, both of which can hinder your lawn’s growth. This step is essential for ensuring that your grass receives the nourishment it needs to thrive.

You can pair this step with dethatching, which is the process of removing thatch (dead grass) from your lawn’s surface. Combined, these two will allow your lawn to become fully oxygenated and receive sunlight and nutrients that give you.. You can read more about my experience with dethatchers here.

Pro tip: You can rent this thing from Home Depot (like I did) for super cheap.

Overseeding your lawn

Overseeding is a vital aspect of fall lawn care to ensure that your grass grows back thick. Thick grass chokes out and prevents weeds and invasive grasses from taking root in your yard. The best defense is a good offense.

I suggest overseeding in the Fall to fill in any bare patches and encourage thick, lush growth. In my video, I explain exactly how I use my spreader in my yard to ensure that I get sufficient, even coverage of seed.

Pro tip: Follow my pattern above for ensuring even coverage throughout your yard.

Weed Control and Watering Schedules

The final steps in achieving a beautiful Fall lawn that sets you up for a beautiful spring lawn involve weed control and setting up a proper watering schedule. My video goes into detail about the types of herbicides and weed control products to use in the fall to prevent weeds from taking over your lawn during the winter. 

I also share insights into the importance of keeping a consistent watering schedule: I recommend deep, infrequent watering rather than shallow, frequent watering, which can encourage shallow root growth.

Final words: My Fall Lawn Routine

By following these professional tips, you can ensure that your lawn thrives during the fall and emerges in the spring as a vibrant, healthy carpet of green. Don’t neglect your lawn this fall; follow these expert recommendations to enjoy a stunning lawn when warmer days return.

What Is Dethatching? Ultimate How-To Guide (2024)

Dethatching is one of those things I had never heard of before I owned a home. In fact, I didn’t even know what thatch was.

But once my lawn went from green to yellow after a few years of the same old fertilizer and aeration treatment, I started to get confused.

Why was I getting worse results after doing the same thing year after year?

That’s when I found out about dethatching – and more importantly – electric dethatchers.

Why you should let your soil breath

Lawn thatch is basically a bunch of old, dead grass and weeds that takes a while to decompose. The way that I realized I had too much thatch in my lawn was when I took my six month old daughter into the yard. She started clawing at the ground and pulling dead grass out of nowhere. 

Thatch from our yard.

While she is an inexpensive dethatcher, there are child labor laws that prevent me from cutting her loose on the whole lawn (kidding).

Anyways, lawn thatch can essentially waterboard your lawn – blocking sunlight and nutrients from getting to the soil and choking your grass to death. 

In small quantities however, thatch can have insulator-type qualities. Think of it like you think of mulch. Mulch has great protective qualities for keeping weeds at bay. Too much mulch that isn’t replenished starts to decay and become harmful to surrounding plants. 

So…what should you do about it?

How it works

Dethatching is the removal of thatch from the top surface of your soil. When dethatchers remove thatch from the surface of your lawn, it opens up the lawn and allows it to breathe. 

A couple weeks after dethatching and overseeding.

I know you may think this doesn’t make a difference, but you would be surprised to see how much thatch comes out of your lawn.

Ever used one of those things that cleans out your ears? The amount of wax that comes out is crazy and changes you forever.

The same thing is true of dethatchers. Whenever I use one, it makes me feel like I have been holding my breath for years and finally get to breathe.

When to dethatch – Fall or Spring?

Hopefully you won’t have to wait as long as I did to realize what was going on in the yard. It’s actually pretty easy to tell when you need to dethatch your lawn:

My neighbor DEFINITELY dethatched this year.
  1. You can wait and slowly watch your lawn die (not recommended)
  2. Your lawn retains water well after you think it should have evaporated
  3. You notice more weeds and/or mushrooms in your lawn
  4. The lawn is becoming unseasonably yellow
  5. Your lawn looks like it has male pattern baldness

If you’re not sure or are feeling paranoid, feel free to go out and dig a nice little cross section of your lawn. You’ll be able to see how deep the thatch goes. 

If you have a decent layer built up in your yard and you see more than a quarter inch or so on top of the soil, it is time to dethatch.

We wrote a great long post about the best time to aerate and overseed your lawn as well.

The difference between dethatching and aerating

Dethatching and aerating are commonly mixed-up lawn care processes. Both involve removing things from your lawn and you really do them in tandem.

But dethatchers are simply focused on the top layer of soil in your lawn. They are helpful to allow nutrients, sun and water reach the top of the soil, but are really skin-deep. Dethatchers do not get into the soil themselves.

Using a core aerator after dethatching.

On the other hand, aerators pull up chunks of soil that almost look like dog turds. This allows for the soil to open up, become less compact, and essentially mix together. The aeration process pulls plugs from the soil to the top of the lawn.

Don’t freak out! These are soil plugs from aerating.

 Both are done around the same time of the year in this order.

  1. Scalp your lawn and get the grass super short, being sure to bag it.
  2. Dethatch your lawn thoroughly, being sure to get all the thatch off the surface
  3. Use a core aerator on your lawn to pull up plugs
  4. Overseed
  5. Water (2x/week for 50 minutes on each area)
  6. Enjoy!

Types of dethatchers

The O.G. lawn dethatcher is a lawn dethatching rake. Which looks like a normal rake but is more intense. 

Not an ancient torture device, but a manual dethatcher.

This rake can help pull up all of the thatch and works well.

But it is a back destroyer. It’s like shoveling for snow except the snow is all ice and your shovel is made of plastic. 

You can make the process WAY faster, remove more thatch, and not be bed-ridden for the next week by using an electric dethatcher.

Electric dethatchers work by basically looking and operating like a push mower, but underneath there are small tines that dig up the thatch and bring it to the surface of your yard. Electric dethatchers are some of the most satisfying tools on the planet and are addictive.

Most electric dethatchers are corded electric tools, but newer battery-powered dethatchers are coming into the market. These aren’t super common tools right now, but I imagine most folks will have an electric dethatcher in the next few years.

Recommended electric lawn dethatchers

We at The Lawn Review have had the distinct pleasure of using lawn dethatchers ourselves. 

We’ve written extensively about the Sun Joe corded electric dethatcher and used it in our ultimate fall lawn care routine YouTube video

We also reviewed it in a single long-form YouTube video if you want to learn more.

Basically, the Sun Joe dethatcher is an affordable electric dethatcher that works really well. I believe they recently released a battery powered lawn dethatcher, which we haven’t used but are interested in trying.

The Sun Joe electric dethatcher we used.

You can find the corded Sun Joe dethatcher on Amazon as well as the new cordless Sun Joe dethatcher.

Greenworks also has a corded electric dethatcher. We liked this one as well, but didn’t love that it came without a collection bag. It is a great budget-friendly electric dethatcher, so I highly recommend it as well. You can get the Greenworks electric dethatcher on Amazon for a great price.

Kobalt electric dethatcher.

Frequently Asked Questions

We get these all the time from people considering dethatching their lawn. This will be an ongoing list collection, so if you have any questions, feel free to let us know.

What is lawn thatch?

Lawn thatch is a layer of dead and decomposing grass between your soil and grass blades. It is okay in small quantities but can also prevent your lawn from thriving.

What is lawn dethatching?

Lawn dethatching is the process of removing dead grass stuck to your soil in order for your lawn to receive better nutrients.

What’s the difference between dethatching and aerating?

Dethatching is the process of removing dead grass from your soil, whereas aerating pulls soil from the ground on top of your lawn. Both are important parts of your lawn care cycle.

What’s the difference between a dethatcher and a scarifier?

Dethatchers and scarifiers often work together to pull up thatch from your grass. Scarifiers are blades that cut up and loosen thatch while dethatchers physically pull it from the grass.

How often should I dethatch my lawn?

Totally depends on your environment. For folks that get a lot of snow, I recommend dethatching yearly to pull up all the grass that got killed underneath the snow.

For others in drier climates, once every few years might be enough. I know that I like to do it every year as part of my fall lawn care routine with cool season grass.

When is the best time to dethatch my lawn?

For those with cool season grass, early fall is the best time. For warm season grass, early spring.

What is better, aerating or dethatching?

Both are used in combination to prepare your lawn for overseeding.

Why we started this site

We started The Lawn Review out of frustration. We couldn’t find clarity around what type of products were actually good and reliable. All the fertilizers we tried didn’t work. We ended up with a dying lawn, wasted time, and wasted money.

We take this stuff seriously!

So we started buying and reviewing lawn tools and figuring out which ones were the best. And now we’ve moved onto actually keeping that grass nice and healthy all year around. 

We’ve spent thousands of hours building this content for people just like you and me – normal p

Lawn Aerator vs Dethatcher vs Scarifier: Guide To Using Each

Lawn aerators, lawn dethatchers, and lawn scarifiers are all tools that can be used to help your yard thrive.

But these are all too commonly confused with each other. Some folks only aerate, others only dethatch, and hardly anyone only scarifies.

In reality, these are a holy trinity that when used together can absolutely amplify your lawn care results and get you the greenest grass in the Fall.

Curious? Let’s dig in.

Why we started this site

We started The Lawn Review out of frustration. We couldn’t find clarity around what type of products were actually good and reliable. All the fertilizers we tried didn’t work. We ended up with a dying lawn, wasted time, and wasted money.

We take this stuff seriously!

So we started buying and reviewing lawn tools and figuring out which ones were the best. And now we’ve moved onto actually keeping that grass nice and healthy all year around. 

We’ve spent thousands of hours building this content for people just like you and me – normal people.

Lawn Aerators Explained

A vital part of taking care of your lawn is that it needs air and other nutrients to help it thrive. Over time, soil can become dense and nutritionally dead. Water can no longer reach it and neither can sun or other vital nutrients.

Aeration is the process of bringing air and soil turnover to your lawn. Most aerators are core aerators, which pull plugs of compact, older soil to the surface of your lawn. Removing these plugs (which look like dog turds) allows for water and other nutrients to reach deep down into your soil, bringing vitality and health to your entire yard.

A core aerator we rented from Home Depot

Lawn aerators tend to make your yard look like crap for a few weeks, but are often done in combination with some of the other tools we discuss today. Once these are used together with overseeding your lawn, you will start to see your lawn completely rejuvenate itself.

Not dog turds

You can rent a lawn aerator from Home Depot for a pretty cheap price, among a ton of other things you can rent from Home Depot.

When to aerate your lawn

Most folks should aerate their lawn in the fall. If you have a cool or transition season grass, this is the perfect time to reset your lawn and allow for new growth. We recommend aerating after you have already scarfied and dethatched your lawn.

If you have warm season grass, spring is actually the best time to aerate – so for those in Florida and Texas, Spring is the time.

For a full guide, we wrote a longer document that highlights the best time to aerate and overseed your lawn.

Lawn Dethatchers Explained

Lawn dethatchers are some of the most satisfying lawn tools on the planet. It’s basically like  peeling the plastic off of a new appliance, but for your whole yard. 

Lawn dethatchers, particularly electric lawn dethatchers, work by using metal tines that pick up dead, old grass in your yard.

Thatch is the compilation of dead grass, roots, and weeds in your yard that forms a little blanket over your soil. It can be good for a few things, like keeping nutrients and retaining moisture, but if it gets to be too much it can totally choke your yard. 

This is thatch.

Lawn dethatchers differ from lawn aerators in that they don’t actually interact with the soil. Whereas core aerators pick up big chunks of dirt and put them on top of your grass, dethatchers simply pull up dead thatch and bring it to the surface. 

A Sun Joe dethatcher we used.

We recommend using a dethatcher before a core aerator. Dethatching will give you a better aeration and allow for more nutrients and seed to get down into your soil.

Electric dethatcher recommendations

You can also dethatch your lawn with a manual dethatcher, but it is a back breaking process that will crush your hopes and dreams. 

Electric dethatchers are amazing and there are some great options. We have reviewed the Greenworks dethatcher and the Sun Joe dethatcher and even compared the two in the same post. 

Scarifiers explained

Scarifiers can be thought of as an extension to your dethatcher. Scarifiers use little blades to cut vertical lines just at the surface of your soil. Why would you want that?

Well, you may want to help cut up some of the thatch before using the dethatcher and aerating. Scarifiers are not as necessary as dethatchers and aerators, but can definitely give you better results when you dethatch. 

The scarifier blades that help shred thatch.

If you have never used a dethatcher and think your lawn is completely covered in thatch, then it’s worthwhile to use a scarifier to make sure the thatch is nice and loose. Otherwise, the dethatcher may only be able to get a small percentage of the thatch.

The scarifier is a good tool in combo with the aerator and dethatcher.

Scarifier product recommendations

While I’m sure you could buy an electric scarifier, most electric dethatchers have a scarifier attachment that you can quickly run over the yard before dethatching.

The Sun Joe dethatcher we used in one of our videos had a nice scarifier attachment that easily popped on.

The Best Time to use a scarifier, dethatcher, and aerator

As mentioned previously, the best time to use a scarifier, a dethatcher, and an aerator is in combination with overseeding your lawn.

The actual order of events is:

  • Use a scarifier if needed to break up all the thatch in your lawn
  • Use a dethatcher to pull all the dead thatch out of your lawn
  • Then use an aerator to pull up compacted soil

Once you have done these three things, your lawn will be ready to overseed. For most folks, the best time to do this is around mid-September to early October. This gives the appropriate time for the cool season grass seeds to germinate and grow before the winter freeze comes.

For those with warm season grass, the best time to aerate and overseed is in March, following the exact same process.

The importance of overseeding your lawn

Overseeding your lawn is important for the health and vitality of your lawn, but is going to be a fruitless (or grassless) effort if you don’t dethatch and aerate your lawn. 

Overseeding your lawn is the best way to get luscious grass but also helps choke out weeds and other invasive grass types that can quickly overtake your yard.

Following overseeding, you want to be sure to be very consistent with a watering schedule. We recommend at least twice a week for 50 minutes in each area and preferably in the morning.

Frequently asked questions

What is the difference between a Dethatcher vs Aerator?

A dethatcher is used to take the top layer of dead grass, or thatch, off of the top of your yard. This prepares it well for further aeration, receiving more seeds and nutrients, and easier watering.

We made a cool Google Web Story highlighting the difference between aerators and dethatchers!

An aerator pulls little plugs of compact soil out of your lawn, allowing air to flow into the soil and restoring the vitality of the soil. Aeration is a necessary yearly investment in your lawn to help keep it lively and green.

What is the difference between a dethatcher vs a scarifier?

Dethatchers and scarifiers commonly go hand-in-hand and complement each other well. Scarifiers are used to cut up thatch, loosening it for the dethatching process.

Dethatchers are used to collect thatch from the top layer of your yard. Their performance is enhanced by scarifiers, especially if you haven’t dethatched in a long time.

Greenworks vs Sun Joe Dethatcher: Comparison Guide

The Greenworks dethatcher vs Sun Joe dethatcher is exactly like Tom Brady vs Peyton Manning. Both absolute greats, but Peyton clearly being the best. I like the Greenworks dethatcher better because it comes in at a lower price point.

My Greenworks dethatcher that I used when comparing against the Sun Joe dethatcher.

Just kidding – kind of. When looking for a lawn dethatcher, there are a few really important things to keep an eye on, and we will look at all of those here today. 

Jump ahead:

***Spoiler: Both are great, but we recommended the Greenworks dethatcher because of the price point. If you want a nicer version, check out the new cordless Greenworks dethatcher that I tested out here.

Greenworks dethatcher vs. Sun Joe dethatcher

Now that we know the how and why of dethatching, let’s roll up our sleeves and compare the top two choices. We will do a head-to-head comparison of the Sun Joe dethatcher vs the Greenworks dethatcher to make sure YOU make the best choice for YOU. 

To read our full product reviews, click here for the Sun Joe dethatcher and here for the Greenworks dethatcher.

The Sun Joe is slightly more powerful

Let’s start here with expectation setting. These tools are not yard beasts. They require an extension cord (remember those?) and a bit of time and patience. When looking at power, the difference is really marginal.

The Greenworks dethatcher comes in at about 10A of power, whereas the Sun Joe offers 12A. A here stands for Amperes, or units of electrical power output. In reality, this difference will not be very noticeable or even necessary. Power is not the name of the game, but being methodical and patient are. 

We tried it for real!

When it comes to this head to head, I’d love to make it a tie but the numbers just don’t work.

Sun Joe takes this round.

Usability comparison for these dethatchers

Alright, both of these operate basically the same. You plug them both in, press a button, then start slowly walking. When it comes to using a dethatcher, the most important aspect of the usability is really how much time you are going to be out there.

The amount of time you are out there is dependent on how wide the dethatcher is. Just like with mowers, the larger the blade size is, the larger the cutting path. The same is true with dethatchers. While they are notoriously small, every inch matters. 

The width of the Greenworks dethatcher is 14 inches, whereas the Sun Joe is only 12.6 inches. For usability, I am going to go with Greenworks dethatcher.

Slightly wider!

Add-ons to both Sun Joe and Greenworks dethatchers

The Sun Joe comes with a couple of add-ons that the Greenworks Dethatcher does not. Sun Joe offers a scarifier attachment and a bag for the thatch.

I don’t really think you need either. Definitely not the bag – the bag is useless because it is so small it gets full after about five feet of pushing. This will end up getting tossed. 

The scarifier is an attachment that you can put on the dethatcher that has a few blades on it that can cut up the thatch before using the dethatcher. I’m iffy on this one as well and don’t ever use it. Others seem to like it, but I never have time for it. 

The Greenworks is a bit cheaper

The Greenworks dethatcher comes in at a slightly lower price than and the Sun Joe dethatcher will cost you a slight bit more last time I checked.

As a reminder, the Greenworks does not have the attachments that the Sun Joe dethatcher has, but is wider. 

Our ranking table comparison

Hands down – the Greenworks dethatcher is the way to go here, folks.

CategoryGreenworks dethatcherSun Joe dethatcher
Power++
Usability++++++
Price++++++
Appearance+++++
Overall++++++

The Value of My Dethatcher

Dethatchers are a lesser-known lawn tool but that’s because most folks don’t care enough about their yard to use one. If you are reading this post, you are in the elite subgroup of yard enthusiasts who give a darn and are about to be the envy of all of your neighbors.

Dethatchers work by pulling up dead grass that is stuck to your lawn’s soil. 

“Wait a second, that stuff is bad?”

Well, maybe not BAD, but it limits the amount of nutrients your soil can take in. We go out and pull weeds in the garden bed because they can overtake our flowers and bushes. The same goes for our grass. The thatch is not going to take over your yard and is dead, but it is still taking up valuable real estate that could help grow more grass.

Thatch when it sees any open space in the soil.

When to dethatch your lawn

Dethatching your lawn should take place just prior to aerating and overseeding – so generally in the fall. For those of us that live in the South, this is sometime around mid to early October. If it’s too hot, the seed will dry up and not thrive. If it’s too cold, well, it is too late.

You can also dethatch at the end of a brutal winter to allow your soil to open up and breathe again before it warms up. So many lawns continue to limp into the spring because they are mushy and have a ton of moist thatch just clogging up the yard. Get rid of that.

Electric Dethatchers 101

Okay, let us make our way into the meat of this post. Old-school dethatchers are fine-toothed rakes that require you to physically make your way across the yard and pull up all the dead grass like a cave man. I do not recommend this to anybody that enjoys having a back. 

Doing my best.

On the flip side, there is a reason that motorized dethatchers are not gas-powered. Dethatchers, even motorized ones, require a slower movement across the yard. And honestly, that is a good thing. There’s no way to go through the process quickly. If you had a gas-powered dethatcher, you would basically till your entire yard and you might as well plant something else if you do that. 

Check out our web story about electric dethatchers and how satisfying they are.

Electric dethatchers are perfect because they are super light, easy to use, and simply hover across your yard, pulling up all the dead thatch. The two most popular electric dethatchers are the Greenworks dethatcher and the Sun Joe dethatcher. 

Greenworks Electric Dethatcher Review (+ How-To Guide)

My Greenworks Dethatcher is a lawn tool that I became obsessed with the second I started using it. Dethatchers work by pulling up old, dead grass that is embedded in the soil of your lawn. This provides the most satisfying experience ever when you use it.

This dead grass, or “thatch”, prohibits your living grass from getting nutrients and can cause your grass to appear thin. Dethatchers have historically been tough-looking heavy rakes that you could pull across your lawn by hand. 

Let’s get started!

When and why to use a dethatcher on your yard

Dethatching your yard is one of the most satisfying lawn tasks. If you are one of those people who likes pimple popping videos or loves to peel off the plastic of a new appliance, then dethatching will be your jam.

My Greenworks Dethatcher.

It basically pulls up all this dead grass that is stuck to your lawn and pushes it to the top of your yard. You can almost hear your yard start breathing again. 

The time of year to dethatch your yard is just prior to the aerating and overseeding process. For us, this time of year is in October, but can vary depending on where you live. Dethatching right before aerating and seeding gives the best possible chance for your seeds to make contact with soil. 

THIS is thatch.

First, you pull up the dead grass with the dethatcher. Once you have pulled all of this up and gotten rid of it, then you can aerate. You will want to aerate your lawn immediately after dethatching, then overseed the lawn. This will put seed straight on the open soil and give it the best success to grow into a thick, luscious lawn. 

The Greenworks Dethatcher features

The Greenworks dethatcher comes in at a slightly lower price point than the Sun Joe Dethatcher. It is also one of the most popular dethatchers available on the market. Let’s review what makes this so popular.

Folding down my dethatcher after use.

Psst – check out our comparison of the Sun Joe vs Greenworks Dethatcher.

My experience using this dethatcher

I used my Greenworks dethatcher for the first time this year on my relatively newly sodded lawn in Austin, TX. Despite only having a year or two of life, I got an insane amount of thatch off the ground. Here’s how it worked.

The Greenworks Dethatcher comes with an easy push to start functionality. This push to start feature allows for guaranteed starts after being stored through a cold winter. It boasts a 14 inch width for the tines (the little spikes that pull up thatch), which gives it an immediate advantage over some of its competitors. 

The handles fold in and allow for easy storage. As do other dethatcher in its class, it does not use any batteries and requires no charging. Rather, the Greenworks dethatcher requires an extension cord. As I mentioned in my last dethatcher review, a fifty foot extension cord is recommended. Longer extension cords can become quite heavy and cumbersome to move throughout your yard. 

The start and stop features on my Greenworks dethatcher.

Comfort is important to me, and as a tall person I highly value the longer handles that come with the Greenworks dethatcher. These are much more comfortable and help me stay out in the yard longer. 

This is surprisingly powerful

Not sure what kind of power you can expect with an electric dethatcher. This is not a gas guzzler and is not meant to really provide any power. But it does have 10A of power running through it. It does not have a self propelled feature persay, but does inch forward with the help of the thines moving forward trying to pull up grass. 

When I was using this dethatcher and testing out the power, I noticed that it wasn’t an issue – the issue was moving slowly, which is basically just what I have to do when I use a dethatcher.

You can check out the cordless version of the Greenworks dethatcher.

This dethatcher is simple and durable

While most people scoff at plastic and electric lawn tools, I think this one really does have great durability. I have not put too much use into mine, but have heard others talk about the longevity of the tines. The tines are the little pieces of metal that actually pick up and displace the dead grass on the bottom of the dethatcher. You would expect some wear and tear, but they appear to last quite a while.

This is really a simple machine that does not require any maintenance. When broken down to its functional components (kind of like active ingredients in supplements), it is just an electric power circle of little spikes. Not much can go wrong.

This one was really easy for me to break down and fold in half in my garage, basically just like how it came out of the box.

My yard now looks way better after using this

My Greenworks dethatcher will pull up the dead grass from the top of my yard without fail. As long as it is moderately dry outside, it will not have a problem getting to the thatch and giving your grass some room to breathe. 

Clean-up, however, is a different issue. Compared to several other electric dethatchers, the Greenworks dethatcher does not come with a bag. Do not fret! The bags that come with the dethatchers are almost comically small. 

Height settings on my Greenworks dethatcher.

I was surprised with the amount of grass that came up from this tool. You will likely fill your bag after about 5 to 8 feet of pushing. With that in mind, most people use all dethatchers without bags. 

To clean up, simply grab your mower, put it on a high setting, slap the bag on, and do a quick run over the yard to suck up all the thatch. You can always use a blower, a heavy duty rake, or whatever you would like to clean up the yard. 

Comparison: Greenworks dethatcher vs Sun Joe dethatcher

If you are looking at an electronic dethatcher online, you are likely picking between these two. Both are the top sellers on Amazon and combined have over 20,000 reviews. Both look very similar and both have almost 5 stars on Amazon. 

Luckily, I have owned both and even tested them side by side to see which one did a better job of pulling up thatch.

Functionality and power

To compare the two, let’s start with functionality. They function identically. Both are powered by an extension cord, move at the same speed, and electronically pull up thatch. The advantage goes to Greenworks here because they have a slightly bigger tine deck. 14 inches in the Greenworks vs 13 inches in the Sun Joe dethatcher. You will get more out of each pass using the Greenworks.

Add-ons

Something else to consider when comparing these products is the availability of add-on features. Greenworks offers zero add ons to their product, whereas Sun Joe offers a scarifier and a bag. As mentioned previously, the bag is meaningless and most people trash it. The scarifier applies blades to the soil to help cut through and tough thatch and provide a modest amount of aeration. The advantage in this category goes to Sun Joe. 

Tines at the bottom of my Sun Joe dethatcher.

Cost and value

As of right now, the Sun Joe dethatcher costs around $150 and the Greenworks dethatcher comes in right around $130. Both are going to last a long time and both are of very similar quality. If it were me (and it is me), I am going with the Greenworks. 

Overall comparison: Greenworks dethatcher vs Sun Joe dethatcher

Y’all this is a relatively easy one for me. I will save $20 and go with the Greenworks dethatcher if I had to do it over again. It operates the same, has great durability, is slightly wider, and a good bit cheaper. 

Check out our web story detailing the competition between these two.

You can grab the Greenworks dethatcher on Amazon (on sale right now for 35% off) for an awesome price. You can also get the Greenworks 27022 dethatcher straight from the Greenworks website.

Sun Joe Electric Dethatcher Review (+ Full Video)

The Sun Joe dethatcher AKA Sun Joe AJ801E, is a tool that has recently blown me away. I had never used a dethatcher before – and boy was I missing out. Not only on the results but on the complete satisfaction this tool provides.

Ever gotten really close to the soil and wondered what all that dead grass was doing? After it rains it is all of the super soggy, dirty, twisty grass that sits at the base of the grass and clogs it up. I can tell you what it is doing – it is called thatch and it is clogging up the soil and suffocating your lawn just like it was mine.

When I started dethatching my lawn at least once per year, especially before I aerate and overseed, has yielded amazing results. Getting rid of those dead strands of grass gives my yard room to breathe, take in nutrients, and grow more luscious throughout the season. 

Let’s get started – click to jump ahead

How I tested the Sun Joe dethatcher

In short, I bought it and recorded a long video of myself using it in the yard. So if you want to see it in action, check it out on Youtube.

But I have about a half acre of tall fescue and I took this puppy through my entire yard – twice. It dug up so much dang thatch that I had to put it in my trailer. When I was evaluating it, I was mostly looking at its power, convenience, durability, and value (price to performance ratio).

It was pretty sweet.

Sun Joe dethatcher features and benefits

At first glance, the Sun Joe dethatcher appears to be a big plastic box with a metal bar. In fact, it looks weak and wimpy. It feels kind of unsturdy and cheaply made.

Do not be fooled. This thing is a workhorse! You will notice once you get it going that it has some serious power to pull up the dead grass. Yep, that same dead grass that broke my back with the rake is coming up super easily by a plastic box. No reason to feel embarrassed.

Plug and play

The downside of this dethatcher is that it needs to be plugged in to operate – it is not battery powered. A nice, long extension cord will help get the job done. I recommend a fifty foot extension cord. One hundred foot extension cords tend to get really heavy and difficult to maneuver. 

The dethatcher from the front with bag attached.

Clean-up after dethatching – bag or no bag?

The Sun Joe dethatcher leaves quite the mess behind. I was be surprised to see the amount of thatch that comes up from beneath my grass. That being said, Sun Joe provides a bag that can be mounted to the dethatcher. I suggest using this to clean as you go. Otherwise, go over the loose thatch with your mower and collect it in that bag. Another option is to grab the rake, but obviously would be a last resort. 

Height adjustment.

Sun Joe Dethatcher Durability

At first glance, this chunk of neon green plastic that is only about 13-15 inches wide does not look like it would be super durable. Frankly, that is exactly what I thought when I first looked at the Sun Joe Dethatcher (or really any Sun Joe product).

The truth is, the little throngs at the bottom poking out are called tines. The tines on this machine are, in fact, super durable. These tines will work to dig up all of the thatch and leave my lawn looking great. Truly, the plastic casing and wheels are deceptive, as they simply serve as a cover for an otherwise low-output (meaning not getting super hot or vibrating) tool. I have no concerns with the durability of this equipment and have had zero issues with tines. The tines can also be replaced if needed, giving the Sun Joe dethatcher a high durability ranking.

Setting expectations

While the Sun Joe dethatcher is a powerful tool that will save my back, it isn’t for everyone. If you have a massive yard, you are better off getting a commercial size dethatcher that can be hooked on to the back of a riding mower.

Assembling the Dethatcher right out of the box.

To level-set expectations, the Sun Joe dethatcher has a width of almost 13 inches ranging up to 15 inches with the largest model. This is not going to be “a few passes in the yard and you are good to go”. It will require you to move relatively slowly and make many passes to cover the entirety of your yard. But boy, will you be surprised by the amount of thatch you pull up. 

It is ideal to use the dethatcher on your yard right before you aerate and seed. This gives your yard a fresh slate to work off of for the most aeration and overseeding. All of those gaps that you notice between the blades will become filled in (if only this could happen to my hair).

The scarifier attachment on the Sun Joe Dethatcher

This machine also comes with a scarifier attachment. Honestly, I had never used or even heard of a scarifier before I used the dethatcher. It basically looks like someone removed the blades out of my blender and put them in this machine. 

The tines inside.

Basically, the scarifier cuts little grooves in your yard to somewhat aerate and cut through small roots and other tricky pieces that might give the dethatcher a hard time. In my experience, I would just use the dethatcher then switch over to a normal aerator to get the job done prior to seeding. 

Renting vs buying the Sun Joe Dethatcher

This is a very easy question for me to answer. Simply put, once I used the dethatcher on my lawn one time, I was addicted. It is incredibly satisfying to pull up a bunch of old grass that has been plaguing my lawn. 

The Greenworks dethatcher is the main competition – we own it, too.

Renting a Sun Joe dethatcher simply is not worth it. This is something I will want to do to my lawn every couple of months. The dethatcher is relatively inexpensive compared to other lawn items, ranging from $150 to $200 depending on where and when you buy. It is on sale on Amazon right now, which is where I got mine.

The Cordless Sun Joe Dethatcher: A new version

For an additional $100 or so, you can purchase a cordless dethatcher. I do not generally recommend getting the cordless version and I will explain why.

The range of the batteries on these will not get me much further than the limit of an extension cord. Meaning, I will not get much of a benefit besides not having to worry about pulling around or tripping over an extension cord. I also hate having clutter in my garage and already have enough battery chargers for my other tools. This comes with two batteries that will simply add more clutter, chargers, and things that I will fall and break my neck on in the garage. 

The official review: Sun Joe Dethatcher

FeatureSun Joe AJ801E
Difficulty to useMuch easier to use than a rake
DurabilityMedium durability
MaintenanceNo maintenance required
ValueHigh value to own vs. rent
For lots <10,000 sq. ftHighly recommended
For lots <1 acreRecommended up to 0.5 acres
For lots >1 acreNot recommended
Our breakdown.

The Sun Joe dethatcher will absolutely change your yard. While this can be a tedious process, it beats out the alternative of breaking your back with a rake. We here at The Lawn Review highly encourage purchasing this product and giving it a try. Once you do your first pass in your lawn, you will be addicted!

Check out our comparison web story we made stacking this one up against the Greenworks dethatcher.

You can grab the Sun Joe dethatcher AJ801E on Amazon for sale right now.

Why would I buy a Sun Joe dethatcher?

I am not really sure who Sun Joe is, but he makes electric yard tools like dethatchers, pressure washers, electric air compressors, and more. Traditionally, dethatching is done with a fine rake across the entirety of your yard. Other than the damage this does to your weekend and lower back, it can put a lot of stress on your living grass. 

The Sun Joe dethatcher AJ801E provides an electronic way for you to simply scoot across your lawn and pull up all of the dead grass. This saves you time and back pain and is much more effective. 

Sun Joe also has a line of winter products, aptly named Snow Joe.

When to use a dethatcher

Dethatchers are great for people who do their own lawn care. Where I see dethatchers being most useful is at the beginning of the spring when the snow has melted. Snow plows and general use around your yard can cause dirt, debris, and rotten roots.

Another great time to use the dethatcher is right before aerating and seeding, typically around October (depending on where you live). This gives the seed fresh ground upon which to grow and takes away competing sources of nutrients like sunlight, nitrogen, and water. 

Why we started The Lawn Review

The reason we started this website in the first place was because we had so much trouble trying to find reasonable, understandable, honest reviews for lawn equipment. And it’s not cheap! After hours and hours of research, trying products and returning them, and messing up our yards – we started this site. 

We have unusual testing methods.

As people who had to learn the hard way, we want you to know exactly what you are signing up for before you purchase a piece of equipment. That’s why we are committed to providing honest, easy-to-understand reviews that mean something.

Exit mobile version