Tyler is the heart and soul behind all of our lawn tool tests. One of the leading voices behind the switch to battery-powered lawn tools, Tyler has been quoted in dozens of articles and news stories providing expertise for normal homeowners.
Tyler started his own lawn care company when in high school and has consulted hundreds of homeowners on proper lawn maintenance, providing lawn tool recommendations, and explaining extremely complex topics about tool mechanics to the masses.
When not testing lawn tools you can check Tyler out over on his Youtube Channel - The Lawn Review. He can also be found on Amazon as an influencer.
Ever since I started working on my Shed Renovation and wearing Brunt gear on the regular, I have been getting stopped and asked questions like I’m a celebrity. Whether I am out at Home Depot grabbing a few last minute supplies for the Shed, or out grabbing dinner with my family – the questions keep coming.
“What kind of boots are those?”
Even at this year’s Equip Expo in Louisville, KY surrounded by other lawn care and DIY enthusiasts, people that are familiar with my type of drip, I was blown away by how many took notice of my boots. Not because they were purple and sparkly, but because they looked extremely comfortable and usable for heavy-duty applications AND wearing casually as I cruise around town.
The boots weren’t the only thing I’ve loved from Brunt, however. Let me give you a rundown of the stuff I’ve worn from them and my experience
If you want to grab some of these, make sure to use code LAWNREVIEW10 for $10 off orders over $60 for new customers.
The Ohman – 6″ Slip-On Work Boot (Soft Toe)
The Ohman work boots have been hands down the piece of gear I get the most questions about. They are extremely comfortable, easy to slide on, durable as heck, and stylish enough to wear in the workshop or out on a date with my wife. I like Soft Toe boots for my purposes – not doing any crazy heavy lifting or working with super heavy machinery. They have a lot of protection and are still very firm, but also flexible for when I am moving things around, working on something overhead, or crawling under my new deck.
Here are the pros:
Super comfortable
Slip proof
Durable yet casual
Leather from the USA
Easy to slip on
Some potential downsides
Mien are soft toe, but they do offer a BRUNT Toe or Comp toe version that is a better for those working in heavier-duty environments
Some folks don’t like slip on
They are a bit pricy – but you get what you pay for
I found mine pretty easy to break in despite being leather. I will have these for many years and wear them basically any chance I get for all four seasons.
The Allard Tech Hoodie
I am a Hoodie enjoyer – especially this time of year when it starts to feel cold basically anywhere you go – indoors or outdoors. I like that it feels heavy enough to keep me warm, but is also moisture wicking so that if I end up getting splashed, get some rain on me, or spill a drink all over myself, I can wipe it right off. It has some nice button snaps on the front – almost like those older Patagonia pullovers, but they’re tighter around the neck which gives me some adaptability for cooling off or warming up. The Allard Tech Hoodie has been one of my favorite new pieces.
Here are the pros:
Looks like I could wear it anywhere, but designed to be element resistant
Large hoodie I can fit my hat under (or hard hat)
Warm
Some potential downsides
If you don’t like comfortable or durable hoodies, you may not like this
My wife gets mad at me because I basically just wear this hoodie all the time now. It works for me because I get away with it anywhere – it’s not like it’s some Nike hoodie that would shred into a million pieces if it lived a day in my life. Nor is it too heavy duty where I walk into a coffee shop and people hold their noses assuming I’ve been mining in the caves of Kentucky all day.
The Torra Pant
The Torra Pant is probably one of my favorite pants I’ve ever worn. Like the other Brunt products, they are comfortable and durable and warm and stylish and all that. But these have blown me away. I have been full blown on my knees crawling around in sawdust and nails and simply stand up, brush my knees off, and the pants are as good as new. I don’t think people recognize how big of a deal it is. Most denim is super stiff or takes a decade to break in, Dickies are a joke and are essentially paper, and these are some sort of alien fabric that somehow are indestructible?
Not only are they super tough, but they are water repellent and somehow have more stretch at the knees than they do other places. One underrated aspect, especially as a content creator, is the cell phone pocket. This is crucial for me as I film a lot of content on my phone, but also if you are generally working outside it can be darn right unsafe to have to reach into your front pocket to get your phone. It also is super hard to grab if you’re wearing gloves. This simplifies the whole experience by making a perfectly sized pocket in the side of the pants. I can quickly grab and return my phone without having to take gloves off or worry about missing a call. It has been a serious gamechanger for me.
Final takeaway
Brunt products absolutely slap. Not only can I wear them for hard work outdoors, but I can wear their products basically anywhere except a black tie function. The bad thing for Brunt is that I think I will have these products for the rest of my life – so not sure how they are supposed to stay in business.
Every year before Easter I make sure to get my lawn prepped and ready to go for the Spring and Summer heat. By nailing this routine, I’m able to get green grass quickly that stays green throughout the year. I’ve missed this window of opportunity before and ended up with more weeds than grass.
My 5-step pre-Easter lawn care checklist:
Complete a soil test kit: soil test kits are the easiest way to get a diagnostic on your yard to determine exactly what it needs. Go ahead and send it in ASAP and complete the next steps while you wait.
Clean the canvas: Get all the sticks, leaves, debris, and anything else off of your lawn that has been sitting there for the past few months.
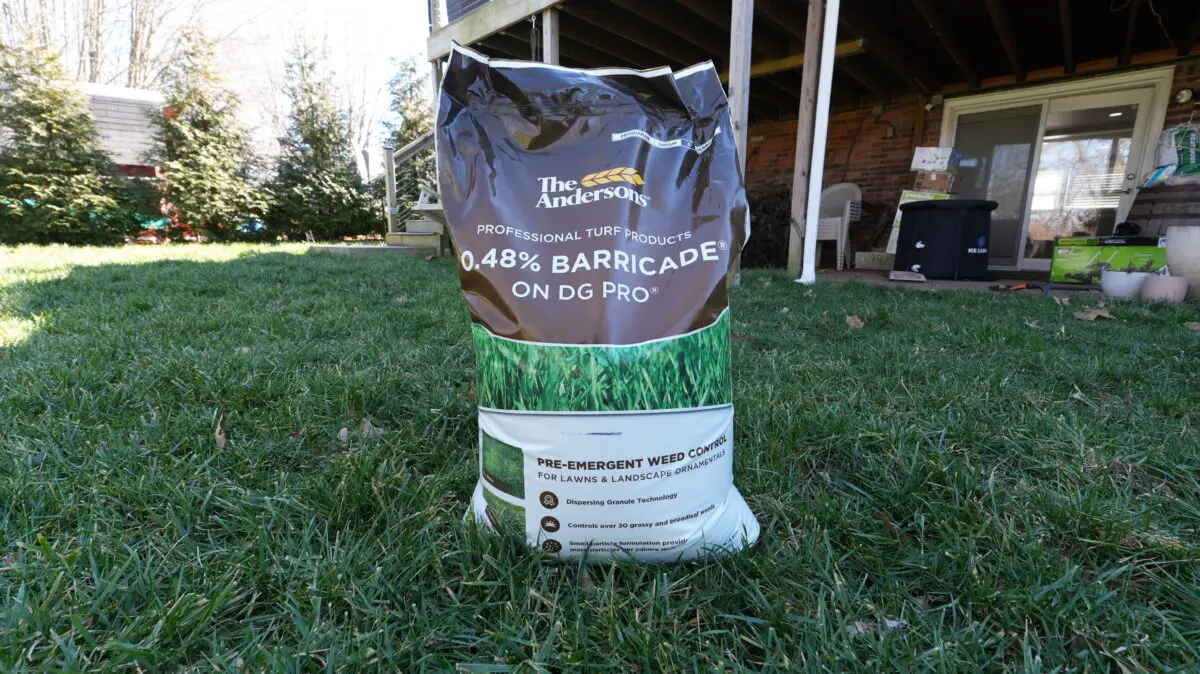
Put down pre-emergent:Pre-emergent is the best way to protect your lawn from invasive grasses and weeds that love to pop-up and choke out your grass.
Use the results from your soil test kit: After a week or so, your soil test kit results should be in and a fertilizer recommendation should have been made. Follow these instructions to make sure your lawn is getting the right nutrients.
Put down mulch:Mulch is a great way to make your lawn stand out and contrast against your perfectly green grass.
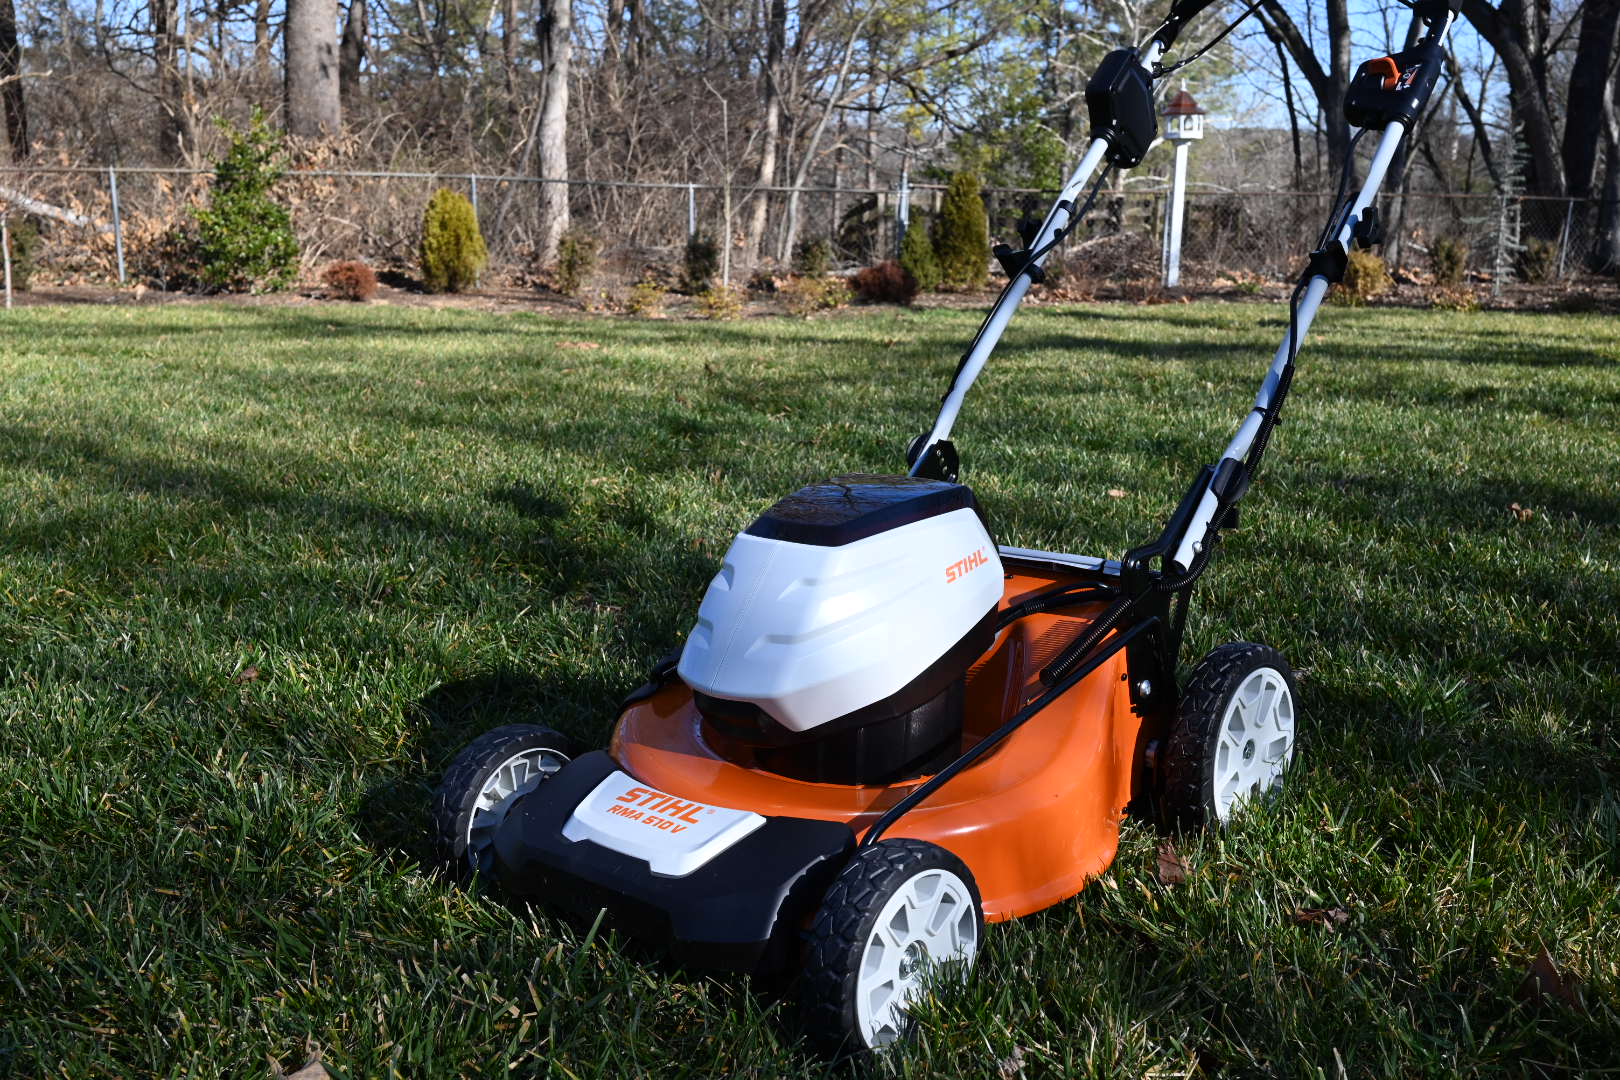
The Stihl RMA 510 V is a battery powered mower recently dropped onto the market by Stihl. The RMA 510V is a good battery powered mower and checks many boxes – but comes in at a premium price point. I don’t recommend it.
If you are wondering why the Stihl electric mower is a big deal, it is mostly because Stihl has historically not made any mowers. Stihl also has not been a major player in the electric space. The investment Stihl has made in their RMA 510 V electric mower signals a huge move.
Here are the pros and cons of the Stilh RMA 510 V after I tested it extensively in my backyard and even tested it against my EGO mower:
Pros:
A nice steel cutting deck
Brushless motor
Great self-propelled function
Super easy to use
Cons:
Expensive
Cannot use battery with many other tools
You can grab the Stihl electric mower at Acme Tools or Northern Tools (I’m NOT an affiliate of either and am providing a 100% honest review).
I tested the all-new Stihl RMA 510 V battery powered mower
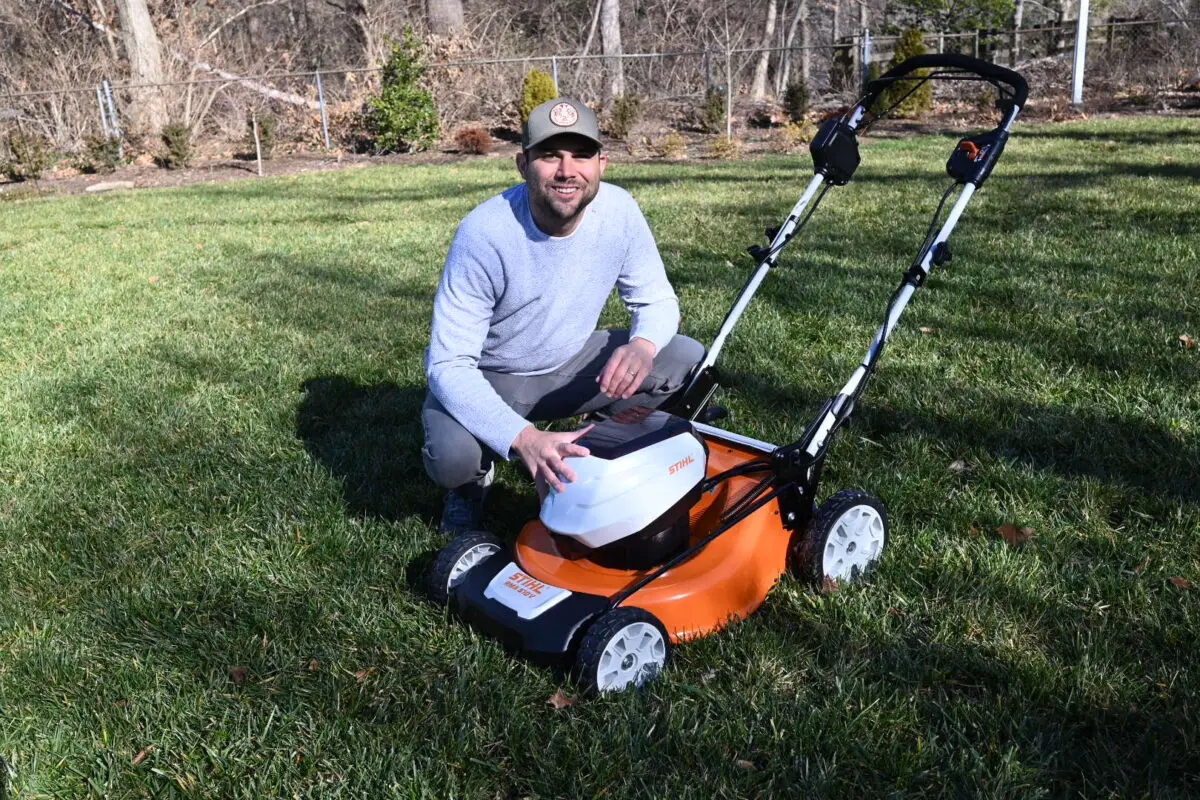
Stihl’s RMA 510 V electric mower got shipped to my house the other day. After I got it unboxed and tested it in my backyard, here were my thoughts. As always, I am going to give you the brutally honest review only The Lawn Review provides.
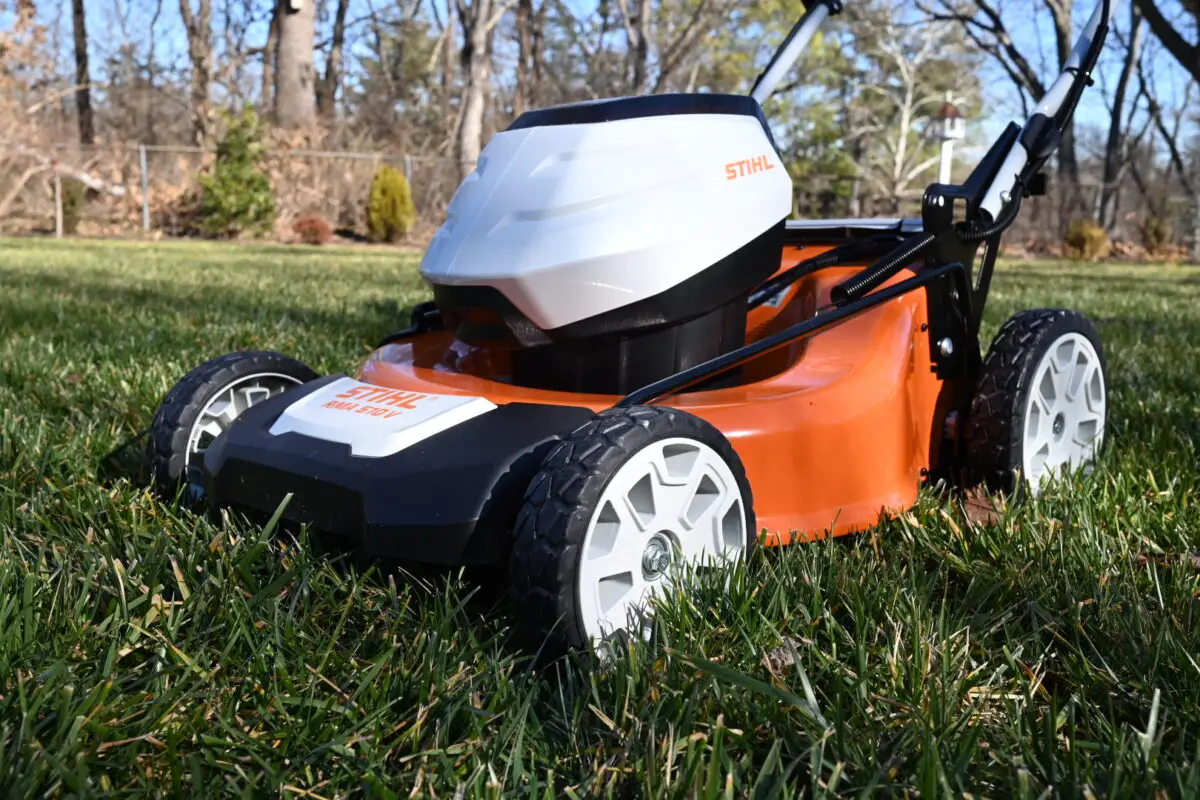
The Stihl RMA 510 V mower has a durable steel cutting deck
Stihl is known for making high quality, durable products so I wasn’t surprised to see they went with a steel cutting deck on their new RMA 510 V electric mower. I liked the metal cutting deck on the Stihl mower because it provides two things.
First, the Stilh RMA 510 V’s metal cutting deck adds additional weight that improves control of the mower. Second, the metal cutting deck is highly durable when compared to competitor’s plastic cutting decks.
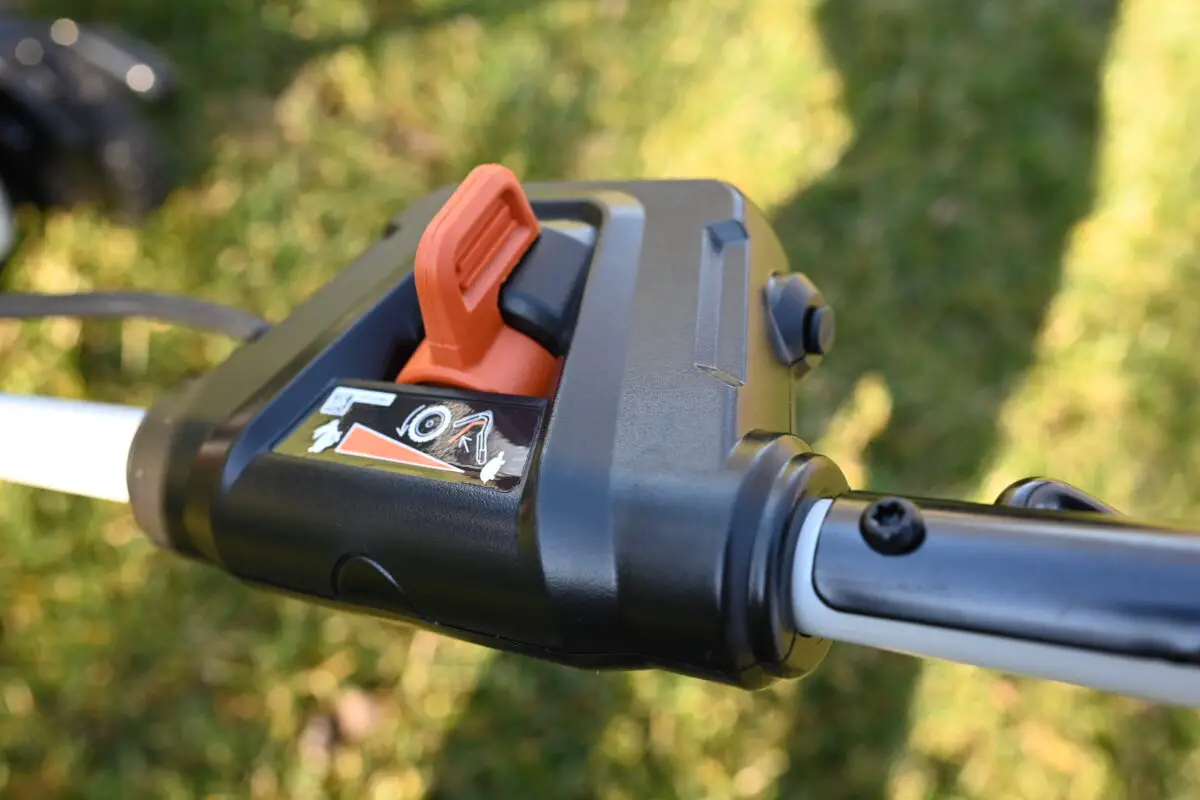
Stihl’s RMA 510 V battery mower has a nice self-propelled function
The self-propelled function on the Stihl RMA 510 V battery mower is super easy to activate. It’s located conveniently on the left side of the handlebars where you can quickly toggle the speed. Many self-propelled lawn mowers have a simple “on” or “off” feature instead of giving you total control of the speed.
The Stihl RMA 510 V has a nice “goldilocks” effect of letting me put it at right about ¾ full speed so I can hustle without getting too sweaty.
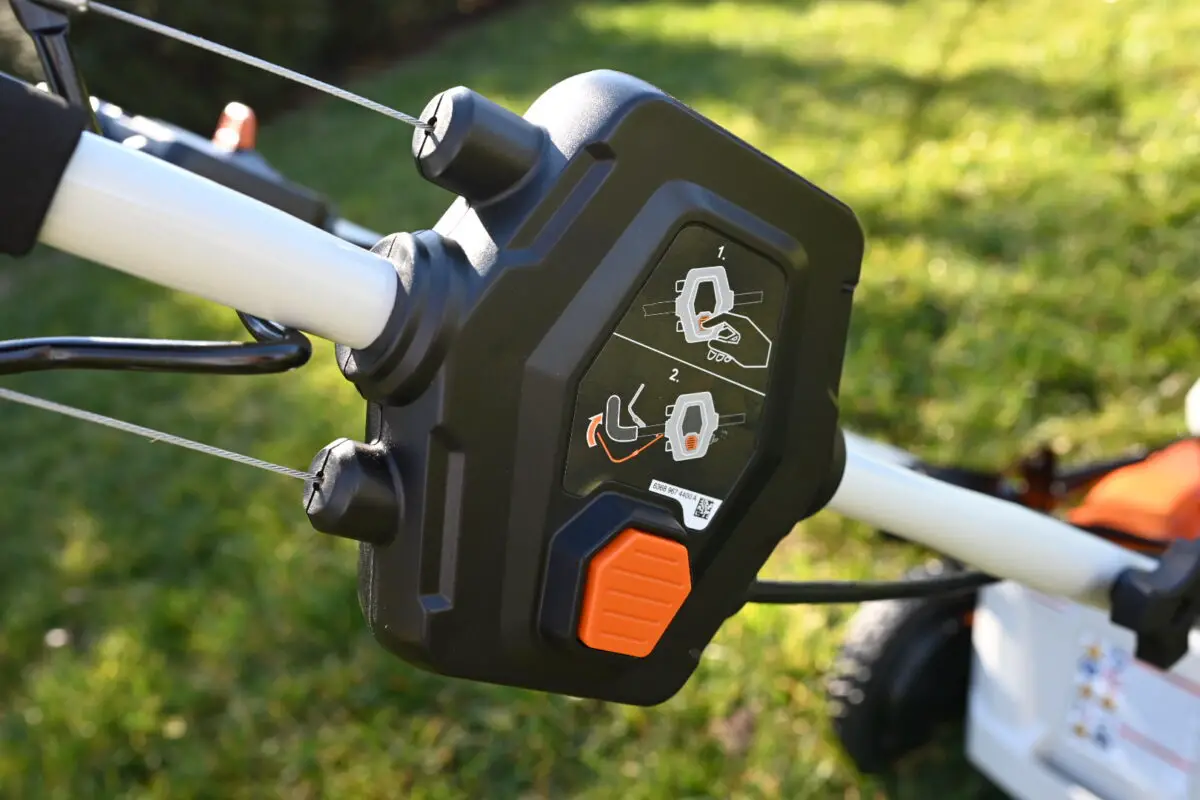
The Stihl mower has all the basics
I like that this mower has a seven-setting height adjustment that makes mowing your lawn in bermudagrass or tall fescue a breeze. Many folks overlook this point, but it is truly versatile all across the great United States.
The RMA 510 V is easy to use, easy to assemble, great for storage, and highly durable.
The Stihl RMA 510 V has a brushless motor – which is important.
Overall – I can’t complain about this mower. If I was handed it for free and got to take it for a spin, I would love it. But the price point is simply too high for me to take the leap when there are other more trusted brands with experience in the battery lawn mower game.
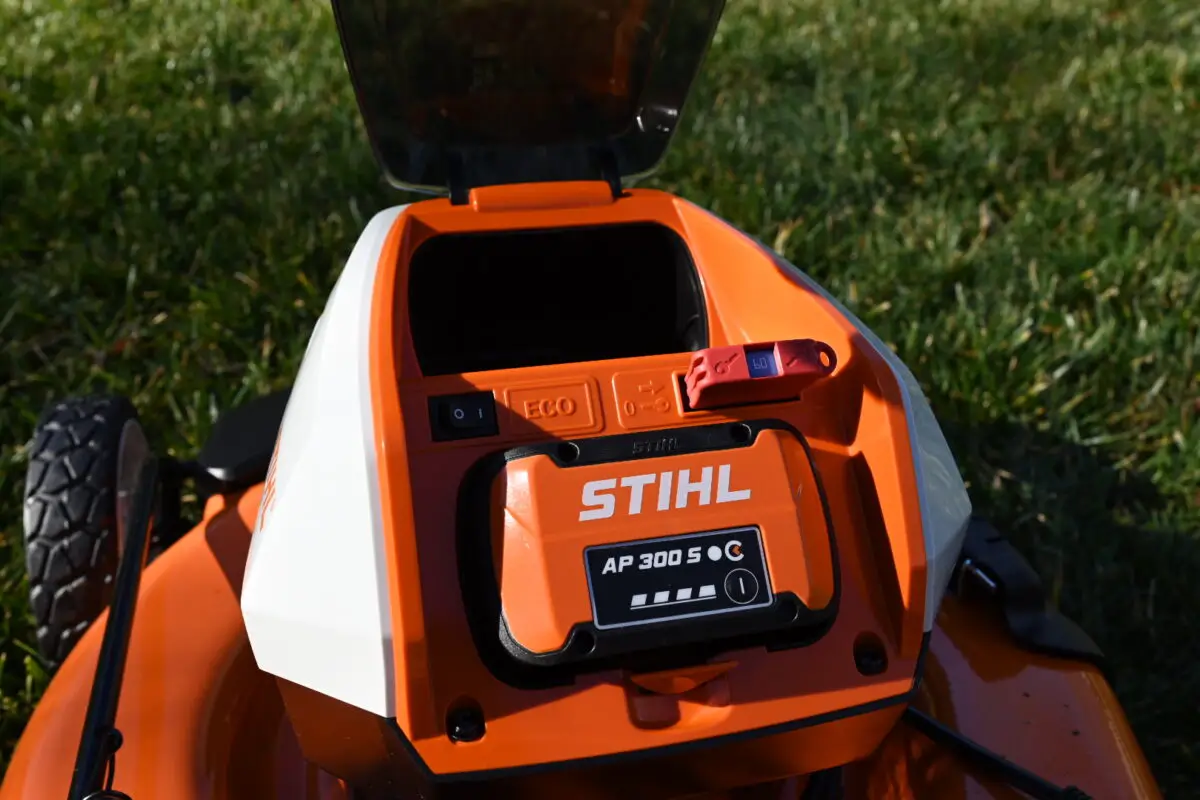
The Stihl RMA 510 V battery system is not expansive
One downside of the Stihl RMA 510 V mower is that the AP 300 S Stihl battery is simply not widely used. With mowers like the Milwaukee M18 mower or the EGO Select Cut XP – you get to use the same battery across hundreds of tools.
When you go with a battery system like Stihl’s RMA 510 V and AP 300 S, you take up charging space in your garage or shed. Not good!
Stihl’s battery mower is expensive
If you buy the full mower kit, the Stihl RMA 510 V battery mower costs you nearly $800. That is too high, in my opinion.
My final review after testing: Stihl RMA 510 V electric mower
I don’t recommend the Stihl RMA 510 V. It has some great features and a solid build, but Stihl has just recently entered the lawn mower game and the battery and electric tool game and I don’t want to be their guinea pig.
How I tested the Stihl RMA 510 V electric mower
I tested the mower the same way I test all of the battery powered mowers I test – by ruthlessly running this mower into the ground. I lowered the deck all the way and put it into some tall fescue, ran it over some sticks, and mowed until the battery died.
The Stihl mower was crying for help by the time I was done – but it had to be truly put to the test to see how it stood up. Overall, I was impressed with how it performed, just not the price point that it is listed for.
FAQ
Here are some common questions I get about Stihl’s RMA 510 V electric mower.
What’s the difference between the Stihl RMA 510 V and the Stihl RMA 510 electric mowers?
The Stihl RMA 510 V has a variable speed self-propelled function whereas the RMA 510 does not.
Is the Stihl RMA 510 V mower worth it?
The Stihl RMA 510 V is expensive for what you get – I don’t think it is worth it.
Does the Stihl RMA 510 V have a brushless motor?
Yes, most of Stilh’s electric tools have brushless motors.
Trust me – it isn’t advertised and I’ve been corrected before!
Why you can trust The Lawn Review
The reason we started this website in the first place was because we had so much trouble trying to find reasonable, understandable, honest reviews for lawn equipment. And it’s not cheap! After hours and hours of research, trying products and returning them, and messing up our yards – we started this site.
As people who had to learn the hard way, we want you to know exactly what you are signing up for before you purchase a piece of equipment. That’s why we are committed to providing honest, easy-to-understand reviews that mean something.
What to look for in an electric mower brand
When looking to purchase an electric lawn mower, you need to make sure you understand what things matter. You will get hit with a lot of technical specifications and marketing tactics. Totally forget them and focus on the things that impact you. Below are my recommendations:
Battery powered mower brand quality
Quality is going to be super important here. Just about everyone is in the electric mower game these days and there are a ton of junky mowers out there. Avoid anything from a weird brand on Amazon that takes 9 years to ship. It is probably being 3D printed in a Laotian bathroom. Go for brands that have consistent quality and focus on the details, not just flashy colors.
Some brands I trust off the top of my head are: Greenworks, Milwaukee, Makita, Toro, EGO, and Kobalt. SOME Ryobi mowers, although myself and others have had some problems with reliability. Brand quality matters, but it’s also important to look at the specs on each. For example, Greenworks sells like 60 mowers, only a handful of them would I ever consider for this list. EGO also sells a bunch of mowers, and only a few are within an acceptable price range to be on this list.
Metal where it matters: the deck
Most electric mowers are plastic-y. Probably to reduce the weight of the mower so that the battery can get you further, but it feels cheap. Make sure to get metal where it matters – namely the deck. The deck is the part that covers the blades. Don’t get plastic here – a rock can rip through it.
Battery interoperability.
A ten dollar word used here, but really just make sure to buy a mower with a battery that is compatible with other electric tools. You’ll see a bunch of these brands that have battery lines that work with a ton of tools. Milwaukee, Makita, and Dewalt are all great options because you can use them for all lawn tools AND power tools – saving you a ton of money on extra batteries.
If you have more questions, check out our guide to electric lawn mowers, where we break this down into a lot more detail.
Self-propelled or not
Self-propelled mowers are lawn mowers that slowly crawl forward when mowing the lawn. They propel forward the mower, taking off a lot of the “pushing power” required by traditional push mowers.
Self-propelled mowers are ALWAYS more expensive because they have the additional power and functionality that makes life easier. They have their place, but because of the cost can often seem not totally worth it
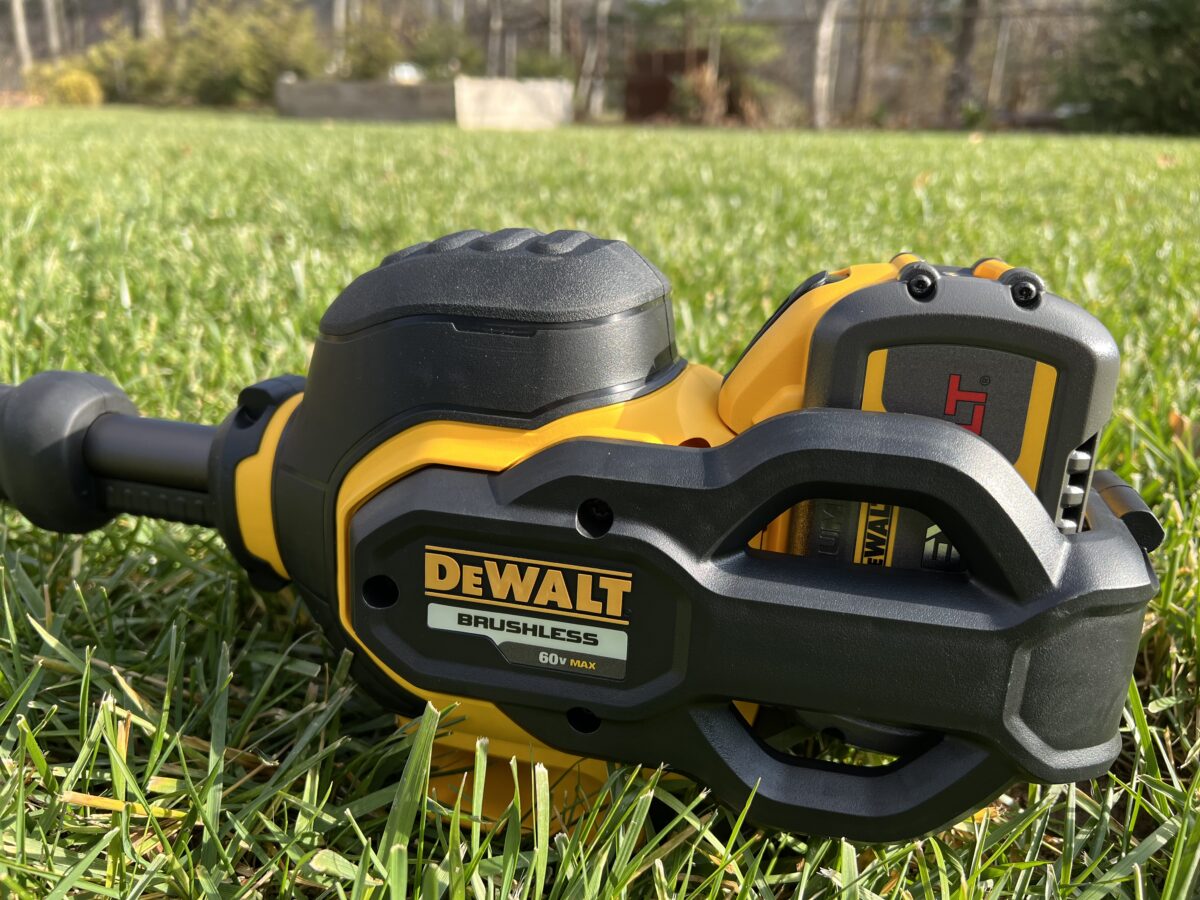
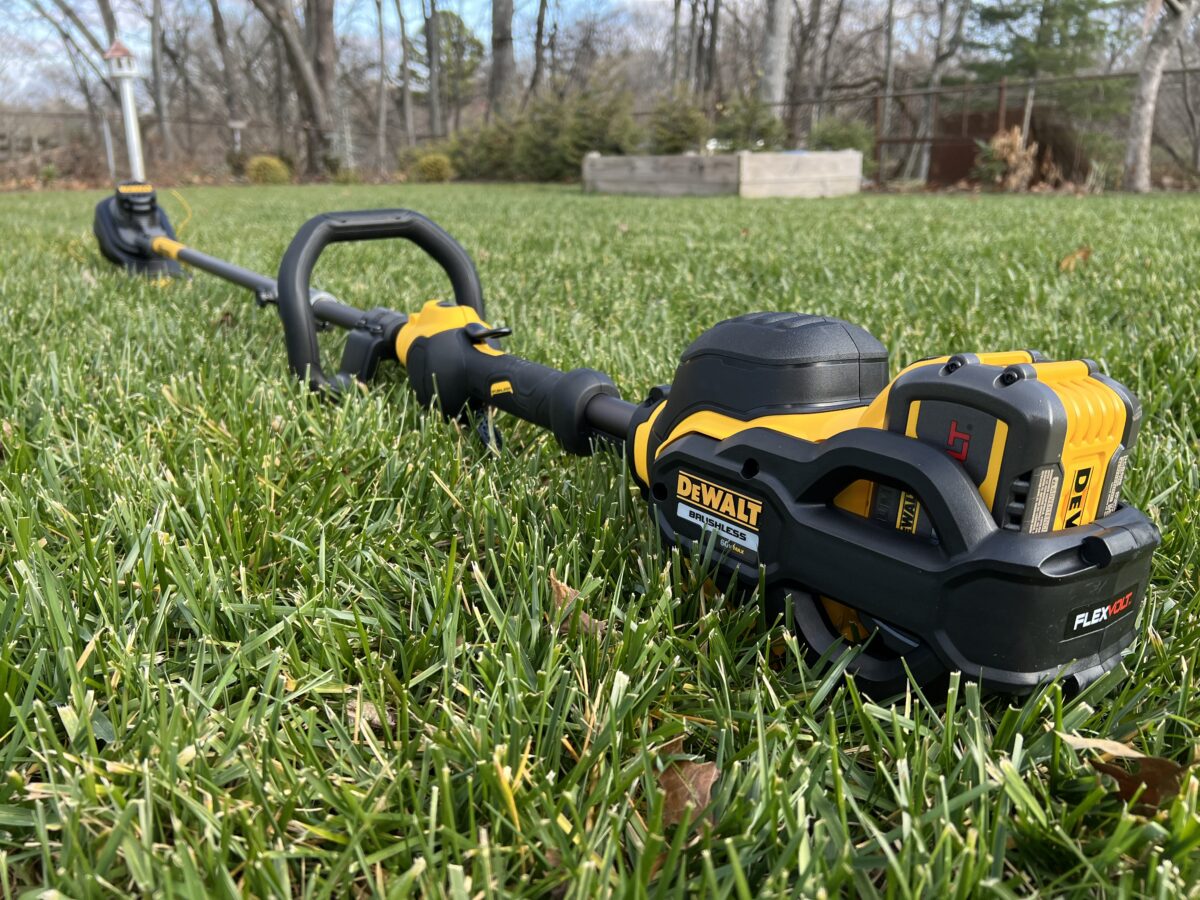
The Dewalt 60V MAX string trimmer was delivered to my house a few weeks ago. I tested out this weed eater, putting it through the gauntlet, to see if it was truly worth the hype.
This Dewalt string trimmer review is really part of a broader set of string trimmers that I put to the test to find the best string trimmer on the planet. You can follow along on our YouTube channel, The Lawn Review.
Bottom Line: The Dewalt 60V Max string trimmer was shockingly powerful and felt very “solid”. This one has all the features I recommend in a weed eater. Grab it from Home Depot for a great price.
Dewalt 60V MAX String Trimmer: Testing each feature
I have a process when it comes to reviewing a string trimmer. I always check for power, durability, usability, and battery performance. My methods can be unusual, but I think they give you a good look into what it’s like to use this string trimmer before you buy it.
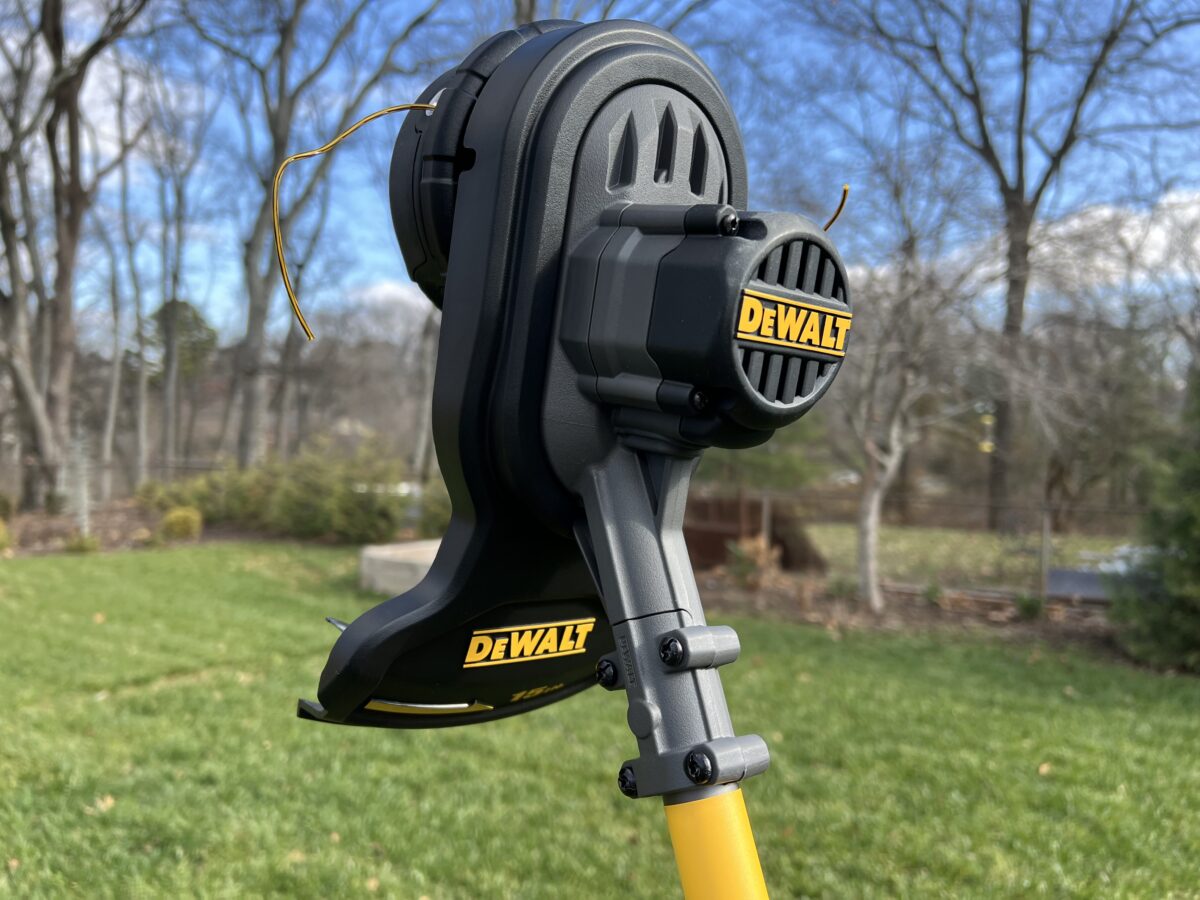
The Dewalt 60V Max String Trimmer has a powerful cutting swath
Dewalt’s 60V MAX string trimmer has the ability to level up to a 17 inch cutting swath. Folks, the larger the cutting swath, the more powerful a string trimmer is. The normal range for a battery powered weed eater is somewhere around 12-15 inches.
At 17 inches, the Dewalt 60V Max string trimmer is nearly unrivaled. I believe EGO has a string trimmer that can cut this wide but to find that width anywhere else, you would need to check out a gas-powered string trimmer.
One recommendation I have for this Dewalt String Trimmer: replace the string trimmer line right away. I don’t like the rounded, twisty kind that comes with it – I recommend using the GrassKicker weed eater string that we created specifically to replace the stock kind.
Dewalt’s 60V Max string trimmer has a durable brushless motor
One thing I love about the Dewalt products I have reviewed, like the Dewalt 60V blower and Dewalt self-propelled mower, are the fact that they come with brushless motors. Brushless motors are basically newer, higher quality electric motors that use less friction to generate power from the battery.
The Dewalt 60V MAX string trimmer has a brushless motor – meaning it has a longer run time, cooler running motor, and longer life. Dewalt backs this up with a 3 year limited warranty and 90 day money back guarantee. Pretty sweet deal!
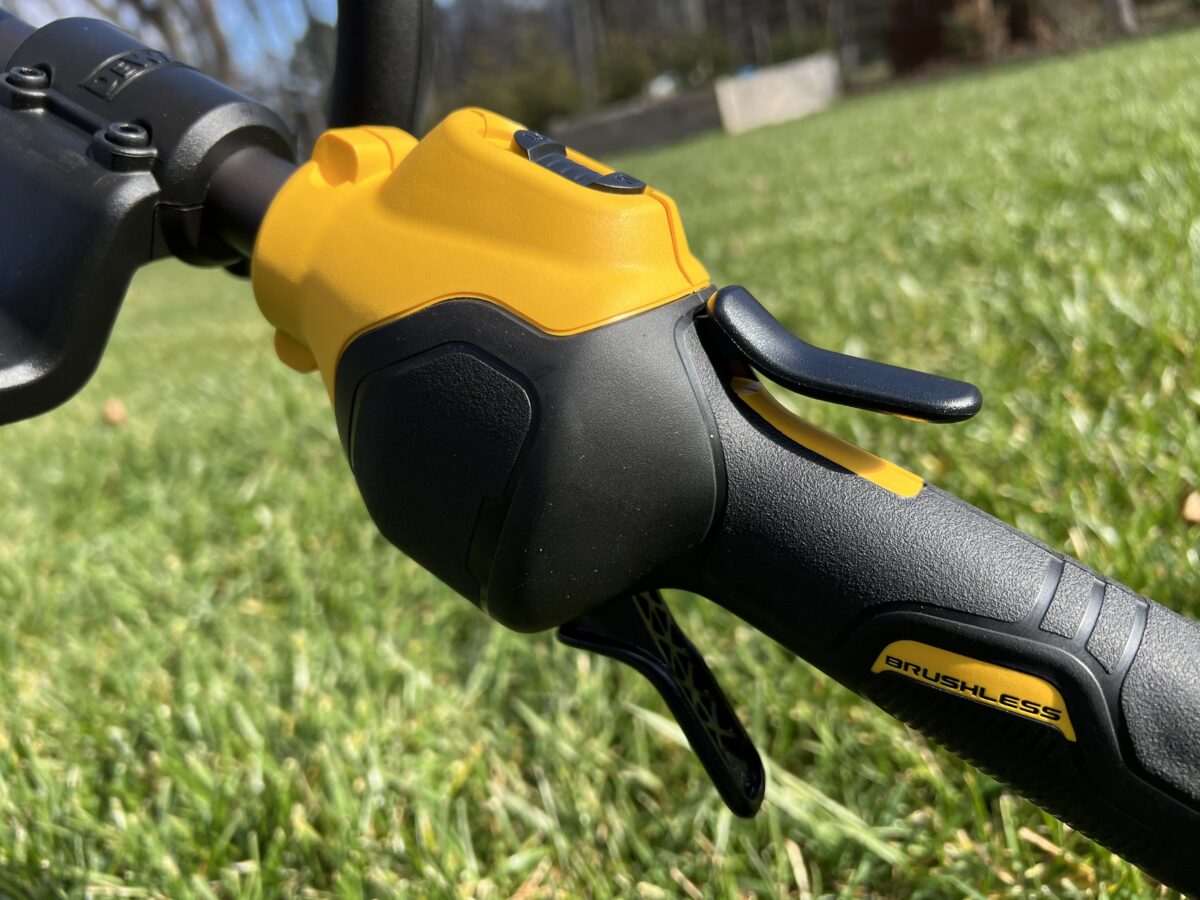
The Dewalt 60V trimmer has a ton of convenient features
One of my favorite features of the Dewalt 60V Max string trimmer is that it has universal attachment capabilities. In fact, it is one of my favorite string trimmers with attachments on the market. Universal attachment capabilities mean that you can use any universal attachment from other brands and probably that random one you have sitting in your garage.
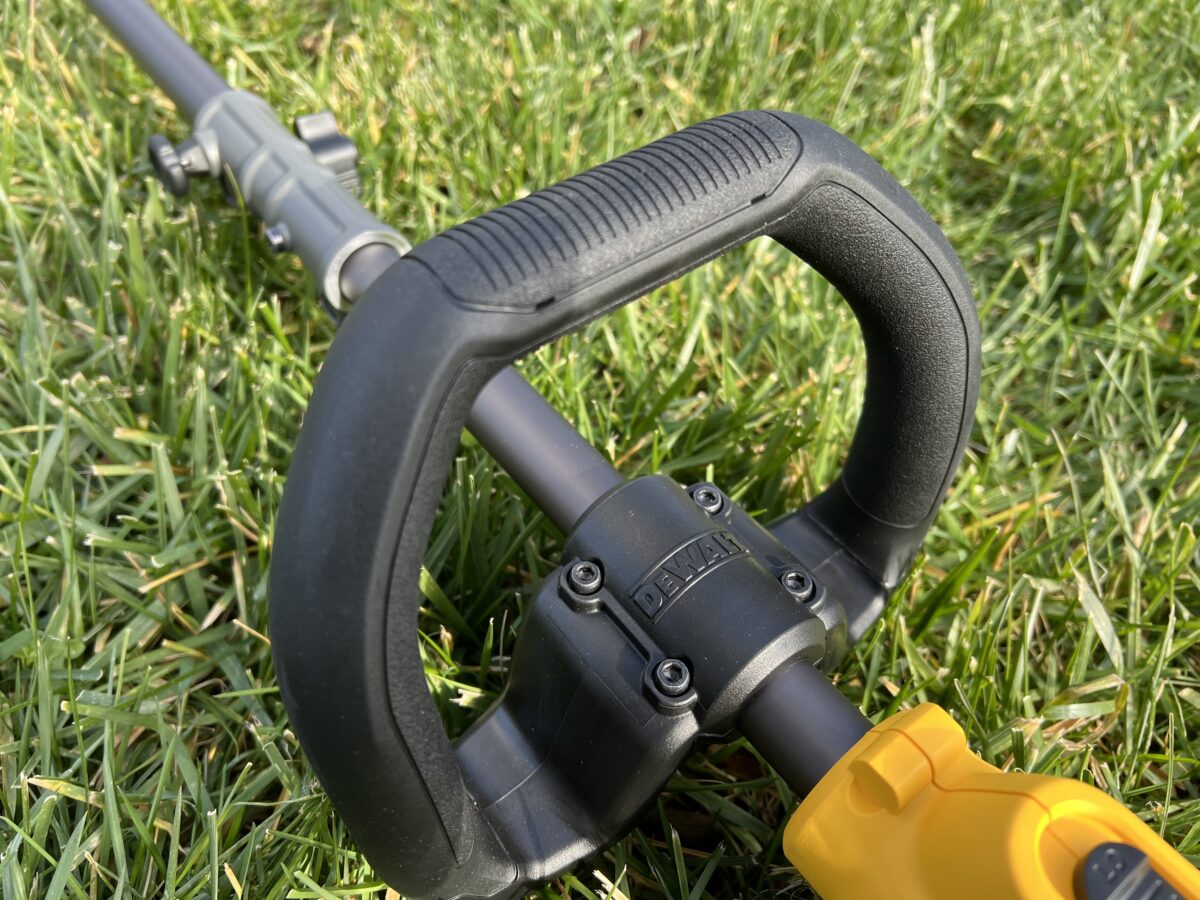
Not only does it have attachment capabilities, but this Dewalt 60V string trimmer has a variable speed trigger with two speed settings and a molded rubber grip and D-loop handle. These features make the string trimmer easy to hold for long periods of time. The two different high and low speed setting adjustments can be used to amp up the RPMs on this trimmer, though I would probably never take it off high.
The battery performance is as expected
The 3 Ah battery on this Dewalt 60V Max String Trimmer is pretty good. For a battery-powered tool, you get decent run time – definitely enough to trim a yard that is about a ½ acre on a single charge.
Battery performance on a string trimmer varies wildly because of different thicknesses of grass, starting and stopping, and whether or not you use the trimmer to edge. Under normal circumstances, I think you could use this string trimmer for about 40-45 minutes before the battery dies.
Lastly, this 60v Max battery series from Dewalt has a bunch of other tools you can use with it, including their blowers, chainsaws, and lawn mowers. You can save a ton of money buying the tool-only version of their tools and using one battery.
Final review after personal testing: Dewalt 60V String Trimmer
The Dewalt 60V Max string trimmer is a solid, powerful tool that will absolutely crush grass in your yard. Don’t overlook this string trimmer just because Dewalt is mostly known for their hand tools. I have tested dozens of battery powered string trimmers and this one is up at the top of the list.
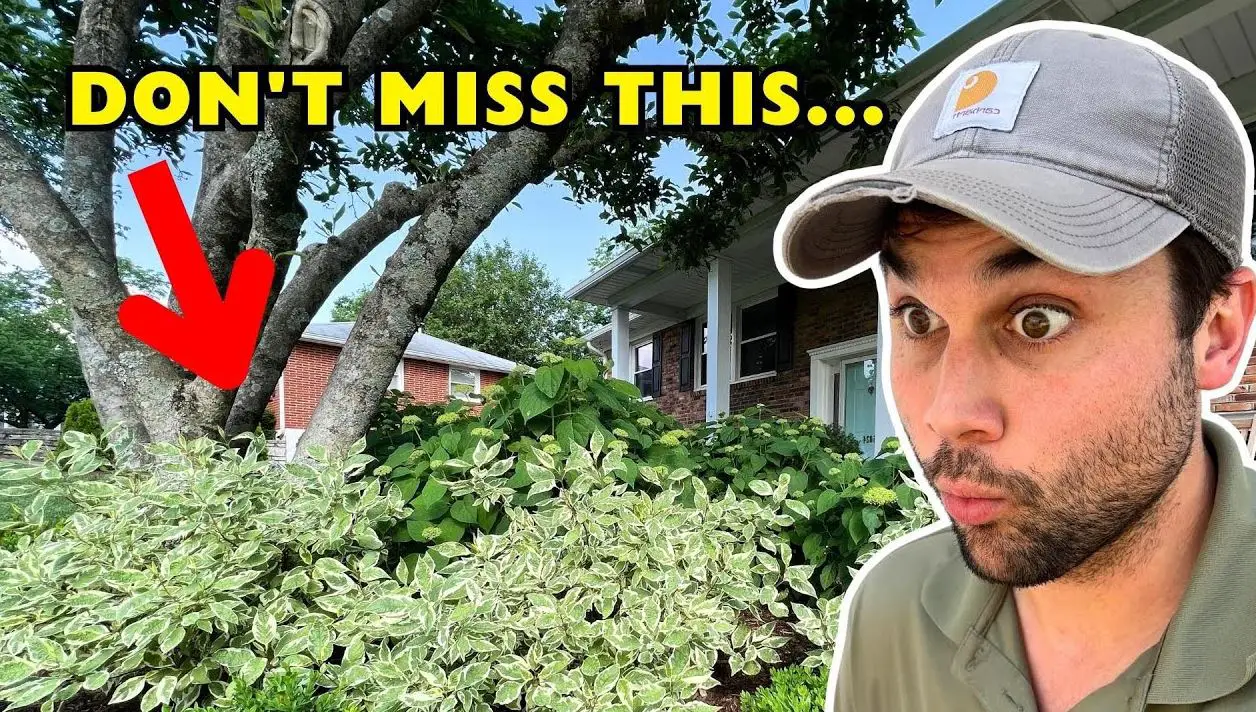
I’ve never lost a plant to disease, fungus, insect, or mites! In this guide, I’ll share with you the secrets of maintaining thriving outdoor plants. You’ll learn exactly what I do, when I do it, and how I do it to keep my backyard green and flourishing. You can read the below or check out my Youtube video that walks through the whole process.
Let’s dive into the key points covered in this guide and unveil the secrets to successful outdoor plant care.
Choosing the Right Products
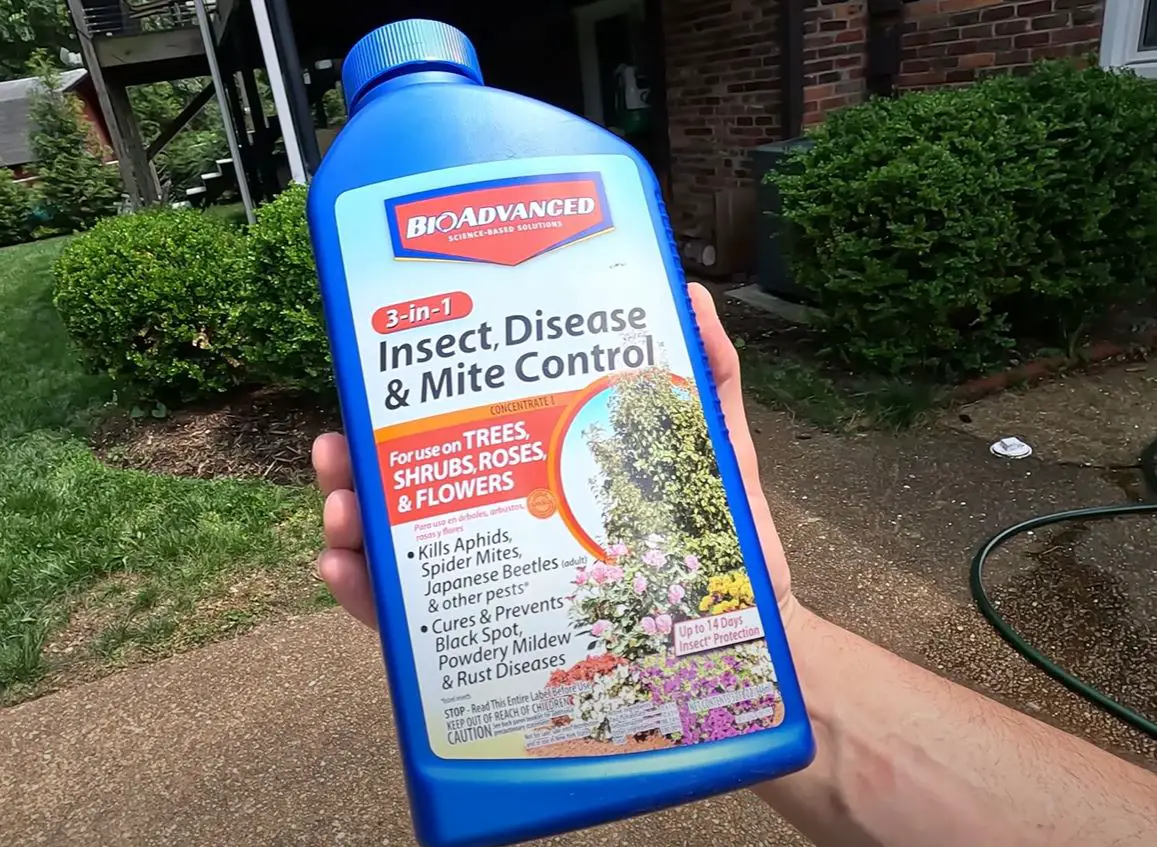
The first step in ensuring the health of your outdoor plants is choosing the right products. Bioadvanced offers a range of solutions, and one that’s particularly effective is the Bioadvanced 3-in-1 product that you can grab on Amazon.
This versatile formula is designed to protect your plants against insects, diseases, and mites. It’s a valuable tool in my gardening arsenal and what I would consider my “secret weapon”. Bioadvanced offers other specialized products like the Tree & Shrub Protect & Feed, Complete Insect Killer, Rose and Flower Care, and Fruit Citrus & Vegetable Insect Control. I use the rose version on my knock out roses.
Each of these products serves a specific purpose, so select the one that fits your plants and what you’re trying to accomplish.
Note: this is not a sponsored post in any way. I talk a lot about Bioadvanced but have never had communication with them and certainly never been paid to use or talk about their products.
Bioadvanced 3-in-1: Your Garden’s Best Friend
Bioadvanced 3-in-1 is truly a garden’s best friend. It’s a game-changer when it comes to warding off potential threats. This all-in-one solution simplifies my outdoor plant maintenance routine, making it incredibly easy to protectmy garden from pests, diseases, and mites (where the 3 in 3-in-1 comes from).
Bioadvanced offers a well-rounded approach to plant care, ensuring that your garden remains vibrant and pest-free. It’s an excellent choice for those who value the simplicity of a one-size-fits-all solution. If you know me, you know I’m rocking the three-in-one shampoo, conditioner and body wash just like every other guy out there. Bioadvanced does the same thing for your plants.
Quick aside: Using Bioadvanced Rose and Flower Care
When it comes to taking care of my flowering plants, Bioadvanced’s Rose and Flower Care is my go-to solution. This product is specially formulated to provide the essential nutrients and protection these delicate plants need.
With regular use, I get stunning blooms and healthy foliage throughout the season. It’s as simple as applying the product according to the instructions, and your roses and flowers will absolutely pop all season long. No more getting demolished by bugs!
How I apply these products to my plants
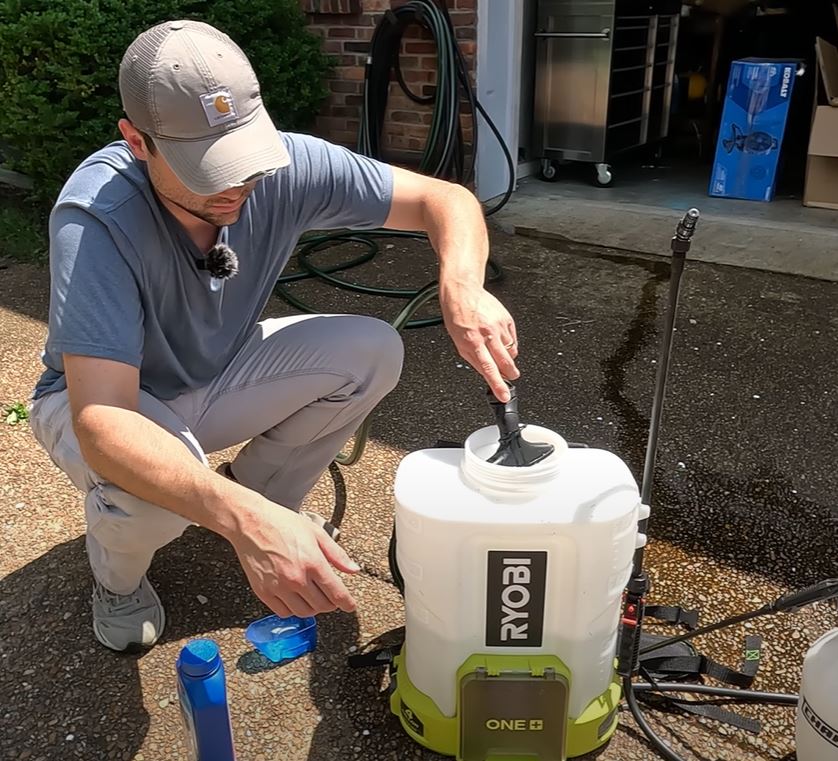
To ensure the effectiveness of these products, it’s crucial to follow the recommended application instructions. Timing is essential. Applying the solution at the right time can make all the difference.
For example, in spring, as new growth starts to emerge, it’s an ideal time to protect your plants with Bioadvanced 3-in-1. Frequent monitoring and applying treatments as needed is also key. Regular inspections will help you identify potential issues early, ensuring your plants are never caught off guard by pests or diseases.
Prioritize Prevention Over Cure
One of the most crucial lessons I’ve learned in my gardening journey is that an ounce of prevention is worth more than a pound of cure (something my mom always said). Translation: it’s easier and more effective to prevent problems from occurring in the first place rather than trying to treat them once they’ve taken hold.
This is where products like Bioadvanced’s 3-in-1 shine – they serve as a proactive shield against potential threats. Your outdoor plants will thank you for the extra care and attention.
Proper Outdoor Plant Maintenance
Alongside using the right products, maintaining your outdoor plants involves various other aspects. Regular watering, appropriate sunlight, and the right soil conditions are equally important. Additionally, pruning and deadheading help your plants channel their energy more effectively and keep them looking tidy and attractive. Be sure to research the specific needs of your plants to create a suitable maintenance routine.
Careful Observation and Adaptation
Gardening isn’t just about following a set of rules; it’s about observing your plants and adapting your care routine accordingly. Pay close attention to the behavior of your plants. If you notice any changes or signs of distress, act promptly. It’s crucial to address issues early to prevent them from spreading to other parts of your garden. By being attentive, you can ensure that your outdoor plants remain in top-notch condition.
Share Your Thoughts With Us!
I’ve shared my tried-and-true methods for keeping outdoor plants healthy, vibrant, and thriving. Now, it’s your turn! I’d love to hear about your experiences and any additional tips you have for plant care. Gardening is a community, and we all benefit from sharing our knowledge and expertise.
Let’s continue to nurture our green spaces and create beautiful, thriving gardens. Find us on Youtube!
Final thoughts on Bioadvanced
Maintaining outdoor plants doesn’t have to be that hard – it isn’t like having a pet or a child. With the right products, timely care, and careful observation, you can ensure that your garden remains disease-free and teeming with life. By grabbing some Bioadvanced products, following their instructions, and adapting your care routine to the needs of your plants, you’ll be well on your way to becoming a successful plant mom or dad.
Maintaining a beautiful lawn is a source of pride for many homeowners (me), and it’s no secret that a lush Spring lawn starts with proper care in the Fall.
In a recent Youtube video I made titled “The TRUTH about FALL Lawn Care that the PROS know. (5 STEPS),” I share my valuable insights into Fall lawn care. Let’s dive into the main points of my Fall lawn routine to uncover the secrets the pros swear by.
Here are the steps for a perfect Fall lawn:
Clearing the surface of your lawn
Mowing at the right height
Aerating your lawn with a core aerator (you can rent from Home Depot)
Overseeding with a spreader
Implementing weed control and a consistent watering schedule
I cannot overemphasize the importance of clearing the surface of your lawn. This means removing debris, sticks, dog poop, leaves, and any clutter that may have accumulated over the summer.
A clean surface provides a fresh start for your lawn as your grass prepares to enter the dormant winter phase. This step takes a few minutes, but its impact on your lawn’s health is invaluable.
One of the sneakiest but most crucial steps for maintaining a healthy lawn in the Fall is proper mowing. In my video I delve into the importance of mowing at the right height. The pros recommend gradually lowering your mower blade height with each cut as fall progresses.
This technique ensures that your grass doesn’t become too long and susceptible to diseases like snow mold. Additionally, I recommend not removing more than one-third of the grass blade’s height in a single mowing session to maintain the lawn’s vitality.
Aerating the lawn with a core aerator
Aeration is a key practice that helps your lawn breathe. Aerating your lawn involves perforating the soil with small holes to allow nutrients, water, and air to penetrate the roots. Aeration is essential in reducing soil compaction and thatch, both of which can hinder your lawn’s growth. This step is essential for ensuring that your grass receives the nourishment it needs to thrive.
You can pair this step with dethatching, which is the process of removing thatch (dead grass) from your lawn’s surface. Combined, these two will allow your lawn to become fully oxygenated and receive sunlight and nutrients that give you.. You can read more about my experience with dethatchers here.
Pro tip: You can rent this thing from Home Depot (like I did) for super cheap.
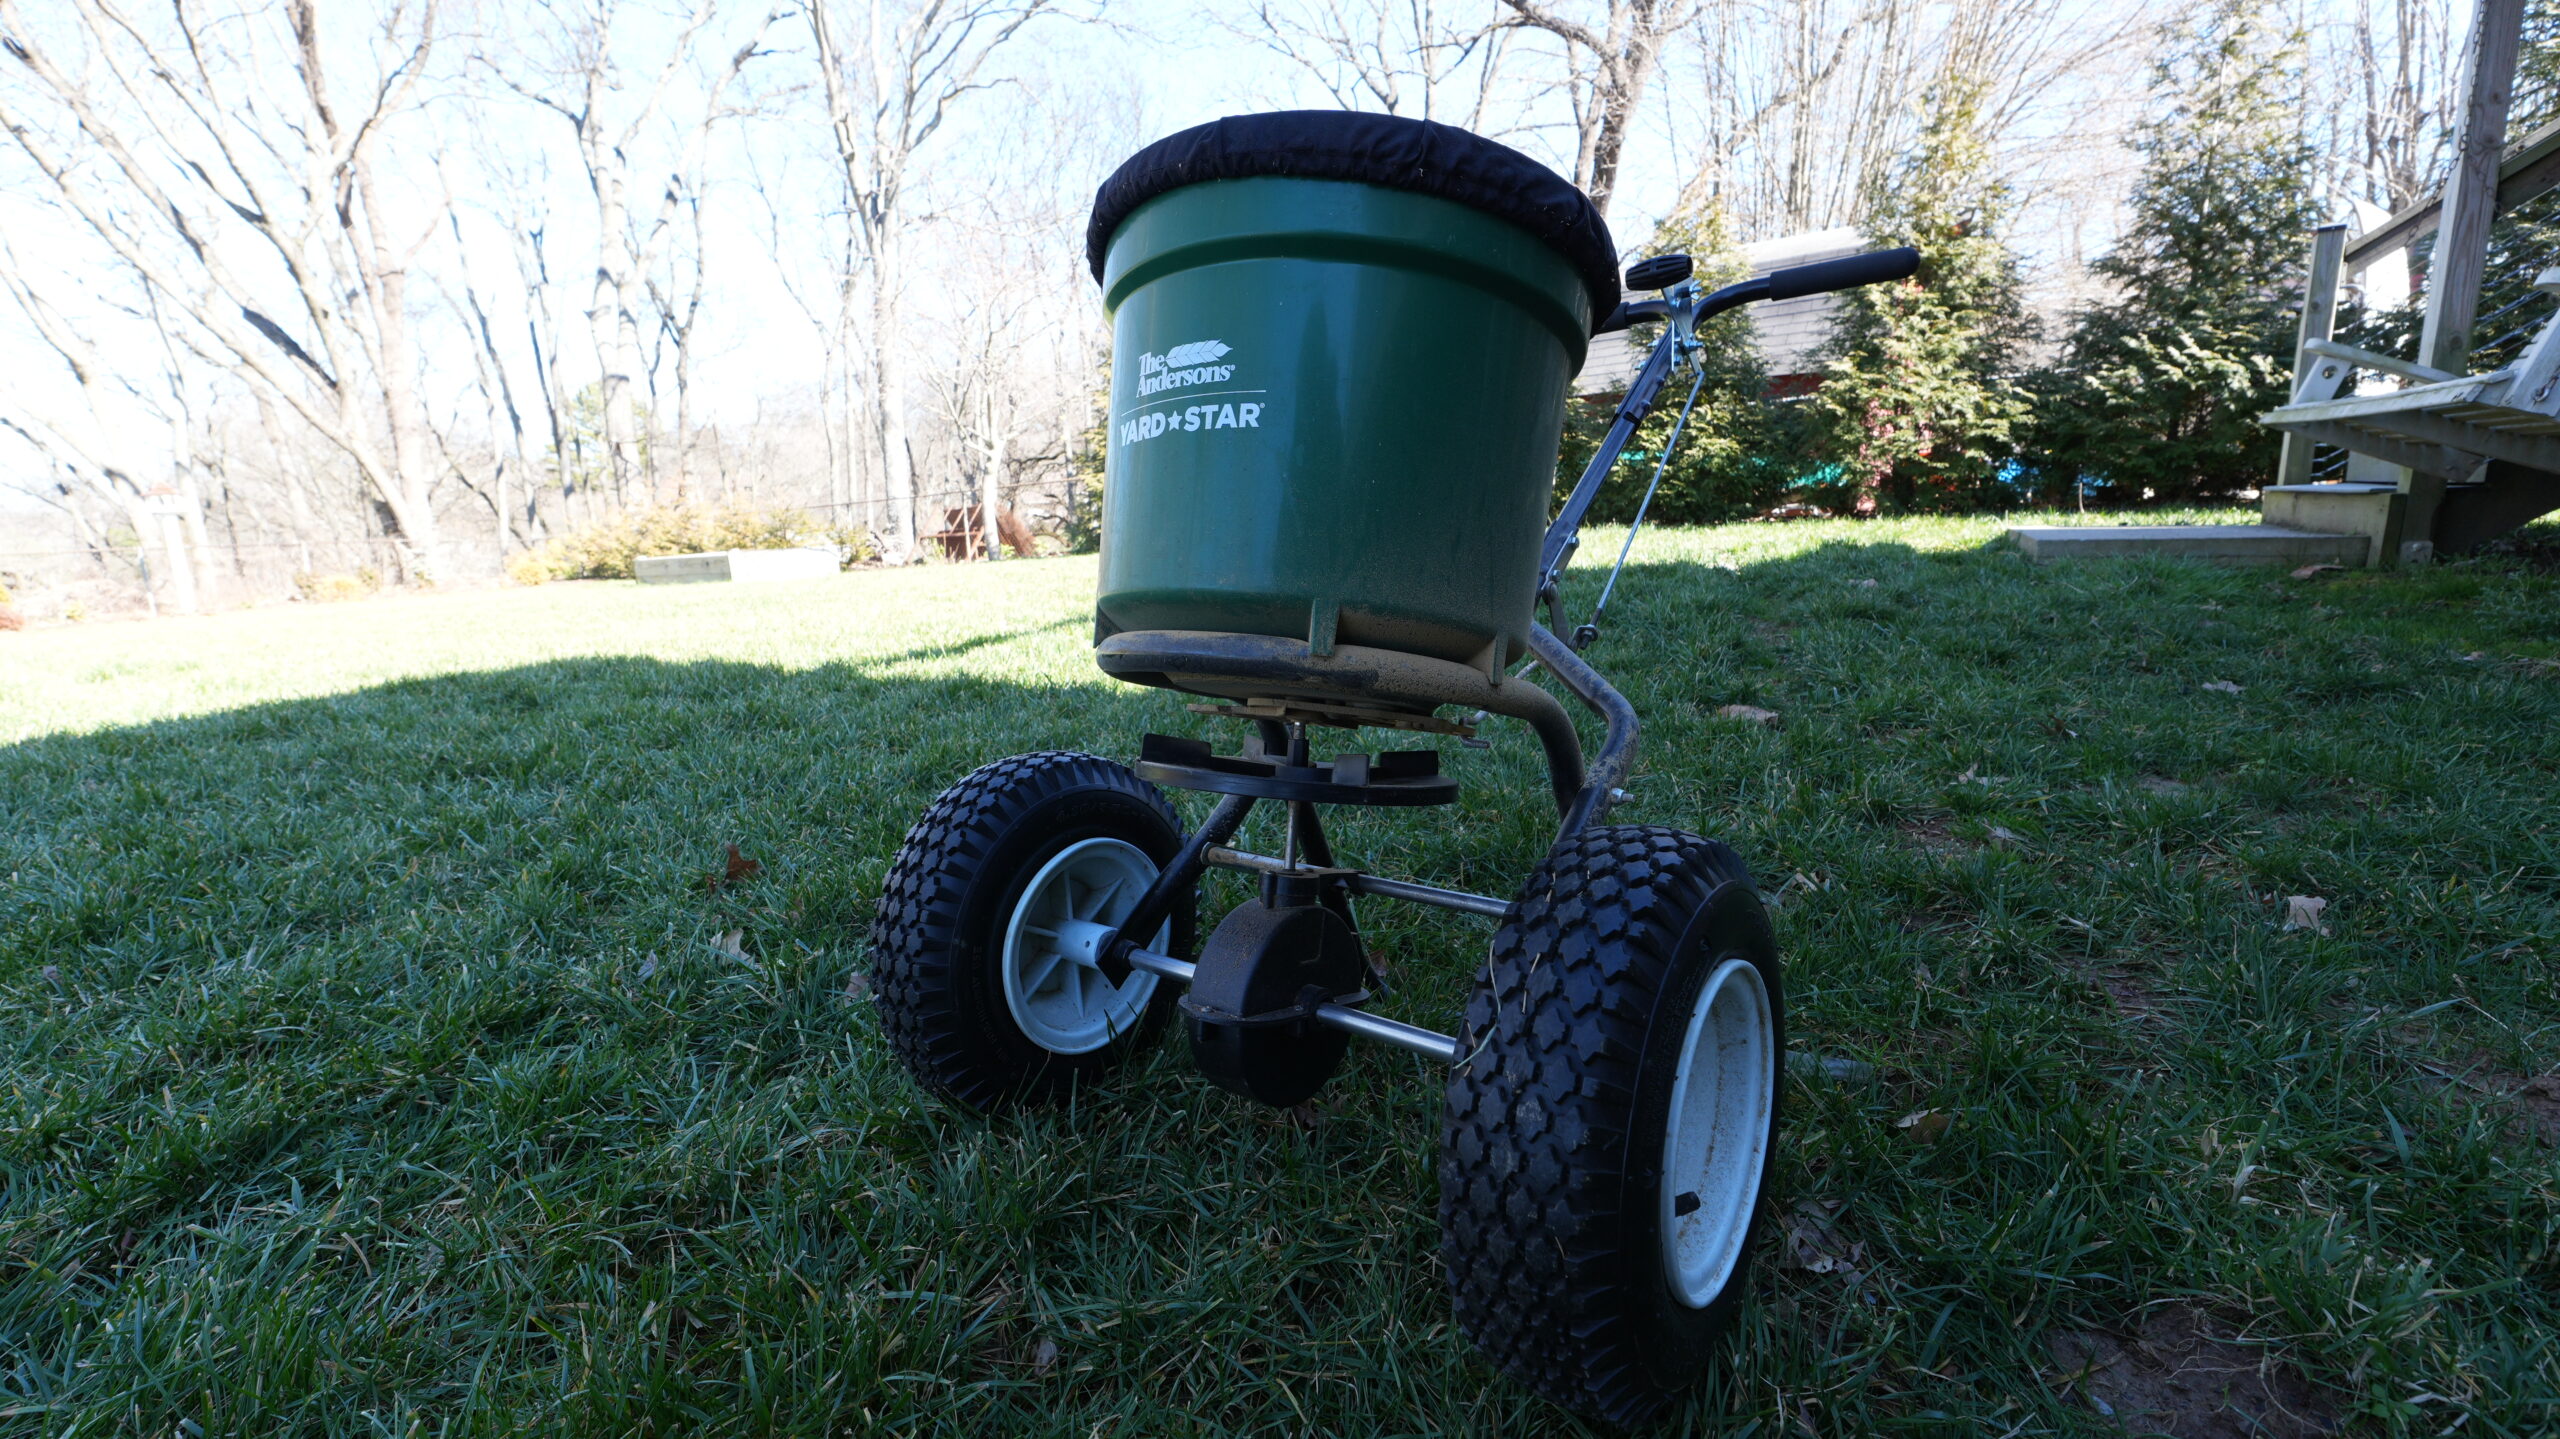
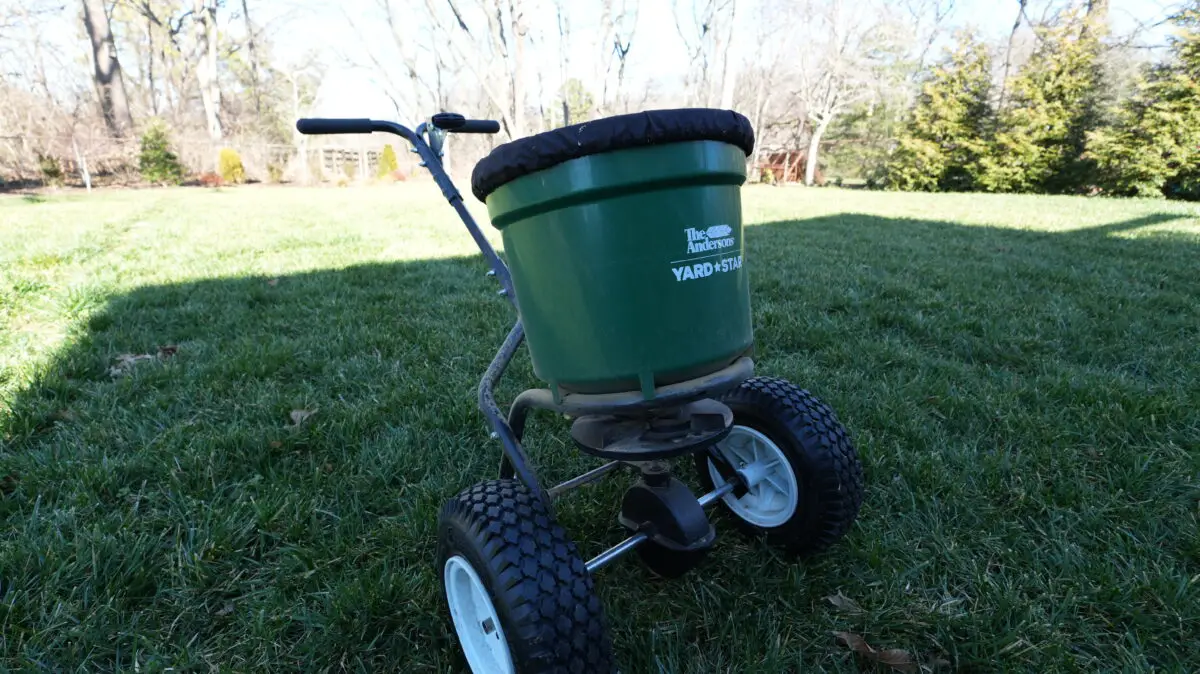
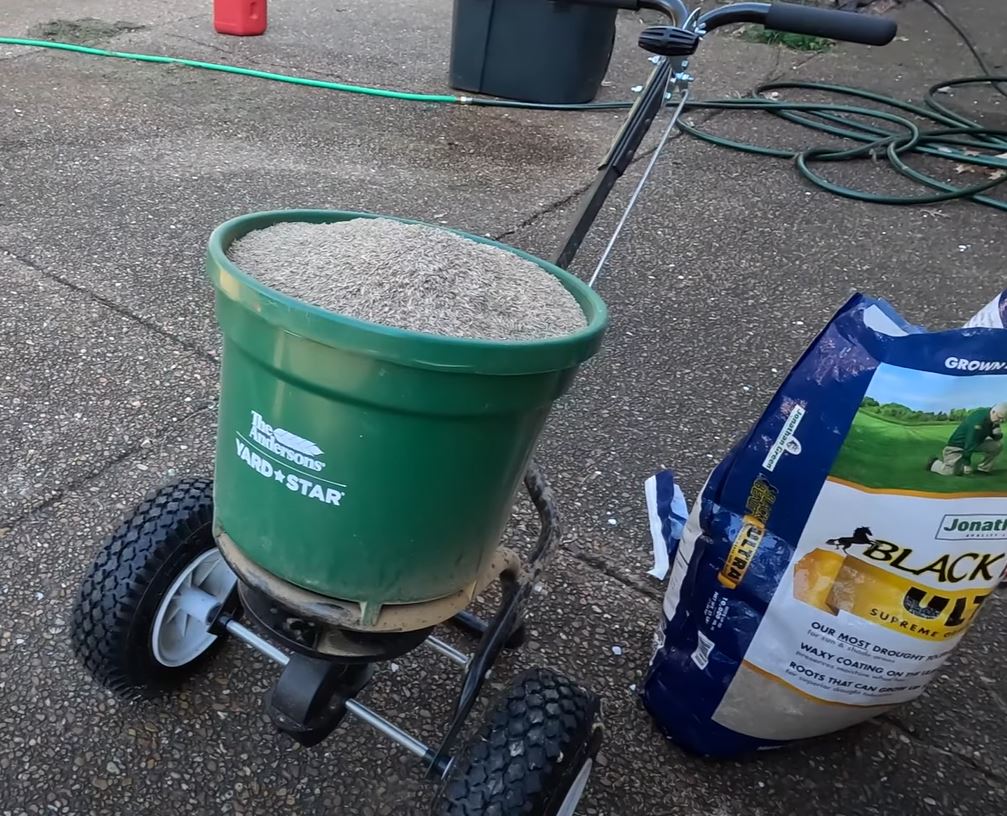
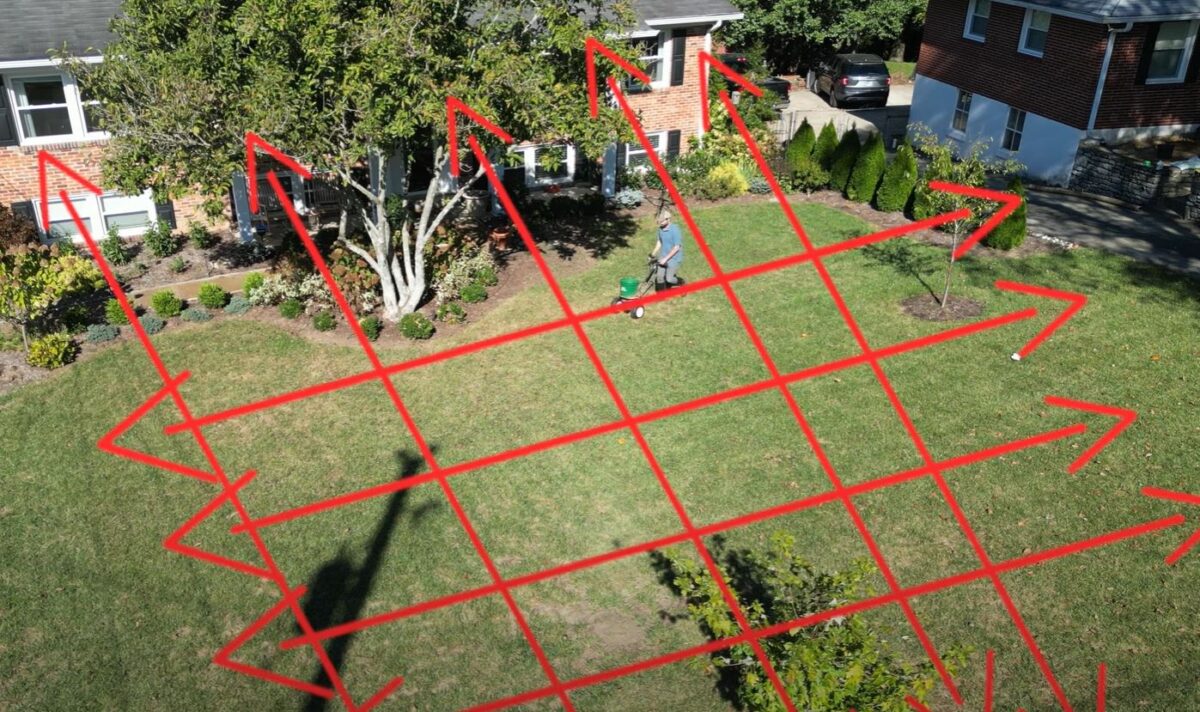
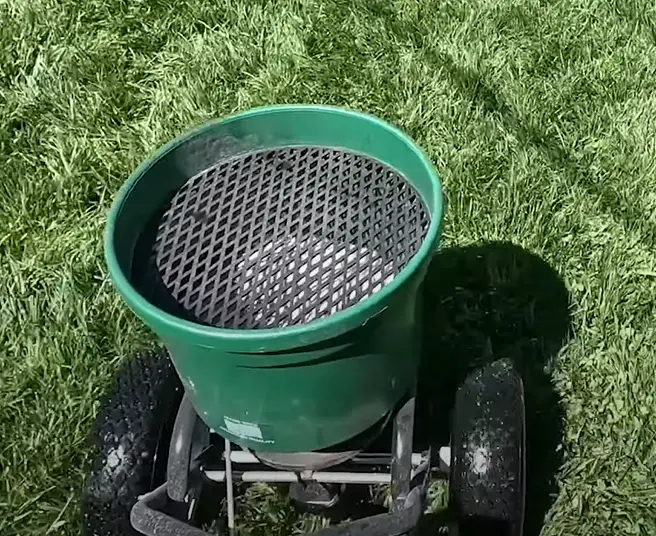
Overseeding your lawn
Overseeding is a vital aspect of fall lawn care to ensure that your grass grows back thick. Thick grass chokes out and prevents weeds and invasive grasses from taking root in your yard. The best defense is a good offense.
I suggest overseeding in the Fall to fill in any bare patches and encourage thick, lush growth. In my video, I explain exactly how I use my spreader in my yard to ensure that I get sufficient, even coverage of seed.
Pro tip: Follow my pattern above for ensuring even coverage throughout your yard.
Weed Control and Watering Schedules
The final steps in achieving a beautiful Fall lawn that sets you up for a beautiful spring lawn involve weed control and setting up a proper watering schedule. My video goes into detail about the types of herbicides and weed control products to use in the fall to prevent weeds from taking over your lawn during the winter.
I also share insights into the importance of keeping a consistent watering schedule: I recommend deep, infrequent watering rather than shallow, frequent watering, which can encourage shallow root growth.
Final words: My Fall Lawn Routine
By following these professional tips, you can ensure that your lawn thrives during the fall and emerges in the spring as a vibrant, healthy carpet of green. Don’t neglect your lawn this fall; follow these expert recommendations to enjoy a stunning lawn when warmer days return.
This summer you will want your lawn to look its best. However, there are some essential rules that I follow to keep my grass healthy and vibrant when the summer heat comes and threatens to destroy my lawn.
Today, I will discuss the key points from my Youtube video titled “Four Things You Should NEVER Do in Your Lawn in the Summer.” My expert insights will help you maintain a lush, green lawn all summer long.
Keeping your lawn in top shape during the summer involves a few key strategies.
Water your lawn deeply and infrequently to encourage strong root growth.
Avoid the temptation to mow your grass too short; instead, maintain a higher mowing height to protect your lawn from the harsh summer sun.
Don’t forget to fertilize your lawn, as it still needs nutrients to thrive during this season.
Be cautious about heavy foot traffic and take steps to protect your grass in areas prone to high use.
Proper Lawn Watering During Summer Months
One of the most crucial aspects of summer lawn care is watering. Contrary to popular belief, I advise against daily watering, as it can be detrimental to your turf and its roots.
Instead, I opt for deep and infrequent watering. Here’s why: frequent shallow watering promotes shallow root growth, leaving your lawn more vulnerable to drought and heat stress. By watering deeply once a week, you encourage your grass to develop deep, strong roots that can access water stored in the soil.
Deeper roots produce thicker, healthier, happier grasses that will be durable throughout the summer and prevent invasive grass and weed growth.
Mow High, Not Low During Summer Heat
While you might be tempted to give your lawn a close cut during the summer, this is a mistake. Mowing your lawn too short can put significant stress on your grass, making it more susceptible to damage from the sun and pests.
Crank the height up!
I recommend mowing your grass at a higher setting on your lawn mower. This keeps the grass blades longer, providing more shade to the soil and roots while helping to retain moisture. Taller grass also helps inhibit weed growth, as it competes more effectively for sunlight.
If you have bermudagrass or other warm season grasses, you still want to mow higher than you might think even though these require shorter cuts than cool season grasses.
Don’t Skip Fertilization in the Summer
Summer is not the time to neglect your lawn’s nutritional needs. Fertilization is crucial even during the warmer months. I always emphasize the importance of feeding your lawn.
Properly timed and balanced fertilization ensures that your grass has the nutrients it needs to thrive, promoting healthy growth and vibrant green color. Make sure to use a summer-specific lawn fertilizer, as it is designed to meet the unique needs of your grass during this season.
I used to throw my hands up in frustration during the summer as it seemed like putting any type of fertilizer down was a waste. But with the proper watering schedule and appropriate fertilizer, you can make a solid green yard even on the hottest days.
Avoid Heavy Traffic in Your Lawn
Summer often means more outdoor activities, which can lead to heavy foot traffic on your lawn. While it’s fun to play games, host gatherings, or enjoy picnics in your yard, too much activity can damage your grass. I suggest being mindful of where and how you move about your lawn – while still enjoying it.
Solution: consider creating designated paths or areas for high-traffic use to minimize the wear and tear on your grass. This simple step can help preserve the health and appearance of your lawn throughout the summer.
For me, it was putting down pavers in the most worn paths of my yard that helped keep my kids off of the grass.
Final words: Keeping a healthy summer lawn
In reality, I had to learn this stuff the hard way after breaking every single one of these rules at one time or another.
By following these tips from my video, you’ll be well on your way to maintaining a beautiful, healthy lawn all summer long.
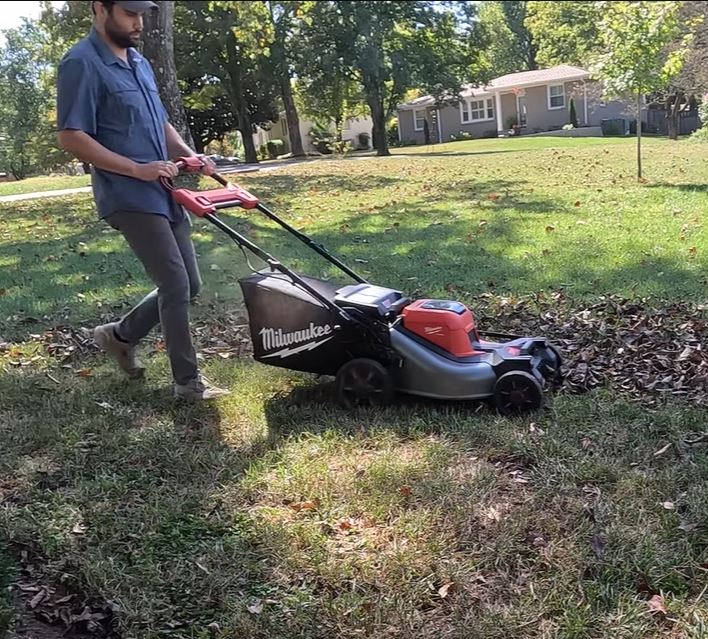
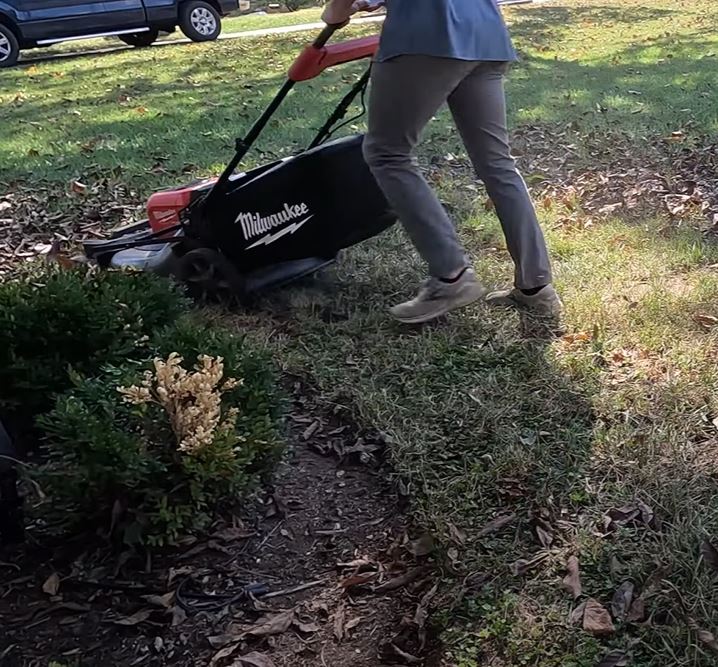
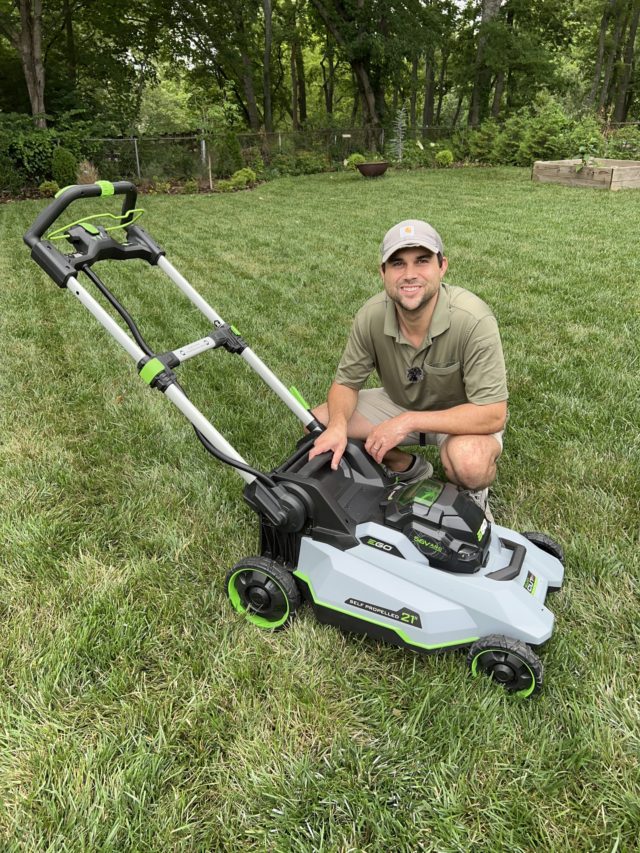
Self-propelled battery lawn mowers are sweet tools that can make your job super easy. I used to never use self-propelled mowers and actively spoke out against them. But I really like the Milwaukee M18 FUEL battery mower because it is extremely powerful and cuts better than my Honda gas mower.
But my mind has been changed. I got a few self-propelled electric mowers and put them to the test. The functionality has a bunch of different ways of working – from front-wheel drive to all-wheel drive and all kinds of cruise controls.
My experience using self-propelled mowers
I started using self-propelled mowers only recently. I’ve always been a push guy and haven’t minded pushing the mower all around the yard. But after I tested one out for one of my Youtube videos – I became a believer. These things are sweet and take quite the load off.
One thing I found after testing out a few of these is that there’s actually a bunch of variety in how these work. Some are easy to use, others have weird functions – they all are better than pushing the dang mower.
I created the Lawn Review to make sure folks like you could see through the confusing marketing.
Ranking the top Self-Propelled Battery Mowers
I’ve been lucky enough to own and test several self-propelled mowers and distilled this list down to only three. I did this to NOT waste your time and give you the pure facts – with everything in mind – price, ease of use, durability, etc. Let’s get started.
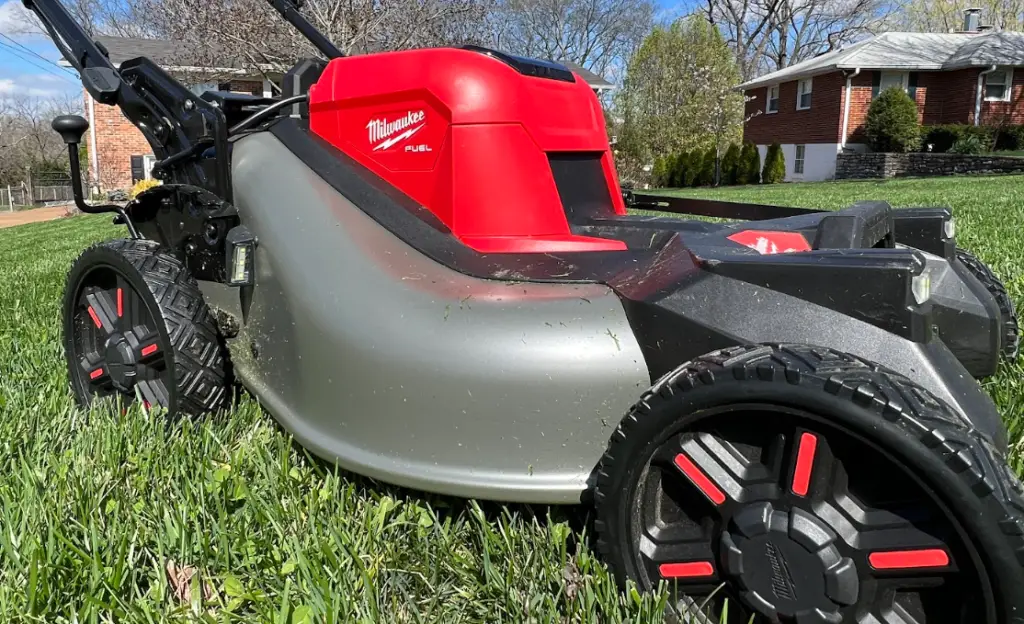
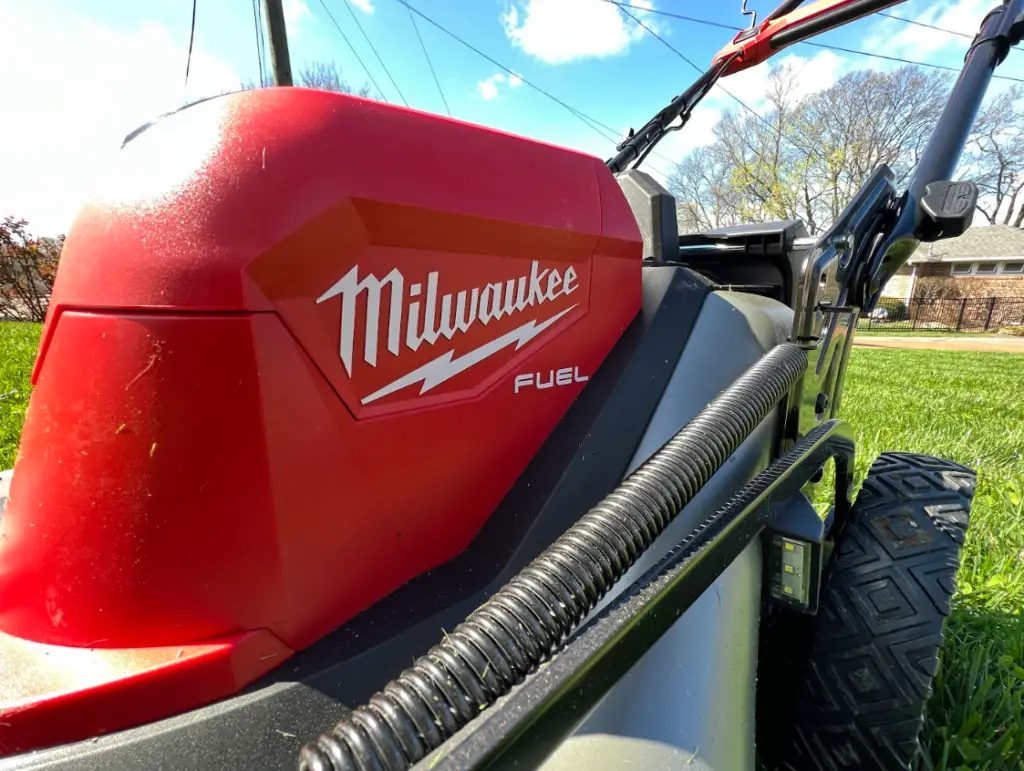
Milwaukee’s M18 FUEL lawn mower – almost exclusively. It is an interesting case because it stands alone as their sole mower offering for now. It’s as if they assembled a dedicated team of dorks and rednecks, brainstormed ideas to create the ultimate mower, and simply went for it without looking back.
The mower features a robust steel deck, setting it apart from the more common plastic decks in the electric mower market
Rapid acceleration allows it to reach full throttle in less than a second – like a Lambo
The inclusion of a brushless motor is a must-have for being at the top of this list
The utilization of two 18V Milwaukee batteries offers compatibility with over 200 other M18 tools from Milwaukee.
The Milwaukee M18 FUEL outperforms many of the others that come in at a lower price point. However, it is worth noting that this superior performance comes with a higher price tag. With a retail price of over $1,000 at Home Depot (if you get it with the batteries), it might be considered one of the more expensive push mowers available. Nevertheless, for Milwaukee enthusiasts or those genuinely seeking peak battery-powered mower performance, this model unquestionably stands out as the best.
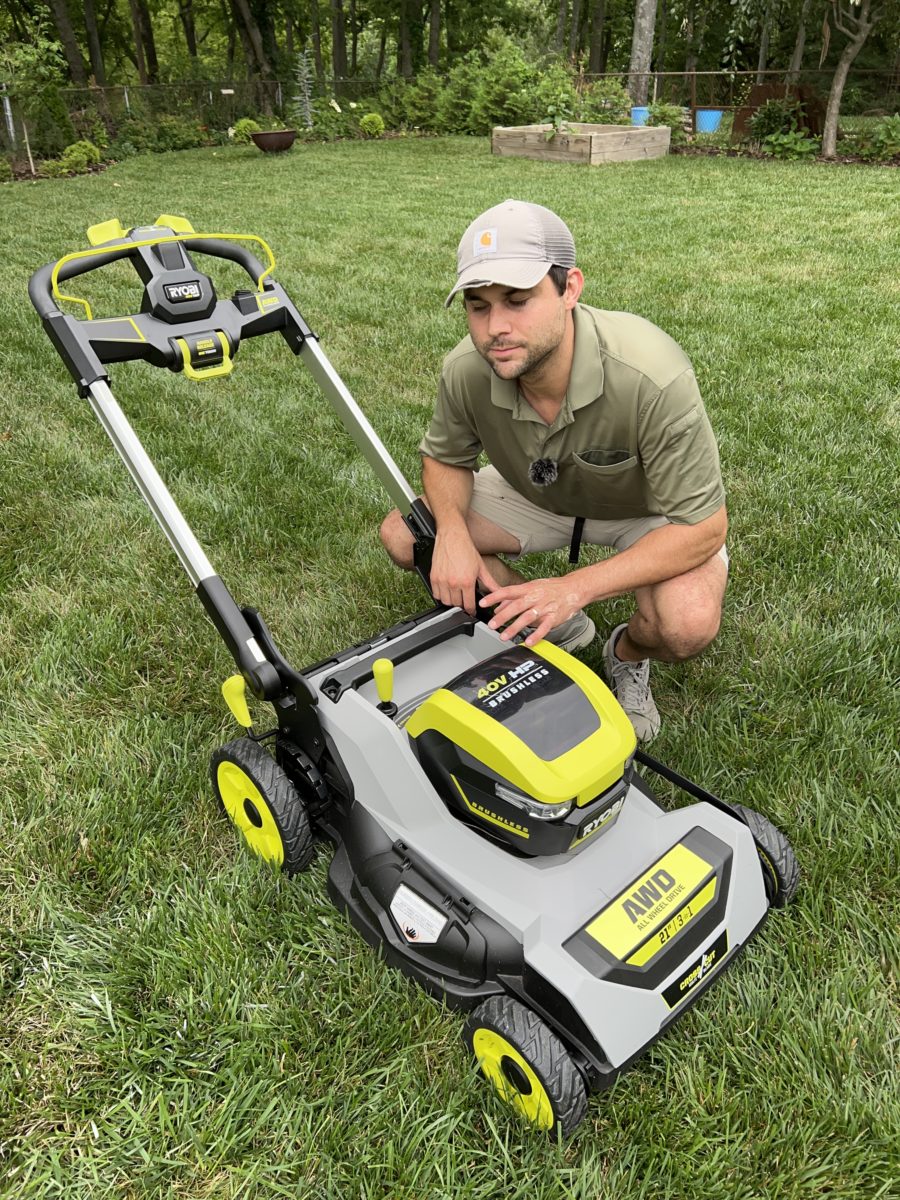
For a side-by-side comparison, one may find it insightful to evaluate how the M18 stacks up against the Ryobi 40V HP, another mower that also made it onto this list.
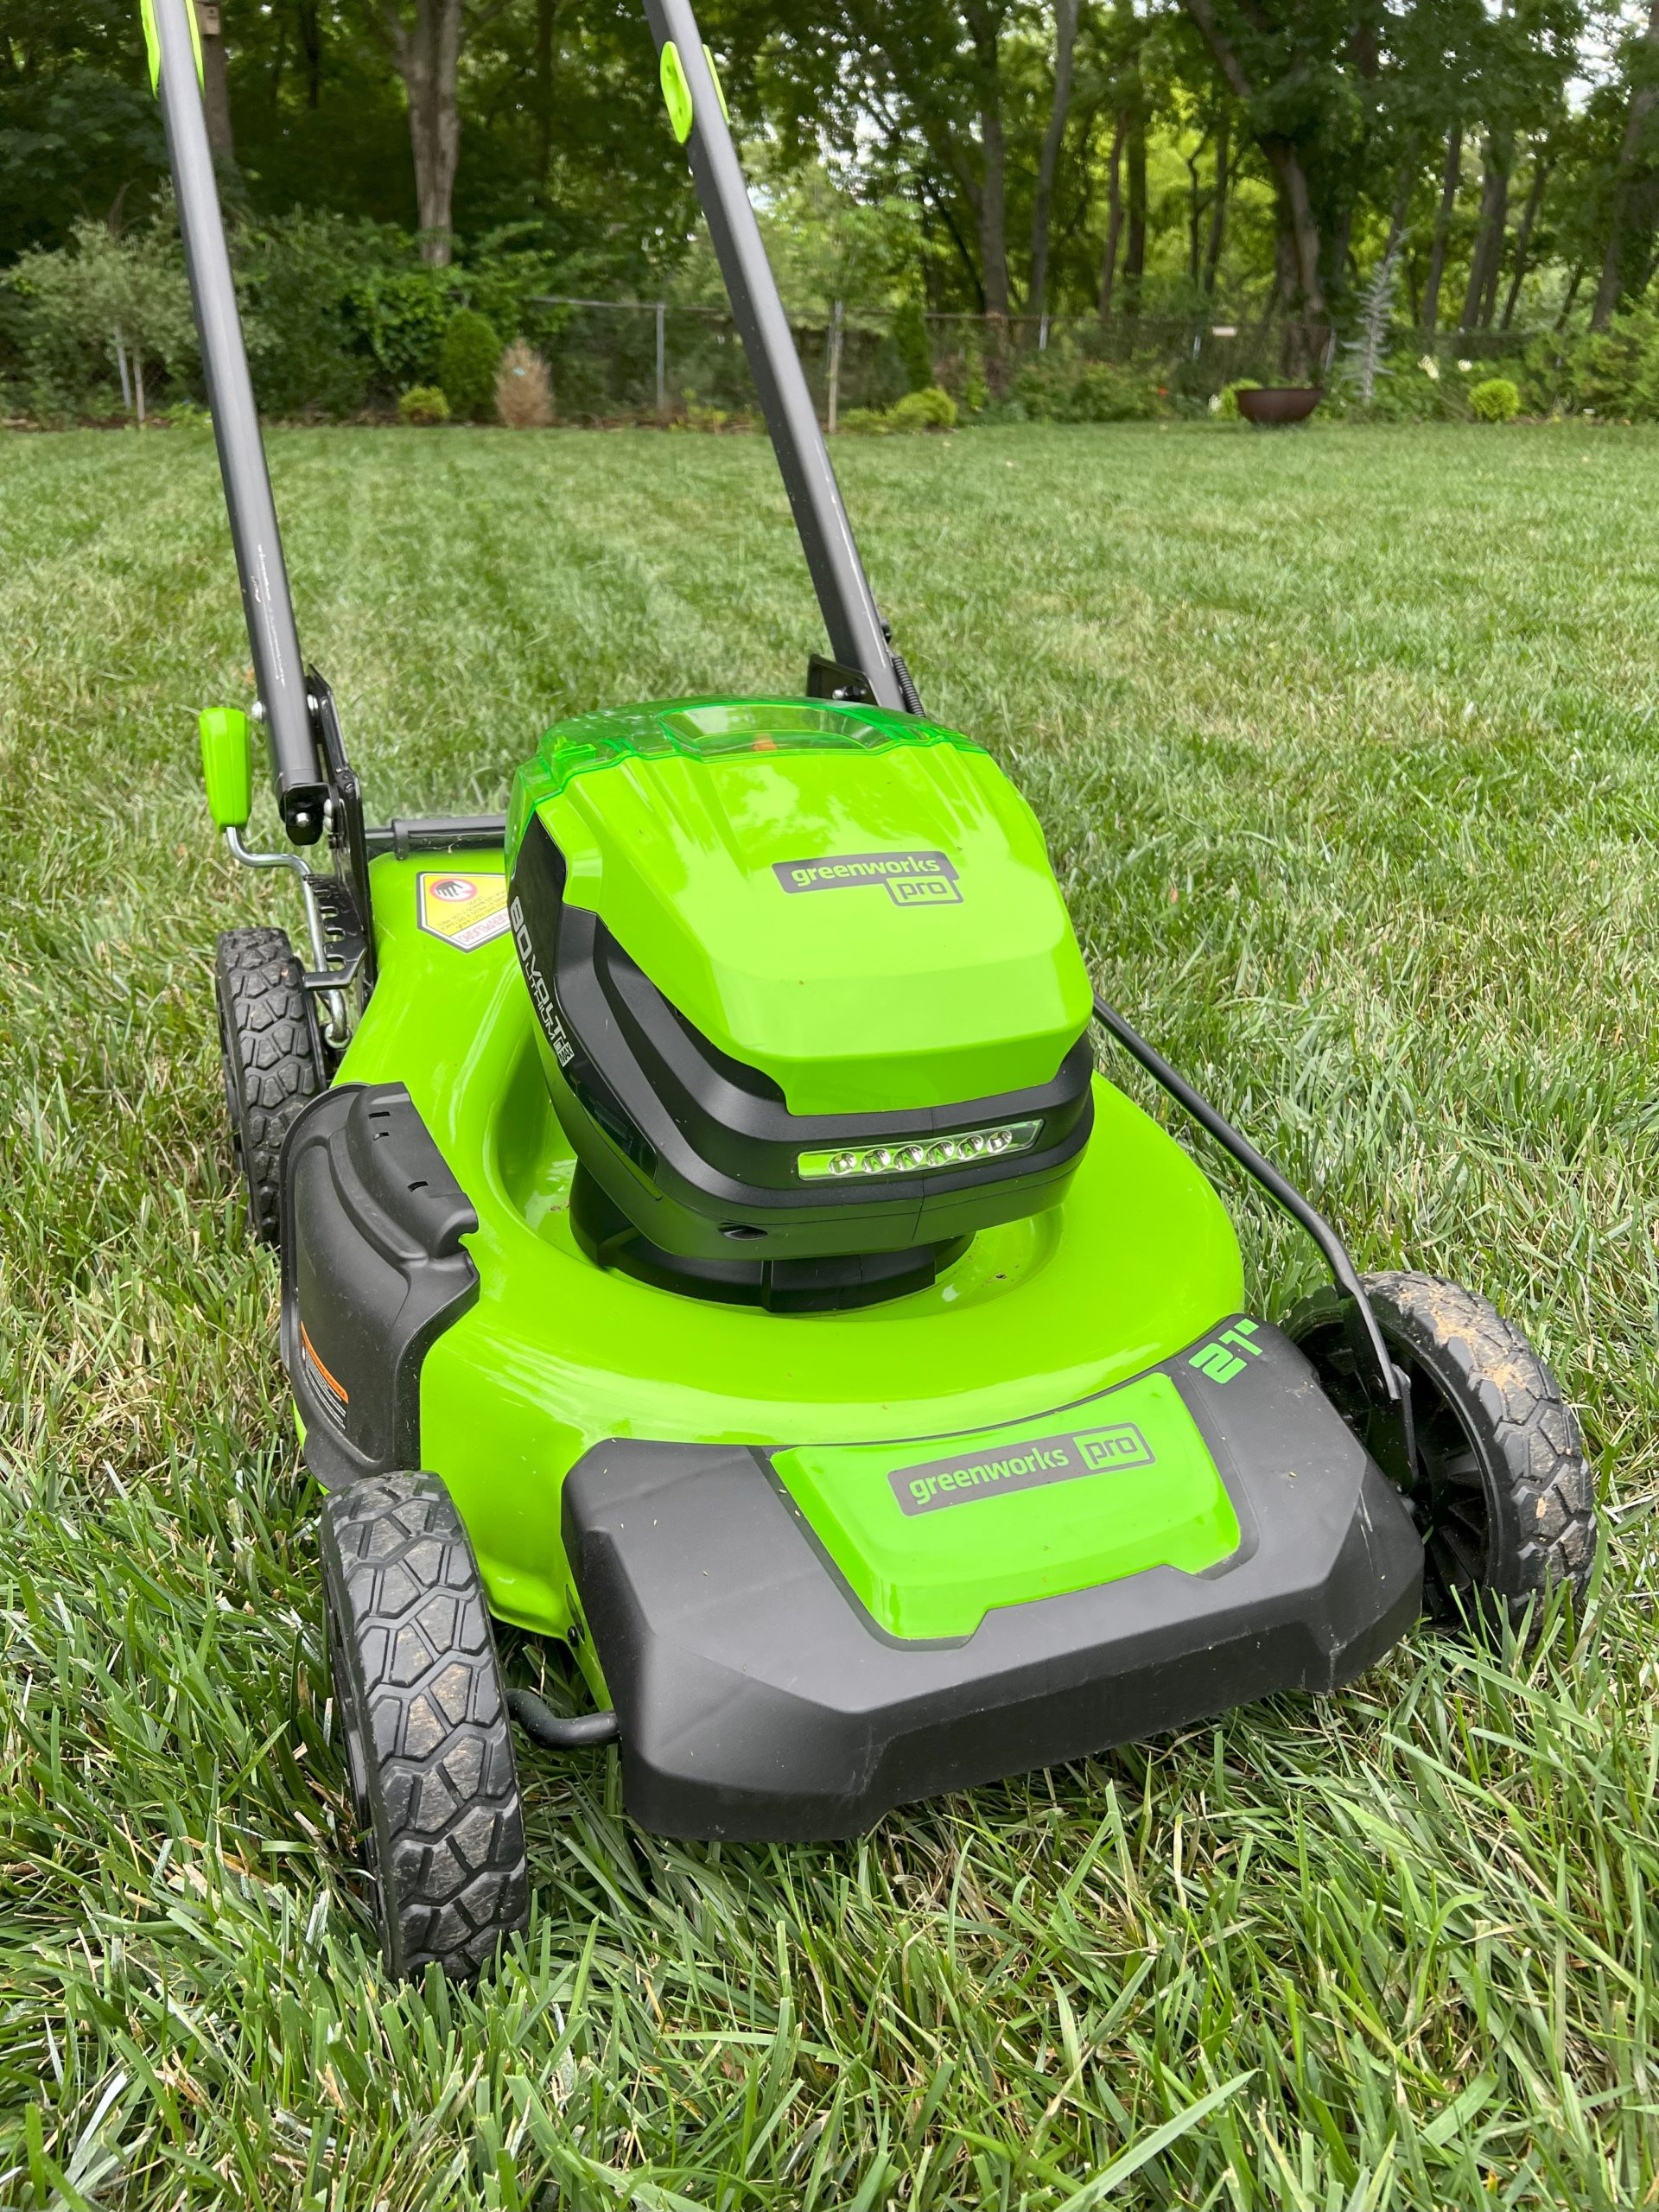
Greenworks Pro 80V Self-Propelled Lawn Mower
It would be really hard to keep this one off the list since I made a huge mower comparison video that had this one at number one. This mower is the biggest, baddest Greenworks mower on the market. Coming in at 21 inches with a nice steel deck, this mower is ready for any size job. In fact, it’s larger than my current gas push mower.
The only reason this one comes in at number two on this list is because the self-propelled function is a little wonky. It prevents the wheels from moving backward, so before you approach a turnaround, you have to let it go and give the wheels time to unlock. This isn’t an awful thing, just takes some getting used to.
It is also self-propelled, meaning it can help move along the job for you. Not to mention the brushless motor. The Greenworks Pro 80V mower is simply the Cadillac of electric mowers.
Another thing I love about this product is that the 80V battery can also be used with a ton of other tools that Greenworks offers, and they are all the most powerful and longest lasting. One of my favorites that pairs well with this mower is the compatible 80V blower.
You can grab the mower alone, or with an edger, trimmer, or blower. If you already have the 80V battery, you can buy just the mower alone and save a ton of money (like $200 of savings).
Here are some of the features that make this one COMPLETELY unbeatable:
Select Cut XP functionality means that this is the highest torque EGO mower on the planet
It also has Touch Drive self-propelled functionality, making it the easiest to use and control
Longest run time at 75 minutes because it comes with 10.0 Ah batteries, basically double the Ah of their other mowers
So this is the most powerful, longest running, easiest to control EGO mower. It is truly probably the best battery powered mower available from a technical specification perspective. But it doesn’t have a steel deck, which makes me sad. And is ultimately the reason that it fell to number three on this list.
As far as overall power goes, this one is almost TOO powerful. If you max out the self-propelled function on this, it will absolutely pull you forward. If you’re the type of person still looking for a workout and don’t want to push, this EGO mower will have you speed walking around your yard.
What to look for when buying a battery-powered lawn mower
When looking to purchase an electric lawn mower, you need to make sure you understand what things matter. You will get hit with a lot of technical specifications and marketing tactics. Totally forget them and focus on the things that impact you. Below are my recommendations:
Battery-powered mower brand quality
Quality is going to be super important here. Just about everyone is in the electric mower game these days and there are a ton of junky mowers out there. Avoid anything from a weird brand on Amazon that takes 9 years to ship. It is probably being 3D printed in a Laotian bathroom. Go for brands that have consistent quality and focus on the details, not just flashy colors.
Some brands I trust off the top of my head are: Greenworks, Milwaukee, Makita, Toro, EGO, and Kobalt. SOME Ryobi mowers, although myself and others have had some problems with reliability. Brand quality matters, but it’s also important to look at the specs on each. For example, Greenworks sells like 60 mowers, only a handful of them would I ever consider for this list. EGO also sells a bunch of mowers, and only a few are within an acceptable price range to be on this list.
Metal where it matters: the deck
Most electric mowers are plastic-y. Probably to reduce the weight of the mower so that the battery can get you further, but it feels cheap. Make sure to get metal where it matters – namely the deck. The deck is the part that covers the blades. Don’t get plastic here – a rock can rip through it.
Battery interoperability.
A ten dollar word used here, but really just make sure to buy a mower with a battery that is compatible with other electric tools. You’ll see a bunch of these brands that have battery lines that work with a ton of tools. Milwaukee, Makita, and Dewalt are all great options because you can use them for all lawn tools AND power tools – saving you a ton of money on extra batteries.
If you have more questions, check out our guide to electric lawn mowers, where we break this down into a lot more detail.
Self-propelled or not
Self-propelled mowers are lawn mowers that slowly crawl forward when mowing the lawn. They propel forward the mower, taking off a lot of the “pushing power” required by traditional push mowers.
Self-propelled mowers are ALWAYS more expensive because they have the additional power and functionality that makes life easier. They have their place, but because of the cost can often come with a higher price tag.
Why we review lawn tools
The reason we started this website in the first place was because we had so much trouble trying to find reasonable, understandable, honest reviews for lawn equipment. And it’s not cheap! After hours and hours of research, trying products and returning them, and messing up our yards – we started this site.
As people who had to learn the hard way, we want you to know exactly what you are signing up for before you purchase a piece of equipment. That’s why we are committed to providing honest, easy-to-understand reviews that mean something.
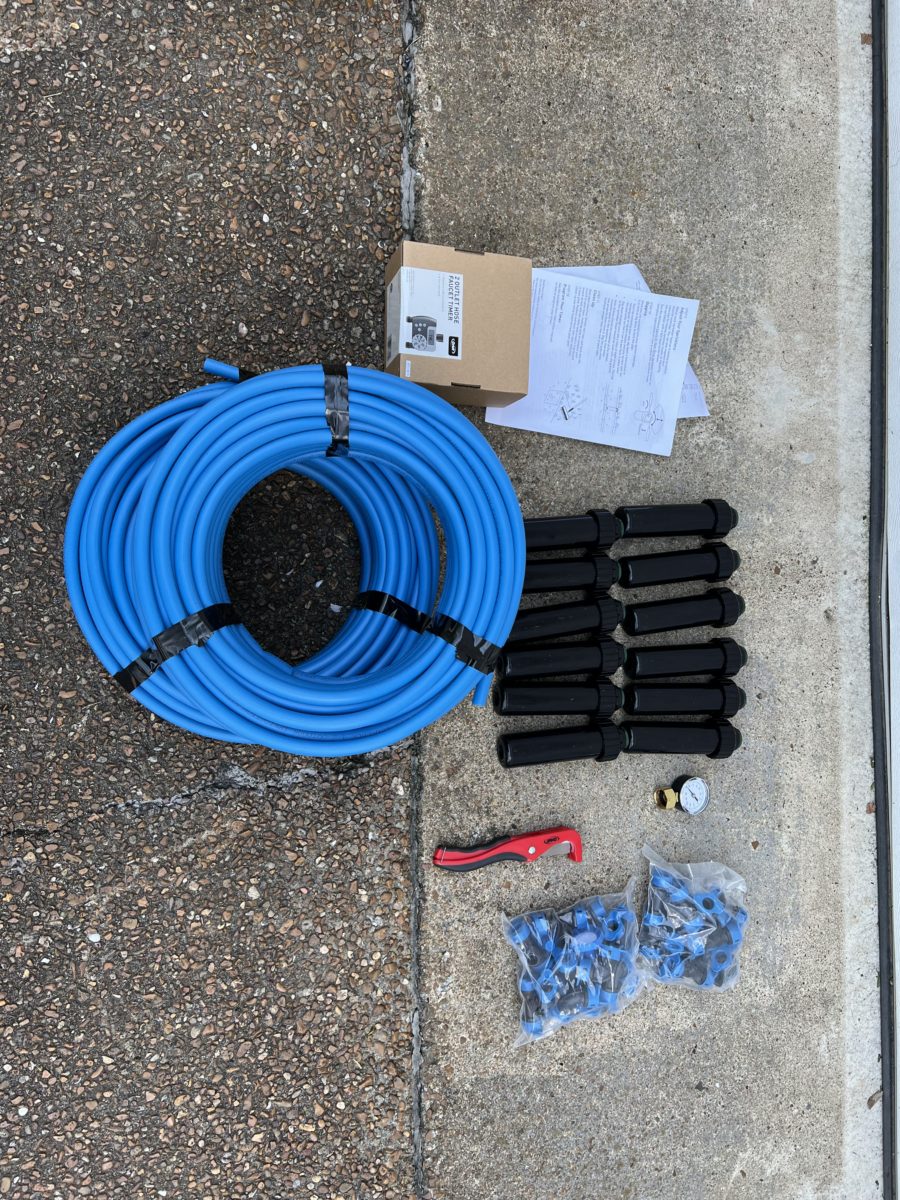
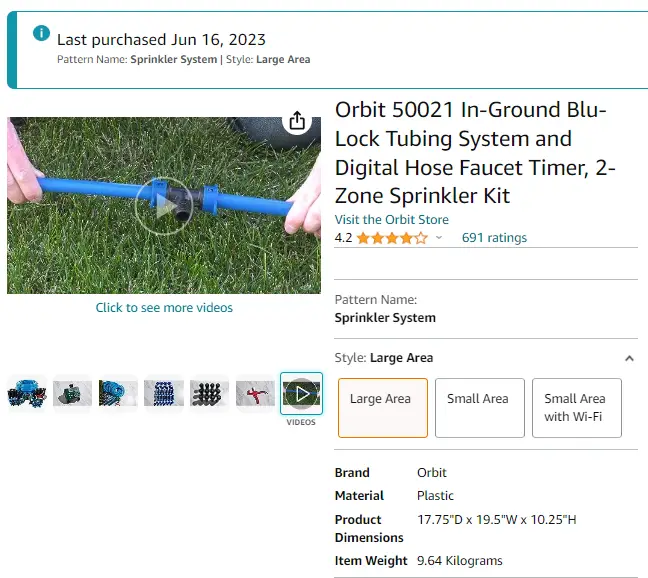
Orbit’s In-Ground Sprinkler System was a super easy choice for me to buy. I love doing my lawn myself and getting this thing for super cheap on Amazon was enough motivation for me to finally set one of these up.
Whenever I used to pass by someone in my neighborhood with an in-ground sprinkler system, my immediate thought was always “can’t hide money!”. In-ground sprinkler systems and big money go hand-in-hand. But let me tell you what – it doesn’t have to be that way. You can get a great system and set it up yourself for something I call “middle class fancy”.
Let me explain more – or you can watch our full YouTube video guide here, where we tested the entire process.
Here are the quick steps for setting up your Orbit In-Ground Sprinkler System:
Let me walk you through exactly how I set up my Orbit in-ground sprinkler system from start to finish.
Step 1: Buy the system (skip if you’ve already done this)
Sounds obvious, but trying to do any pre-work here will majorly mess you up. Going out and digging up a pathway will only bite you in the butt if you haven’t bought the system yet. I got mine from Amazon and it was absurd how cheap the whole kit was.
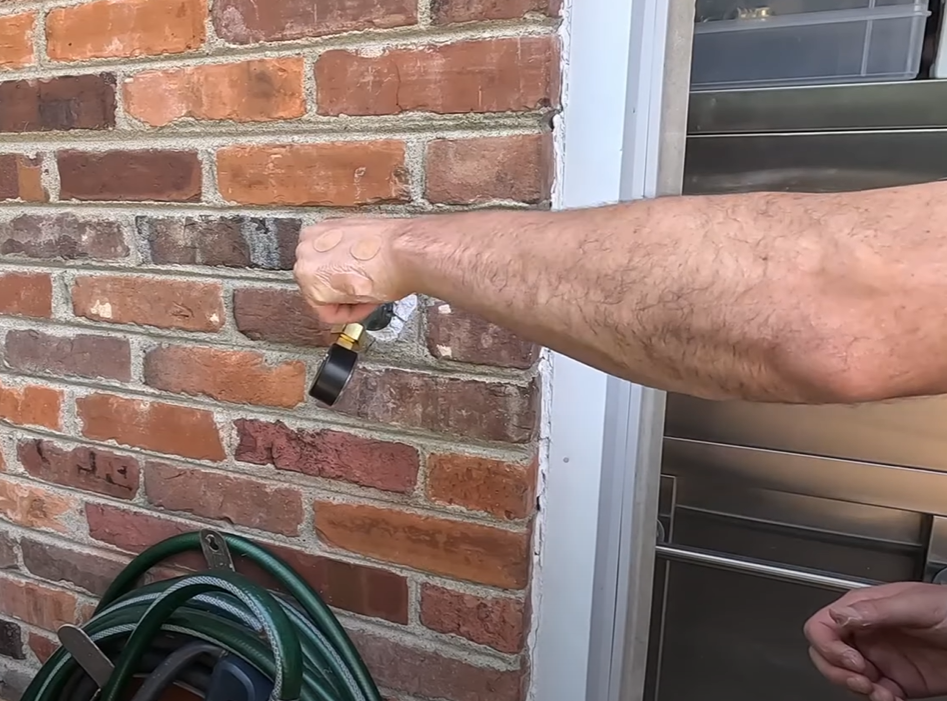
Step 2: Test your hose faucet water pressure
Fortunately, Orbit sends you a nice little pressure gauge that you can hook to your hose faucet that tells you how much water pressure your hose puts out. Simply screw this on, measure the pressure, and keep note of the measurement.
Just a warning here – if your pressure is below 35 PSI, this thing may be super wimpy and not worth it. If your PSI is above 80, then you may want a pressure reducer as it might be too strong for this system.
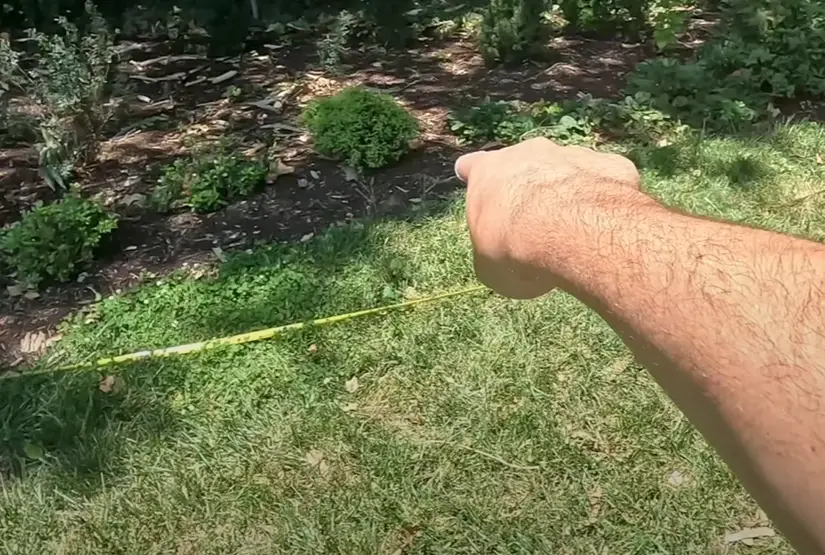
Step 3: Design your sprinkler set up
Orbit has a guide that correlates how much pressure your faucet puts out with how far apart you need to set up your sprinklers. Since mine was on the high end, I am putting each one of my sprinkler heads 24 feet apart.
This takes some careful mapping and spacing in your yard. Orbit recommends a U shape in your yard for you to get optimal spacing and watering. I mapped mine out with some yard stakes to make sure it was all even Steven before doing any kind of digging.
Quick tip: While mapping this out, let the blue hose that comes with the system lay out in your yard and relax and “melt”. This will help kill any tension once you start laying it down.
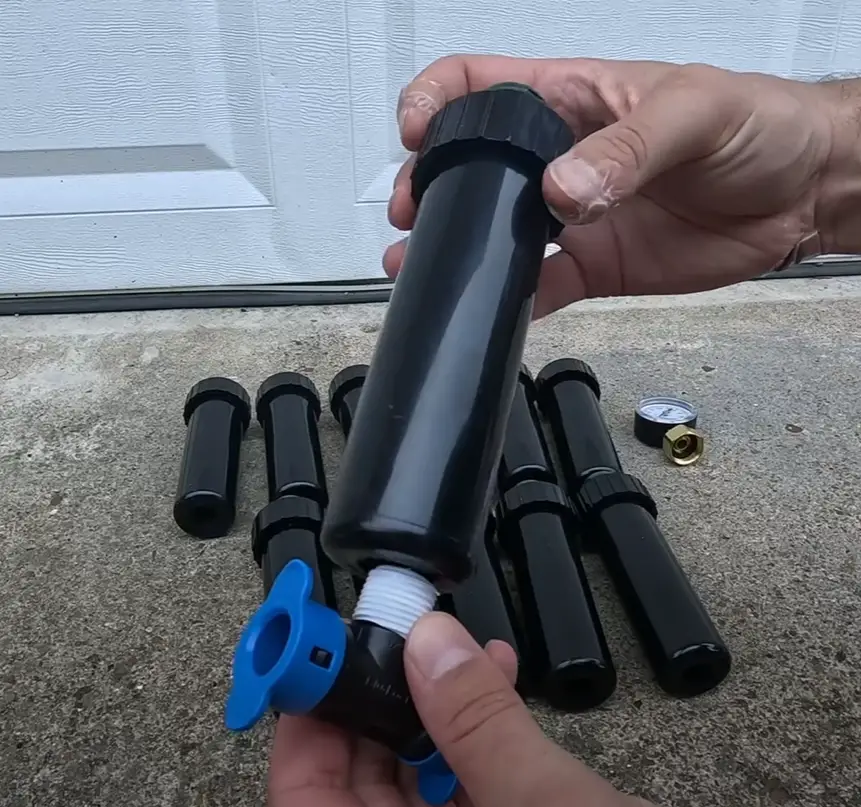
Step 4: Assemble all the sprinkler heads
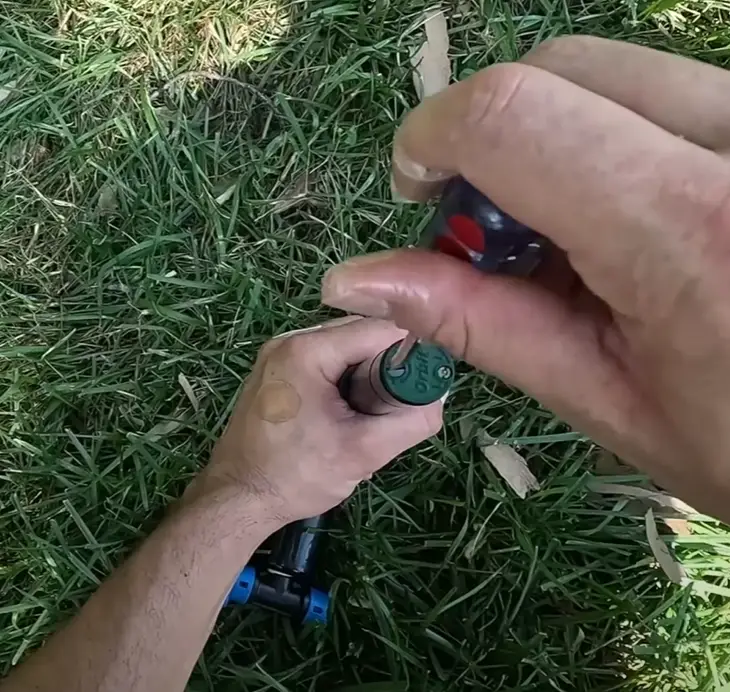
The sprinkler head set up is pretty straightforward and provided in the attached instructions. You simply clip on the blue caps to the base hose adaptor connector and screw those on. I bought some plastic stakes and zip tied the sprinkler heads to those. I’ll explain more later.
Step 5: Adjust sprinkler heads
Once you’ve got your sprinkler heads attached to your stake and in the spot you want them in your lawn, remove the inner sprinkler component (with the green cap). Pull down the spring and set the parameters of the sprinkler. To do this, you get a flathead screwdriver and tighten it until you have a good range.
This takes some trial and error to figure out exactly how this needs to be set up for your yard, but basically functions like a complex parameter range on any other sprinkler (even the oscillating sprinklers).
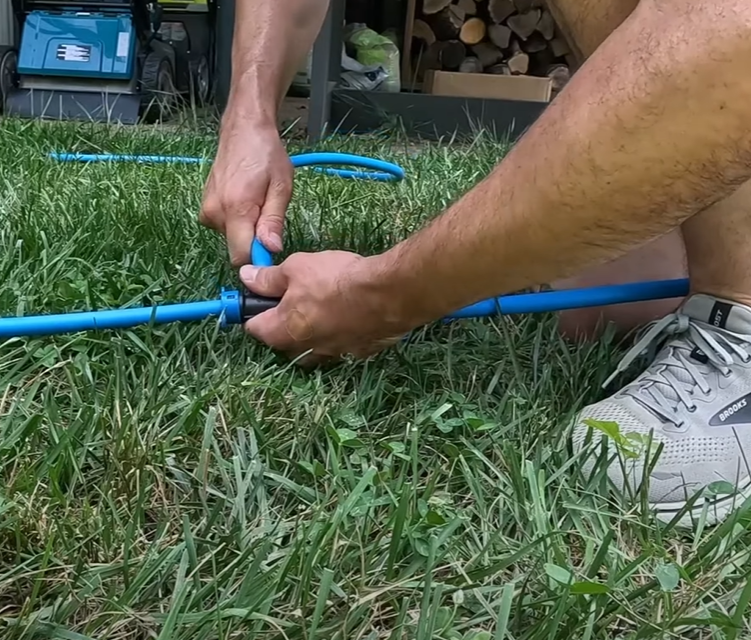
Step 6: Lay out the hose above ground
It’s really important to make sure you set up the full system before doing any digging. This means actually getting the hose out, cutting it, and connecting it to the sprinkler system. Orbit sends a nice tube cutter that lets you easily cut down the hose to the size you need. Some important tips here that I learned the hard way is to push the blue hose in as far as possible to make sure you don’t get leakage.
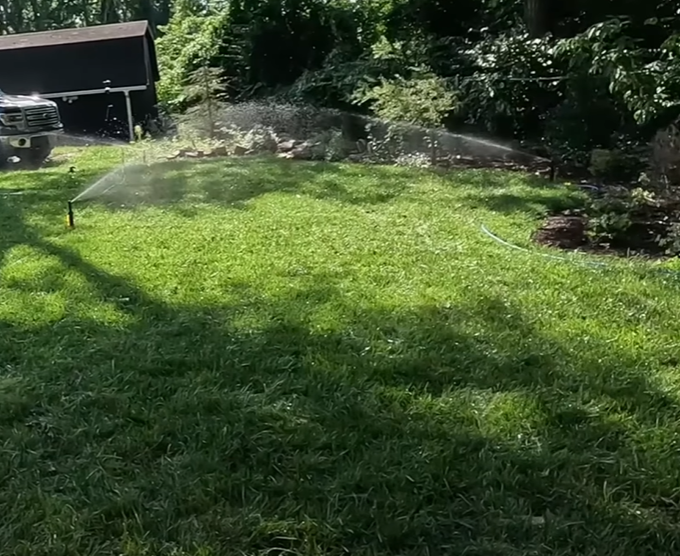
Step 7: Give the Orbit Sprinkler System a test run
Before you dig, make sure the system works! Connect it to your hose and let it run. Make sure there aren’t any leaks and that each spring-loaded sprinkler head actually does its job. This is a critical time to make any last minute adjustments to the sprinkler range.
Pro tip: Make sure you get that head-to-head coverage on your sprinkler. This is recommended by Orbit to ensure you don’t miss any spots and can fully get your yard soaked.
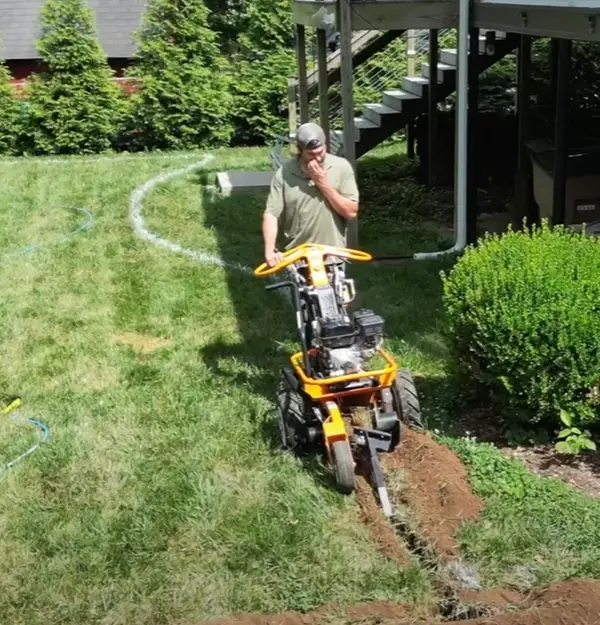
Step 8: Digging the Sprinkler System in
There’s a hard way to do this and a harder way to do this. The hard way is to rent a trencher and dig a nice trench to fill your hose in with. The harder way is to use a flat shovel and do it the old fashioned way. I chose to rent a trencher.
This process took quite a while, but was definitely better than doing it with a shovel. It also gave me super clean, evenly distributed trenches to drop the hose down into.
Pro tip: Dig 8-10 inches and put the pipe in for the best results.
Step 9: Refill the dirt
Once you’ve laid the pipe (no jokes, please), then simply test it out and then fill it back with dirt. This is another laborious process to get the dirt back into the hole, compact, and level.
Orbit In-Ground Sprinkler System Review: My Experience
After getting it all set-up, I’ve actually loved having this sprinkler system in my yard. I’ve got it set up with a timer to run super early in the morning. After I got it installed, I haven’t had to touch any of the sprinkler heads (although it has only been a few weeks).
Mowing for the first time wasn’t too much of a hassle and the grass is starting to come back in on the areas I dug up. I’ll report back after more time has passed, but so far I am extremely pleased with how the set up is going.
This $200+ dollar system is a small item that makes you feel like you are rich. A really cheap way to get a great looking yard without having to go out there with a sprinkler and do it manually.
Common questions and troubleshooting Orbit In-Ground Sprinklers
Here are some common questions I get (and had myself) when I first got my In-Ground Orbit System.
How do you adjust orbit in ground sprinklers?
You can adjust the range of the orbit sprinklers by opening the sprinkler head, pulling down the spring, and using a flathead screwdriver to adjust the range on the top of the sprinkler head.
How do I make my sprinklers shoot farther?
To get your in-ground sprinklers to shoot farther, you need to increase the overall water pressure in your hose faucet. Anything below 30 PSI will make for a very weak sprinkler.
Why is my Orbit sprinkler head not rotating?
If the Orbit sprinkler head is not rotating, there is likely dirt or debris stuck in the head. Open it up, clear it out, and ensure the appropriate rotation range settings are in place.
Why we review lawn tools
The reason we started this website in the first place was because we had so much trouble trying to find reasonable, understandable, honest reviews for lawn equipment. And it’s not cheap! After hours and hours of research, trying products and returning them, and messing up our yards – we started this site.
As people who had to learn the hard way, we want you to know exactly what you are signing up for before you purchase a piece of equipment. That’s why we are committed to providing honest, easy-to-understand reviews that mean something.
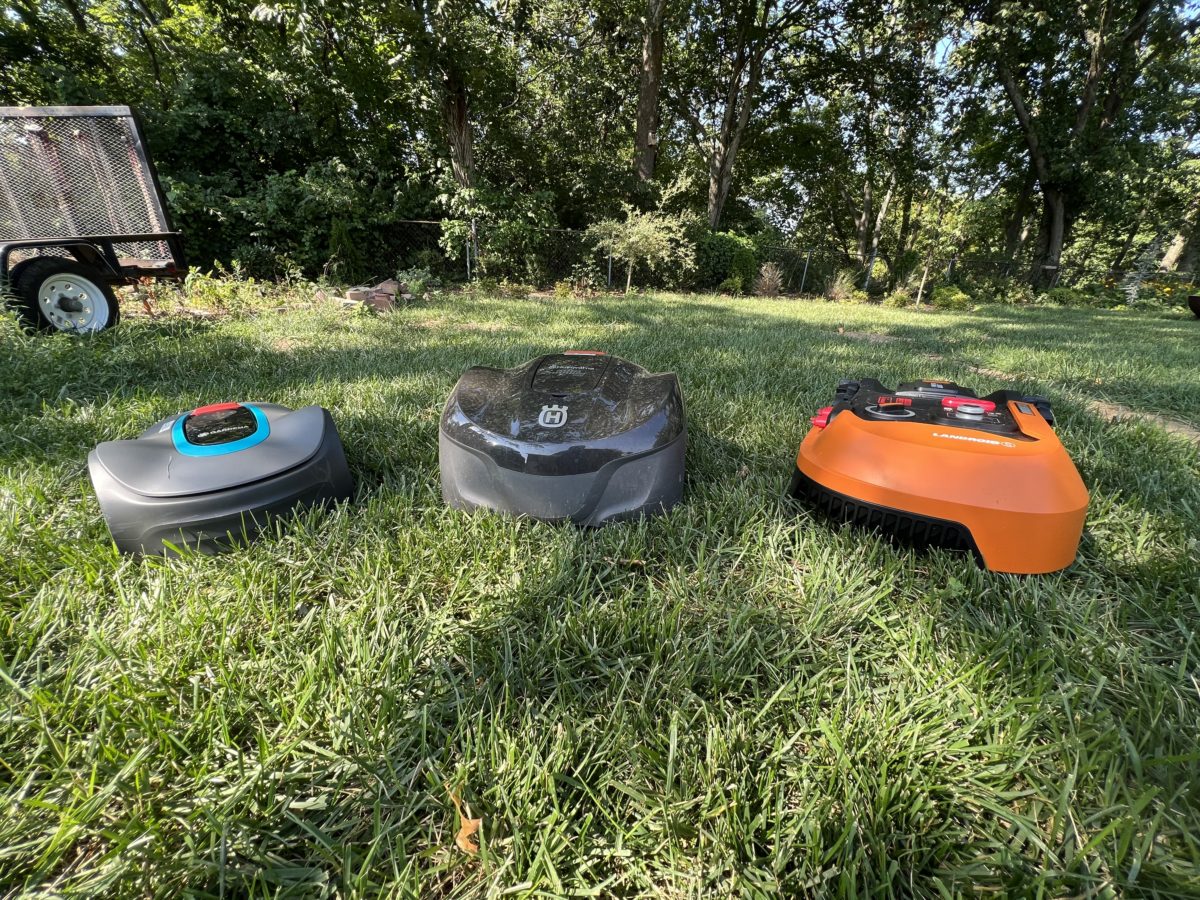
Robotic lawn mowers are here to stay whether you like it or not. But they are REALLY expensive compared to a normal mower.
That’s why I went on Amazon and bought the three top selling robotic lawn mowers for under $1,000. Ones that are still in the reasonable price range that may make not having to go out into the heat and mow for an hour worth it. I put these to the test and had them do a three-way battle for the best cut for the best price.
The results were…interesting. Here are the three
budget friendly robotic mowers under $1,000, ranked:
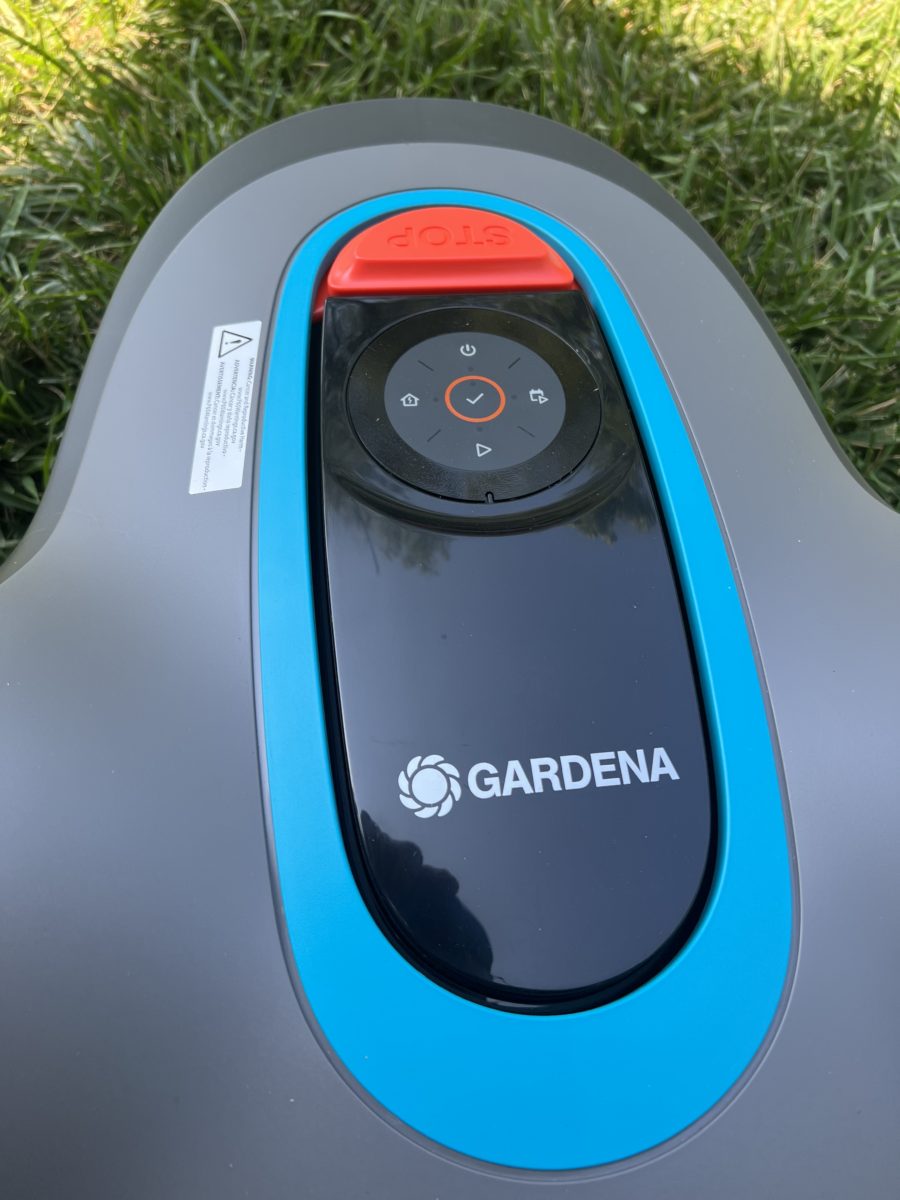
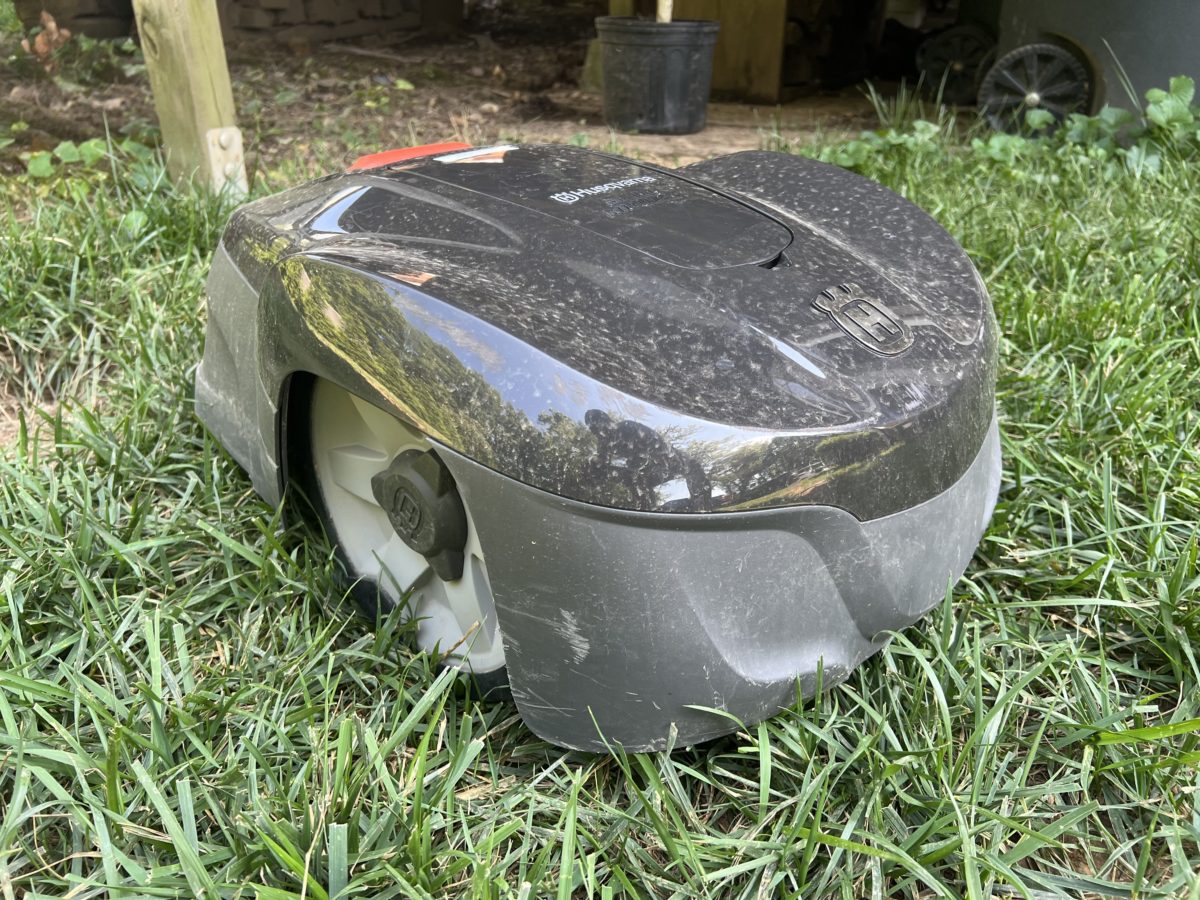
Husqvarna Automower 115 H Robot mower
Worx Landroid S 20V WR 165 Robot lawn mower
Gardena Sileno Minimo Robot mower
My experience with robotic lawn mowers
Frankly, I am just a normal dude who really likes mowers. I’ve used a billion gas powered push mowers, dozens of battery powered mowers, but NEVER a robotic mower. Until now.
But I think that helps you realize I am not a biased source here. I do not have stake in a robotic mower company. I was not paid to create this review – and I didn’t even get these for free (am I doing something wrong?).
I know a thing or two about mowing the grass, though. And that will help me provide a super unbiased review of my experiences with these three robotic mowers. Let’s get started.
Testing out budget-friendly robot mowers
I looked at a few factors when ranking these mowers, so let me break down each one, how I tested it, and how it ultimately performed.
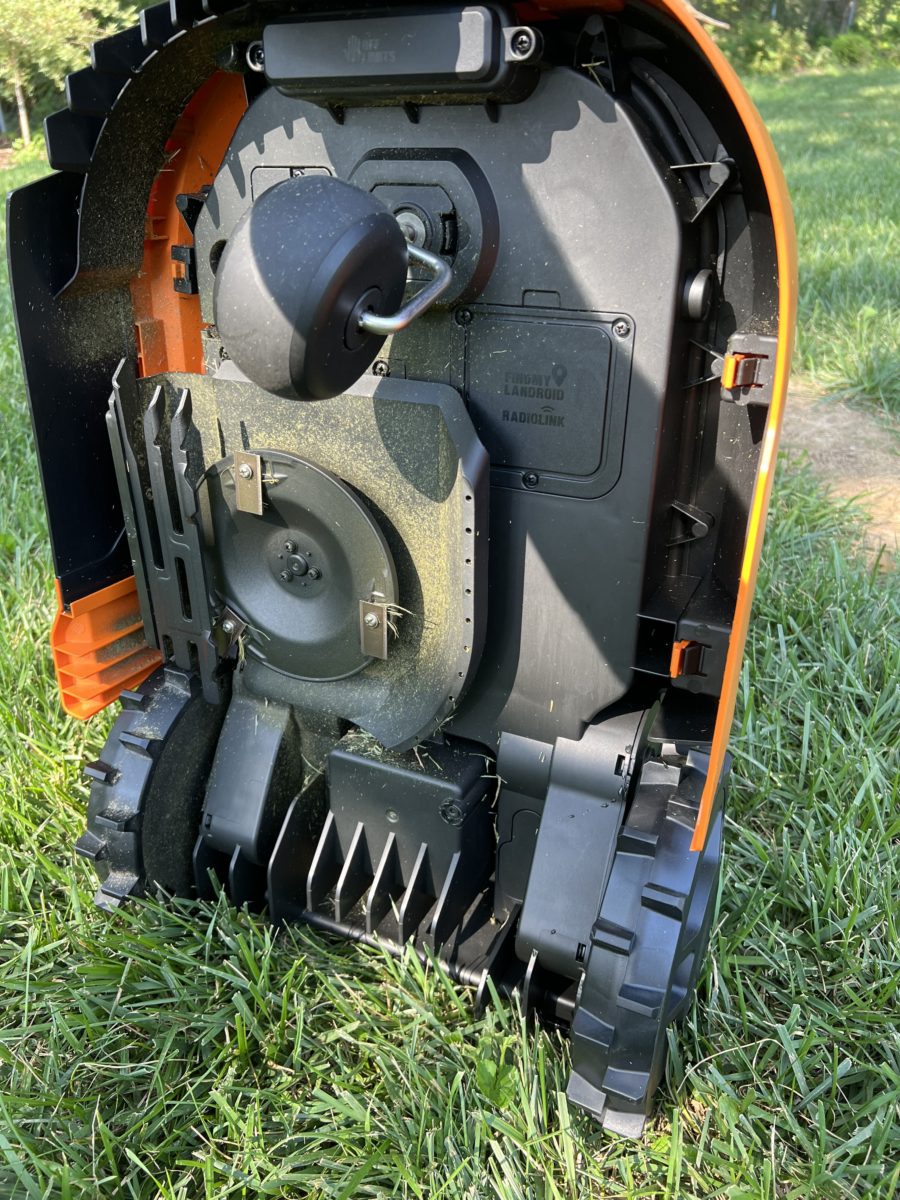
Breaking down the Worx Landroid S 20V Robotic Mower
The Worx Landroid is powered by a 20V battery, which took about 60 minutes to charge each time it made it back to the base station. This one is able to mow about ⅛ of an acre, or about 5400 square feet. If you have no clue or context for what that means in your lawn, you can go to www.measuremylawn.com and get it figured out really quickly.
The height adjustment on this goes all the way down to 1.5 inches all the way up to 3 inches, which is easily adjustable using a knob on the top of the mower. You may note right off the bat here that this isn’t an acceptable height for folks with tall fescue or other grass types that require you to mow high. At 1.5 inches, you’re at a great height for bermudagrass or warm season grasses. This one can also do a 20% slope, which was the lowest of the three. This means it isn’t a great mower for steep lawns or bumpy backyards. It also has a cutting width of about eight inches, which is less than half the width of a normal residential push mower.
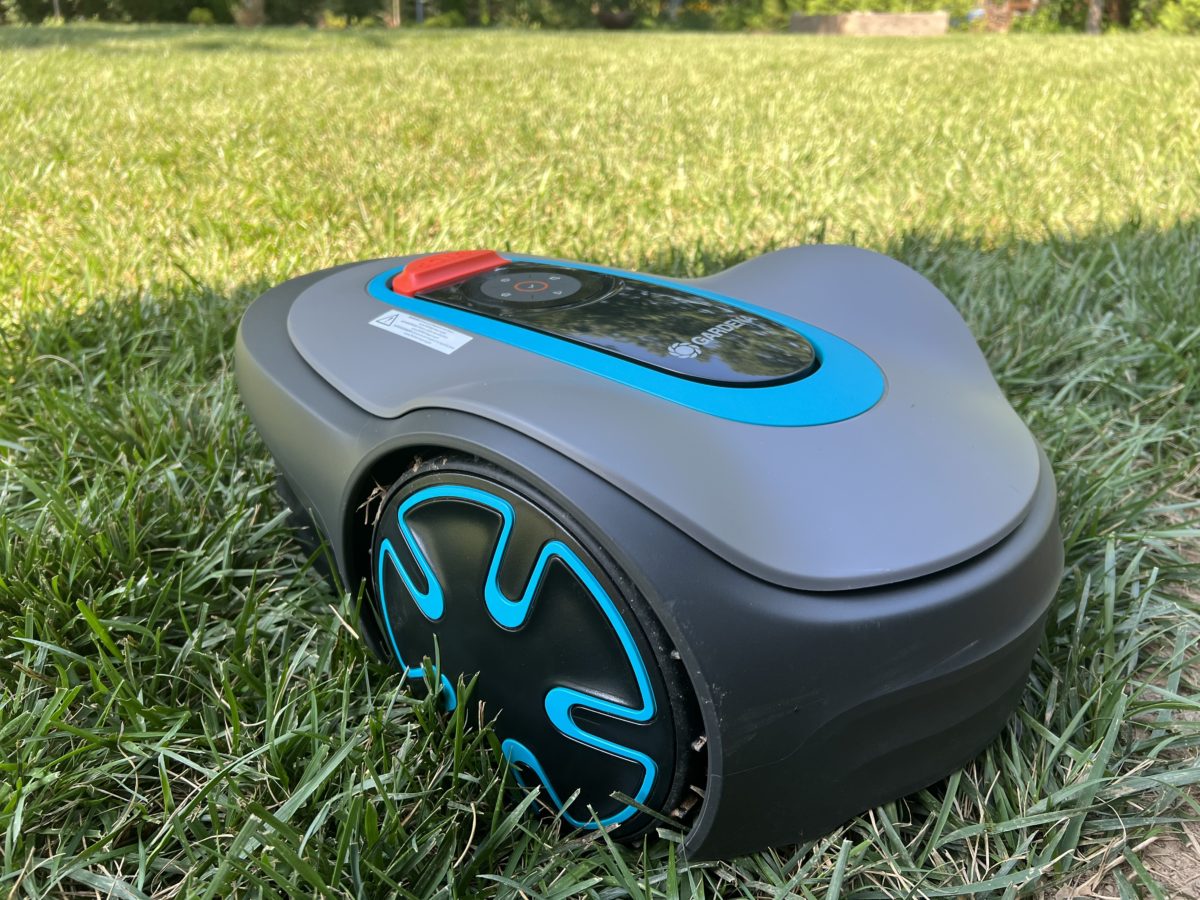
The Gardena Sileno is the one I had the most reservations about going into this. I’ve done a ton of reviews of Worx products and Husqvarna products, but have never heard of Sileno. I had to get this one because it is one of the top sellers on Amazon for under $1,000.
Much to my surprise, this thing is manufactured by Husqvarna. The charging station even has “Husqvarna” written on the side. The Sileno Minimo takes about 65 minutes to fully charge and runs for about 65 minutes until it heads back into the charging station. Gardena’s Sileno Minimo covers about ⅛ of an acre, which is exactly the same as the Worx above.
The height setting on this one was tough, which cuts between 0.8 inches and up to 2.0 inches. This cut height is ideal for warm season grasses but will get you into major trouble for longer grass types, like transitional or cool season grasses (think Tall Fescue).
This thing was tiny though – with a cutting width of about 6.5 inches which is well below the Worx which means it will take a while longer to cut the same amount of grass as the Worx above. At a really good price over on Amazon – this one is cheaper than the Worx and still in a decent price range.
Lastly, I couldn’t really get the mobile app to work on this thing.
Husqvarna Automower 115 H Robot Mower: Analysis
The Husqvarna Automower is the “OG” of the robotic mower space because Husqvarna has been at this for a while and has a full spectrum of more expensive (but better) robotic mowers.
The specifications on this one are quite a bit more impressive. It takes about 60 minutes to charge but can cover 0.4 acres, which puts it well above the Worx Landroid and Gardena Sileno Minimo robotic mowers. The Automower also had a noticeable speed difference and zoomed across my yard relative to the other two mowers.
The height adjustment settings on this one go from 2 inches to 3.6 inches – putting it in a much better category for cool season grasses and overall making it great for both cool and warm season grass. The Automower can also handle a slightly steeper slope – rating at 30 degrees of incline before spinning its wheels.
Best of all, the Husqvarna Automower has a 9 inch cutting width which is the widest. It also comes in at the lowest price point – right at $700 on Amazon.
Ranking Robotic Mowers Based On My Backyard Experience
Alright – now that I’ve provided an overview, here are my rankings of the most affordable robotic lawn mowers on Amazon.
3. The Gardena Sileno Minimo
It was basically unusable on my cool season grass so it didn’t get the best chance. Besides it not fitting my lawn, it was extremely buggy, the app never worked, and it was slow and tiny. Even in a short, warm season grass – this thing would be a total wimp compared to the other two.
When I first got it, I could barely get it to operate and spent a bunch of time on the phone with customer support who tried to get me to do a hard reset on it or plug it into my USB drive of my computer. It was a really hectic process and it ultimately couldn’t get the job done.
It also doesn’t have a screen so its hard to operate it without the app (which never worked). If you are interested in learning more, you can check it out on Amazon.
2. Worx Landroid S 20V Robotic Lawn Mower
Coming in at number two is the Worx Landroid. I liked the rugged look of this one but it only cuts up to about 3 inches, which isn’t going to cut it in my lawn. It also kept getting stuck and lost in my yard. It was essentially an expensive turtle that kept getting flipped over on its back.
It made it through my lawn eventually, but needed a lot of support to get the job done. Overall, the power isn’t there with this one. I was able to download the app on this one that let me schedule the cuts and also had a funny “party” mode.
I did like the height adjustment knob on this one that was really intuitive, but overall I can’t give the Landroid the number one spot. This one is still pretty good and goes on sale on Amazon from time to time.
1. Husqvarna Automower 115H Robot Lawn Mower
The Husqvarna Automower 115H took the top spot in budget robotic lawn mower rankings based on my experience. It looks sort of goofy, but I’ll be darned – the mower worked. As compared to the Worx, which stalled out a few times, the Husqvarna was really good at “unstucking” itself. Whenever it got into a tough or tight spot, it could always find its way out and never needed my assistance.
It was cutting so fast and often, which was surprising to me, but it did a great job and really turned me from a skeptic to a bit of a believer in robotic mowers. If you want to spend some more money, you can grab a better Automower – but for the money – this one cannot be beaten.
Final thoughts: Would I use a robotic mower forever?
I really thought these things would totally suck and was happy to be proven wrong. The Husqvarna was pretty cool but also did a great job and my lawn looked awesome.
In the long term, I would not use a robotic mower. Regardless of how good of a job they can do, I love putting the sweat equity into my yard and doing it myself. If you’re like me, then you understand.
The basics of how these robotic mowers work
Here are a few things I learned that all of these things have in common. They are all way more alike than they are different, but have nuances that ultimately make one better than the other two.
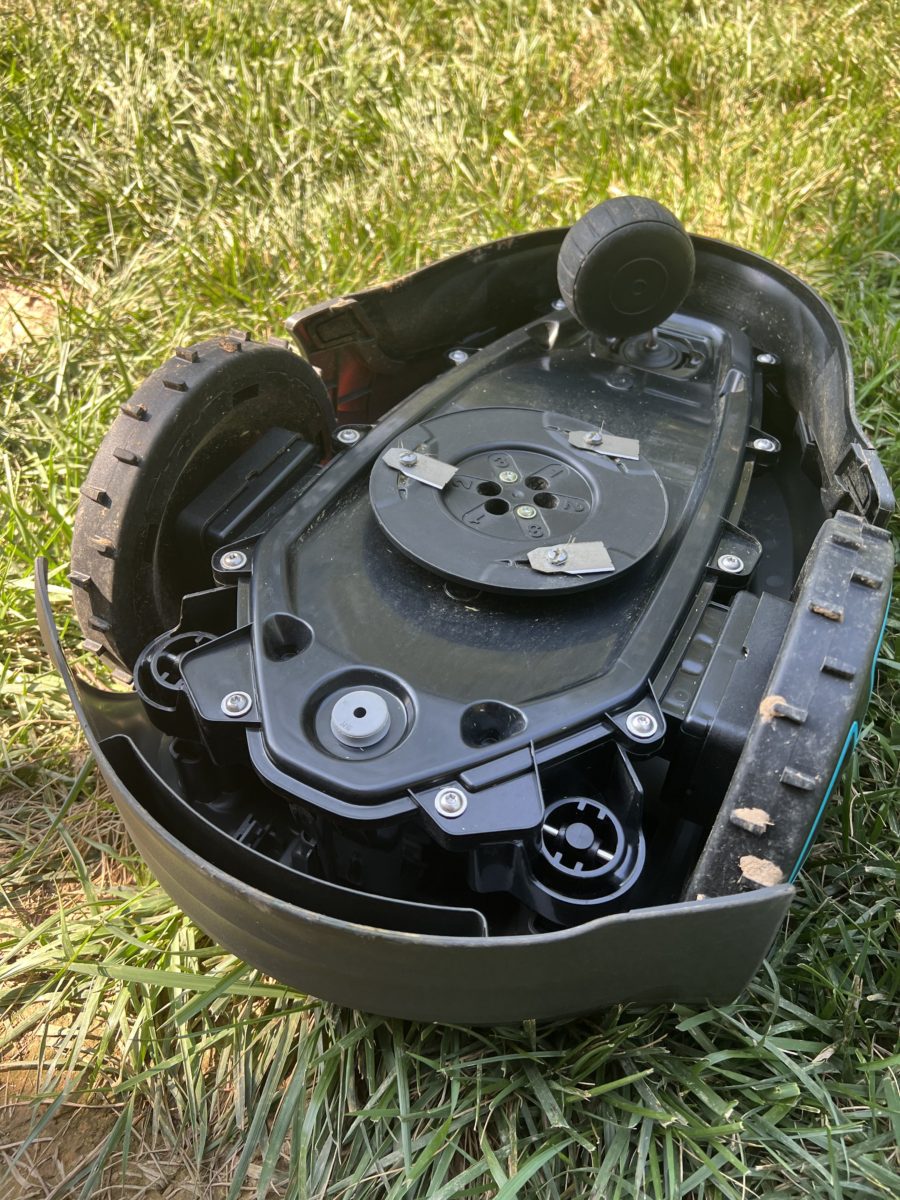
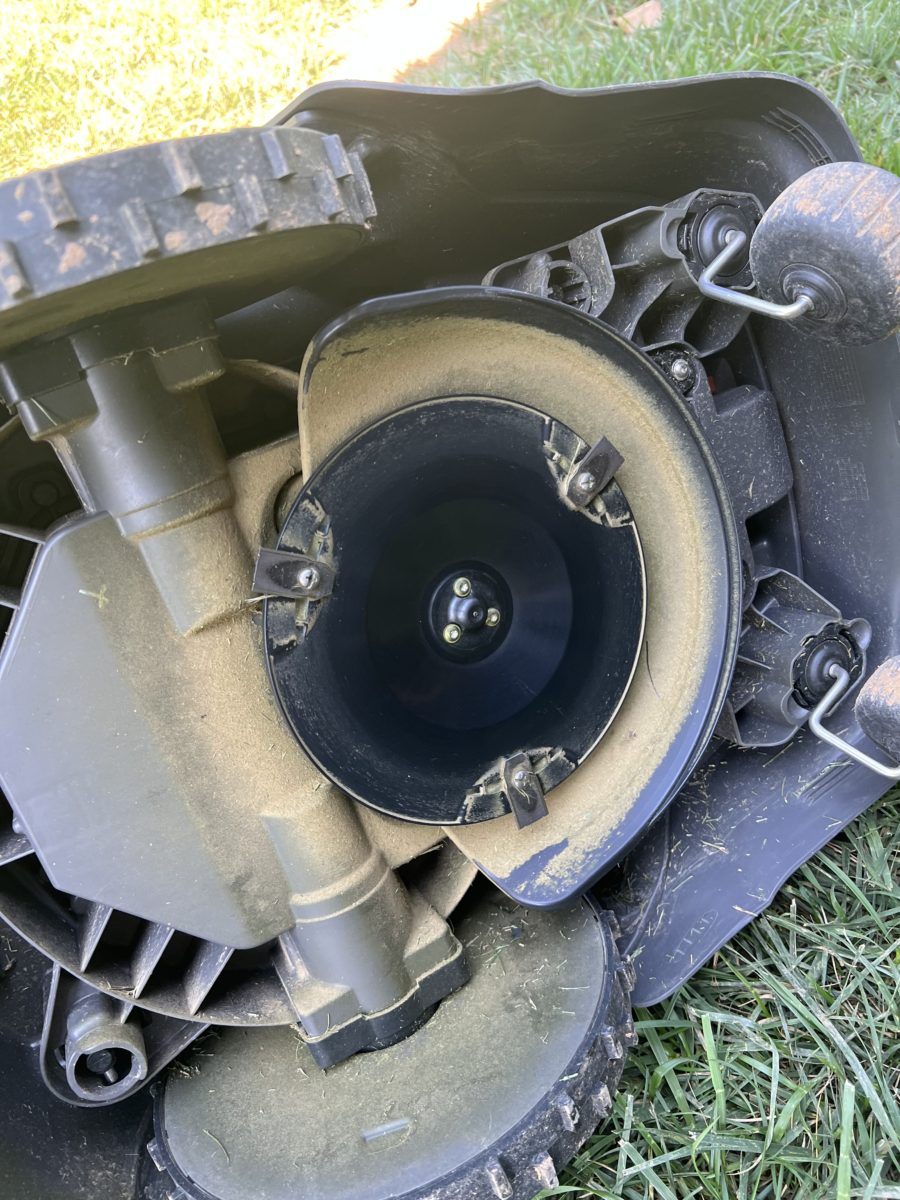
They’re basically giant Roombas with razor blades attached on a spinny disk
They mow in random patterns all throughout your lawn
They are almost constantly running when they aren’t charging
Most require boundary wires to set up the perimeter (all of these do), but others use GPS technology to set a perimeter
Your lawn gets cut…….eventually
Each mower has all the controls you need on top of the mower itself
Setting up the robotic mowers
Unboxing and setting up the robotic mowers was basically the same thing over and over again. The cheaper (under $1,000) robotic mowers all use boundary wires. I believe the high-end robotic mowers have some sort of GPS technology that keeps them in a defined area.
But these cheaper ones have boundary wires and stakes that are used to define the perimeter of your yard. You simply put the stakes into the boundary wire and hammer them down. You can bury them if you’d like, but I didn’t find that necessary as the grass and soil will overtake them after a bit of time passes. One major differentiator in this process is that the Husqvarna Automower and the Gardena Sileno Minimo both require a guidewire that tells the mower how to get back to the charger, whereas the Worx Landroid uses the outer perimeter wire to get it back home to the charger.
Each of these robotic mowers had the exact same setup process – including the perimeter wire, stakes, and instructions on how to set up the mower via an app that they like you to download. One tip to keep in mind with the boundary perimeter wire is that you will want to be cautious not to clip it with your weed eater or edger.
I have to give the advantage in this section to the Worx Landroid robotic mower. Not having to set up the guidewire back to the charging station made the process a bit more straightforward and saved me some time.
Common questions about robotic mowers
Here are some common questions I had before I bought and tested these robotic mowers.
How much does a robot lawn mower cost?
Robotic lawn mowers have extremely high ceilings, but for residential use you can grab one for $700-$5,000.
Are robotic lawn mowers worth buying?
Robotic mowers are worth buying if you hate cutting your grass and want to spend more time doing other things.
Why are robotic lawnmowers so expensive?
Robotic mowers have a ton of tech inside that make them really expensive despite being so small.
What are the disadvantages of a robotic mower?
Robotic mowers have limited cut heights, don’t cut your lawn in a specific pattern, and can be quite expensive.
Do robot mowers cut well?
Robot mowers actually cut pretty well but not in a specific pattern.
How long do robot mowers last?
The jury is still out, but robot mowers likely last between 5-7 years.